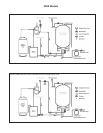
Domestic Water Piping
1. Connect the cold water supply to the connection labeled
COLD WATER.
2. Connect the HOT WATER piping to the domestic hot
water system.
3. When all domestic water piping is complete, open the cold
water supply and allow some water to enter the tank. Look
and listen for signs of leaks and repair as necessary before
continuing.
Note: If installing on a city supply, a properly sized thermal
expansion tank is required and should be installed in accordance
with the product installation manual.
Note: If an external electrical source is utilized, the appliance,
when installed,must be electrically grounded in accordance
with local codes or, in the absence of local codes, with the
National Electrical Code, ANSI/NFPA 70.
Note: The temperature control is adjusted to 120°F, when
shipped from the factory.
4. Install the T & P relief valve and plumb a blow down tube.
Plumb to within 6 inches above a floor drain or as directed by
plumbing code.
Do not drill, puncture or otherwise penetrate
the outer tank shell. Do not screw pipe
hangers or other hardware into the exterior of the tank.
Boiler Piping
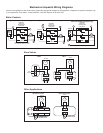
1. Plumb the circulator or zone valve on the BOILER
SUPPLY line.
2. Pipe the BOILER RETURN connection to the boiler return line.
Be sure the return line is NOT plumbed to
the suction side of any heating circulators.
This may require moving the heating circulator off the boiler
tapping on packaged boilers. Failure to do so will result in
overheating and tank damage when the heating system is in
operation.
3. Install a weighted flow check on the boiler return line or
use a circulator pump with integral check valve. This is not
necessary on systems utilizing a zone valve to control the
water heater temperature.
4. After completing the boiler piping, slowly open the boiler fill
valve and pressurize the water heater loop. Check for leaks
and repair as necessary. Proceed to the appropriate wiring
section in this manual.
EXPLOSION HAZARD. Do not install to a
high pressure steam boiler (greater than
15 psig). An explosion could occur.
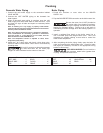
LEFT SIDE ...........1"
RIGHT SIDE..........1"
TOP ................9"
REAR ...............1"
FLOOR.............. 0"
FRONT.............. 1"
Clearance From Combustible Surfaces
LEFT............... 12"
RIGHT ............. 12"
FRONT............. 30"
HEAD ROOM.......36"
REAR ..............1"
Recommended Clearance for Servicing
Plumbing


