


12 TWE-SVX03C-EN
Installation
Caution
Equipment Damage!
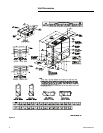
Before hanging the unit on
suspension rods, reinforce the
cabinet around the knockouts by
using a large washer inside the
cabinet. Washers should be between
the skin of the air handler and the
nut on the suspension rod.
Align holes (knockouts) in the cabinet
with structural supports and secure
suspension rods to the structure,
then to the air handler cabinet. If
knockout locations do not permit
proper alignment with existing
structure, it may be necessary to field
fabricate cross members on existing
structural beams.
Note: When other than bottom
return is to be used, side
panel removed for return
duct installation must be
secured over the bottom
opening.
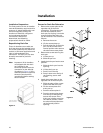
Leveling
This air handler has a double sloped
drain pan. In order to assure proper
drainage along the length of the
drain pan, it is important to have the
unit properly leveled. Be sure the air
handler is level or slightly sloped in
the direction of the condensate
connection.
Auxiliary Drain Pan
A field fabricated, auxiliary drain pan
should be installed under the unit for
all horizontal applications and when
air handlers are installed above
ceilings or in other locations where
condensate overflow may cause
damage. This drain pan will eliminate
any excess condensation that may be
due to extreme humidity or an
obstructed drain in the primary drain
pan. Drain lines from this pan must
be installed, but should not be
connected to the primary drain line
from the unit. Isolate the auxiliary
drain pan from both the air handler
and the structure.
ƽ WARNING
Fiberglass Wool!
Product contains fiberglass wool.
Disturbing the insulation in this
product during installation,
maintenance or repair will expose
you to airborne particles of glass
wool fibers and ceramic fibers
known to the state of California to
cause cancer through inhalation.
Glass wool fibers may also cause
respiratory, skin or eye irritation.
Precautionary Measures
• Avoid breathing fiberglass dust.
• Use a NIOSH approved dust/mist
respirator.
• Avoid contact with the skin or
eyes. Wear long-sleeved, loose-
fitting clothing, gloves, and eye
protection.
• Wash clothes separately from
other clothing: rinse washer
thoroughly.
• Operations such as sawing,
blowing, tear-out, and spraying
may generate fiber
concentrations requiring
additional respiratory protection.
Use the appropriate NIOSH
approved respirator in these
situations.
First Aid Measures
Eye Contact - Flush eyes with water
to remove dust. If symptoms persist,
seek medical attention.
Skin Contact - Wash affected areas
gently with soap and warm water
after handling.
Refrigerant Piping
Installation, brazing, leak testing and
evacuation of refrigerant lines are
covered in the installation
instructions packaged with the
outdoor unit. Read the instructions
before beginning installation of
refrigerant lines.
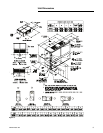
Locate cloth bag(s) attached to the
refrigerant tube of the coil that
contains two (2) brass clamps
(straps) and cork impregnated
insulation material approximately 9"
long by 4" wide. This is for attaching
and insulating the expansion valve
bulb(s) to the suction line(s).
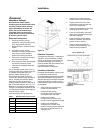
On air handlers that will have
refrigerant lines entering the cabinet
from the left side, remove the split
rubber grommet from the knockout
in the end of the air handler. Uncoil
the cap tub with the bulb attached at
the expansion valve and place the
grommet on the cap tube. With the
grommet around the tube, push the
bulb through the hole and position
the grommet back into its original
position (one bulb and cap tube on
single circuit units and two bulbs and
cap tubes on dual circuit units).
Attach the bulb(s) approximately 45°
off vertical, 10 to 12 inches outside of
the air handler.
On air handlers that will have
refrigerant lines entering the cabinet
from the right side, the bulb(s)
should be attached to the suction
tube(s) inside the cabinet in the same
manner as above, approximately 10"
from the right end of the unit.
After attaching to the suction line(s),
either inside or outside of the
cabinet, wrap the cork impregnated
insulation around the bulb(s) and
suction tube(s). Refrigerant piping
should be insulated.
Note: Important! Ensure that the
refrigerant lines passing
through the cabinet are not
resting on sharp sheet metal
edges.
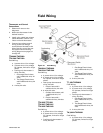
Condensate Piping
The drain pan condensate
connection is a female slip joint type
for 1" Schedule 40 PVC pipe. Use PVC
cement and tubing as required (field
supplied) to construct a trap. A union
or flexible tubing and clamps may be
installed if the drain pan is to be
removed periodically for cleaning.