


730833-100
1
2
3
4
- 2 -
Note: If replacing an existing sink, shut off the water
supply before removing old sink. If installing in a new
bathroom, follow the rough-in diagram to locate the
rough supply and waste lines.
Provide suitable reinforcement behind finished wall for
sink hanger screws. For an installed sink height of
36", center the reinforcement 32" above the floor.
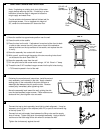
1) Move the caddie into approximate position near the wall.
2) Place the sink on the caddie.
3) Place the level on the sink. If adjustment is required, either front-to-back
or side-to-side, remove the sink, place one or more of the adhesive-
backed cushions on the top surfaces of the caddie, and replace the sink
to verify.
4) Move the assembly into contact with the wall.
5) With a pencil, mark through the center of the two mounting holes found
on the back of the sink. See VIEW "A".
6) Move the assembly away from the wall.
7) Drill two pilot holes at the center marks using a 1/4" bit. Bore in 1" deep.
8) Thread the two 5/16" headless hanger screws into the pilot holes leaving
1-7/8" thread exposed in front of the wall.
C/L of 2 x 8
Support
and Bracket
Finished
Floor
32"
B
C
Connect the trap to drain assembly hand tight to check alignment. It may be
necessary to cut off part of the tailpiece (area "B") or part of the horizontal leg
of the trap (area "C").
Connect hot and cold supply lines between the fitting valve and the supply
shut-off valves. Tighten trap joints for watertight assembly. Apply a bead of
caulk around the back edge of the sink where it contacts the wall.
Tighten the sink securely against the wall.
SINK AND CADDIE INSTALLATION
Following the manufacturer's instructions, install faucet and
drain assembly (not included) in the sink. Apply a bead of
sealing putty on the underside of the drain to ensure a
watertight seal between the sink and the drain. Remove
excess putty immediately after tightening drain.
Move the assembly back toward the wall, guiding the sink
over the two headless hanger screws. Place washers over
studs and firmly hand-tighten nuts onto each.
Hanger Screw,
Washer & Nut
Sink
With sink
in place mark
the two
mounting
hole locations.
VIEW "A"