


7301102-100 Rev. K
- 4 -
In the United States:
American Standard Brands
P.O. Box 6820
Piscataway, New Jersey 08855
Attention: Director of Consumer Affairs
For residents of the United States, warranty
information may also be obtained by calling
the following toll free number: (800) 442-1902
www.americanstandard-us.com
In Canada:
AS Canada ULC
5900 Avebury Rd.
Mississauga, Ontario
Canada L5R 3M3
Toll Free: (800) 387-0369
www.americanstandard.ca
In Mexico:
Customer Service Manager
AS Maquila, S.A. de C.V.
Via Morelos #330
Col. Santa Clara
Ecatepec 55540 Edo. Mexico
www.americanstandard.com.mx
Does not flush
Poor or sluggish flush
Toilet leaks
Toilet does not shut off
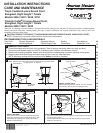
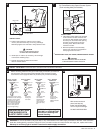
a. Water supply valve closed.
b. Supply line blocked.
c. Flush valve chain too loose or disconnected.
d. Sand or debris lodged in water control.
a. Bowl water level too low.
b. Supply valve partly closed.
c. Partially clogged trapway and/or drain pipe and/or vent.
d. Supply pressure too low.
a. Poor supply line connection.
b. Poor bowl to tank/floor connection.
a. Flush valve chain too tight, holding flush valve open.
b. Flush valve seat and/or flapper worn or deformed.
c. Sand or debris lodged in water control.
a. Open valve and allow water to fill tank.
b. Shut off water supply, disconnect supply line and inspect all gaskets and
washers. Reassemble. Also, see Fluidmaster maintenance. (see Step 13)
c. Readjust chain length as required.
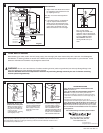
d. Shut off water supply. Remove cap and clean as per Step 13.
a. Check that refill tube is connected to water control and inserted into tank
overflow without being kinked or damaged.
b. Open supply valve fully. Be sure that proper supply tube size is used.
c. Remove obstruction. Consult a plumber if necessary.
d. Normal supply pressure must be at least 20 psi.
a. Review Step 9 of installation procedure.
b. Review Step 4 through 7 of installation procedure.
a. Readjust chain length as needed. Review Step 10.
b. Shut off water supply. Replace flush valve.
c. Shut off water supply. Remove cap and clean per Step 13.
TROUBLESHOOTING GUIDE
PROBLEM POSSIBLE CAUSE CORRECTIVE ACTION
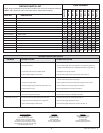
REPAIR PARTS LIST
TANK NUMBER
Repair parts are determined by toilet tank number which can be found marked inside tank.
NOTE: "XXX" represents color or trim finish options. Specify when ordering.
PART NO. DESCRIPTION
4007.100
4007.101
4007.151
738938-XXX0A
034783-XXX0A
7381125-400.0070A
7381146-401.0070A
7381193-201.0070A
7301021-0070A
738570-100.0070A
735127-400.XXX
735124-400.XXX
7381146-405.0070A
7381146-406.0070A
7381146-402.0070A
7381148-200.0070A
7381162-200.0070A
7381193-203.0070A
✔
✔
✔
✔
✔
✔
✔
✔
✔
✔
✔
✔
✔
✔
✔
✔
✔
✔
✔
✔
✔
✔
✔
✔
✔
✔
✔
✔
✔
✔
✔
✔
4007.458
✔
✔
✔
✔
✔
✔
✔
✔
✔
✔
✔
✔
✔
✔
✔
✔
✔
✔
✔
✔
✔
✔
✔
✔
TRIP LEVER - STANDARD LEFT HAND
BOLT CAP KIT
FLUIDMASTER 400A VALVE
FLUSHVALVE ASSEMBLY 3 INCH (INCLUDES FLAPPER)
FLAPPER ASSEMBLY 3 INCH
TANK COUPLING KIT #253
REFILL TUBE
TANK COVER
TANK COVER
FLUSHVALVE ASSEMBLY HET - 3 INCH (INCLUDES FLAPPER)
FLUSHVALVE ASSEMBLY HET - 3 INCH (INCLUDES FLAPPER)
FLUSHVALVE ASSEMBLY 3 INCH (INCLUDES FLAPPER)
EZ INSTALL BOLT CAP KIT
EZ INSTALL TANK COUPLING KIT
FLAPPER ASSEMBLY 3 INCH
4007.428
✔
✔
✔
✔
✔
✔
✔
✔
4007.128
✔
✔
✔
✔
✔
✔
✔
✔
✔
✔
4007.016
4007.500
4007.516