


M968924 Rev.1.3
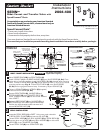
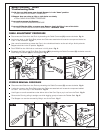
CHECK DRAIN CONNECTIONS
12
11
13
14
15
TEST INSTALLED FITTING
With HANDLES (1) in OFF position, turn on WATER
SUPPLIES (2) and check all connections for leaks.
Operate both HANDLES (1) to flush water
lines thoroughly.
Rotate TRANSFER VALVE (5) from rim wash to
spray several times to check operation.
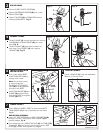
SERVICE
Pull up POP-UP KNOB (3) and fill Bidet with water. Check
that DRAIN STOPPER (4) makes a good seal and retains
water in Bidet. If STOPPER (4) does not seal properly,
please refer to “Troubleshooting Guide” in these instructions.
Push POP-UP KNOB (3) down and check all drain
connections and "P" trap for leaks. Tighten
if necessary.
1
1
4
SPRAY
OUTLINE OF BIDET
2
2
3
UNTHREAD
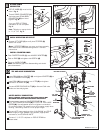
INSTALL HANDLES
1
2
4
5
3
TOP
Figure "A"
SPLINE END DOWN
Push ADAPTER (1) on VALVE STEM (2), so that the hole of the
ADAPTER (1) without a spline is facing up. See figure "A". Tighten
STEM SCREW (3) to secure ADAPTER (1).
Find correct position of LEVER HANDLE ASSEMBLY (4) by adjusting
male teeth on ADAPTER (1) to female teeth in HANDLE (4).
Thread LEVER HANDLE ASSEMBLY (4) onto ESCUTCHEON (5)
until snug against mounting surface
.
THREAD ON
TO DECK
ADAPTER
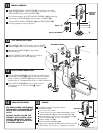
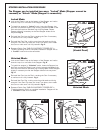
To change direction of handle rotation,
proceed as follows:
Turn valve to OFF position.
Thread counter-clock wise HANDLE BASE (1) to remove
HANDLE ASSEMBLY (2) from ESCUTCHEON BASE (3).
Use a flat blade screw driver to remove SPRING CLIP (4).
Lift STOP WASHER (5), turn 90˚ and replace.
Replace SPRING CLIP (4).
Reinstall HANDLE ASSEMBLY (2).
If spout drips, operate handles several times from OFF
to ON position. Do not force - handles turn only 90˚.
90˚
VALVE
1
5
3
4
2
DO: SIMPLY RINSE THE PRODUCT
CLEAN WITH CLEAR WATER. DRY
WITH A SOFT COTTON FLANNEL
CLOTH.
DO NOT: DO NOT CLEAN THE
PRODUCT WITH SOAPS, ACID,
POLISH, ABRASIVES, HARSH
CLEANERS, OR A CLOTH WITH
A COARSE SURFACE.
CARE INSTRUCTIONS: