


GB
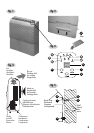
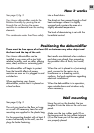
There are four optional outlets for the
drainage tube. To change the outlet of
the drainage tube the rear panel should
be dismounted.
When remounting the rear panel care
should be taken to return all the screws
and washers to their original location.
Connecting the permanent outlet
• Connect the pipe to an outlet tube with
the correct diameter.
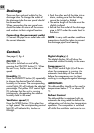
Drainage
Drainage
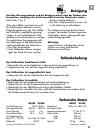
See page 3, fig. 4
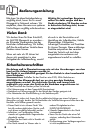
ON/OFF (1)
The unit is switched on and off by
pressing the ON/OFF button (1). When
the unit is on, the fan runs in the set
speed.
Humidity (2)
Press the HUMIDITY button (2) repeatedly
to choose the desired level of relative
humidity in the area. The corresponding
control lights (2) will indicate the selected
percentage. The yellow CNT control light
(5) indicates that the unit is running
continuously, disregarding the relative
humidity level in the area.
Ventilator speed (3)
Press the SPEED button (3) to select low
or high speed. The corresponding control
light (3) will indicate this, Lo=low or
Hi=high.
Controls
Controls
Digital display (4)
The digital display (4) will show the
measured relative humidity in the area.
Compressor (6)
The COMP control light (6) will be on
when the compressor is running. An
automatic time delay of five minutes
before the compressor can (re-)start
working is a safegarde against damage.
IMPORTANT:
This dehumidifier should not be used in
temperatures below 7 °C or above 35
°C.
Defrost Control
The dehumidifier is equipped with an
automatic de-icing mode to defrost the
refrigeration coil during low temperature
operation. The compressor is switched
off whilst the ventilator continues to run.
• Push the other end of the tube into a
drain, making sure that the tubing
cannot be twisted or folded.
• The entire length of the tube must be
slightly inclined.
• Ensure that the outlet of the drainage
pipe is NOT under the water level in
the drain.
NOTE: In very cold weather conditions
precautions should be taken to prevent
the drainage pipe from freezing.
6