


Installation
6
7
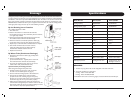
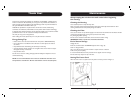
Mounting the exhaust pipe
• The supplied exhaust hose can be
extended from 1 foot to 5 feet
for mounting. It is recommended that
you use the shortest possible length of hose.
• Take care to prevent any kink or
bend in the middle of the exhaust
hose, as this will trap hot exhaust air,
which will radiate back into the room.
Cleaning the Filter
Use a vacuum cleaner or tap the filter lightly to remove loose dust and dirt from the filters
and then rinse them thoroughly under running water (no hotter than 104ºF)
Dry thoroughly before replacing.
Notice! Never operate the unit without the filters.
WARNING!
The length of the exhaust pipe is specially
designed according to the specification of
this product.
Do not replace or extend it with your own hose
as this could cause the unit to malfunction.
Installation
Window Kit Installation
This unit is a portable air conditioner. It can be moved from room to room so that the cooling
can follow you anywhere. Fitting the exhaust hose is easy, through a window or wall.
Please refer to either of the following ways:
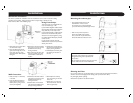
Using Foam Strips:
Two foam strips are provided with the
unit, each measuring 7" x 24".
If your window’s height or width is shorter
than 24", please measure and cut the foam
strip (with the pre-cut hole) to size.
If your window’s height or width is longer
than 24" but shorter than 48", please
attach the two strips together by using
the yellow double-sided tapes provided
and cut to size.
If your window is longer than 48",
additional foam strips can be purchased
directly from Amcor.
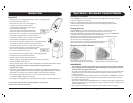
Wall Connection
1. Make a hole (5.1" in diameter)
in the wall.
2. Insert the Round Connector
(part #14) into the hole and
hold in place by using 4 small
screws (not supplied).
3. Extend one end of the exhaust
pipe (part #11) and screw into
the Round Connector by
turning clockwise.
4. Extend other end of exhaust
pipe and screw in Adaptor (part
#10) by turning clockwise.
5. Push Adaptor to fit firmly
over the opening on the back
of the unit.
** When not in use, cover the
Round Connector and hole
with Cap (part #15).
1. Push out the pre-cut circle from
one of the foam strips.
2. Insert the Round Connector
(part #14) through the pre-cut
hole. Note: the “lip” of the
round Connector will be placed
facing out.
3. Extend one end of the exhaust
pipe (part #11) and screw into
the Round Connector by
turning clockwise.
4. Place and insert the foam strip
into your window frame and
close window to hold foams
in place.
5. Extend other end of exhaust
pipe and screw in Adaptor (part
#10) by turning clockwise.
6. Push Adaptor to fit firmly over
the opening on the back of
the unit.