


CAUTION: THE SECONDARY SUPPORT CABLE PROVIDED SHOULD BE USED ANYTIME THE CIRCULATOR IS MOUNTED OVERHEAD FOR
ADDITIONAL SAFETY.
SECONDARY SUPPORT CABLE (Figure 2)
1. Loop one end of the Cable around the Large Diameter Wires of both the Front and Rear Circulator Guard.
2. Attach a Cable Clamp with the "U" on the tail sid eof the loop leaving a tail approximately 1 to 2 inces. Tighten Clamp Nuts. Make
sure no part of the Cable interferes with the Blade.
3. Wrap the other end of the Cable around a secure building joist, truss, or othe support near the Fan. (Figure 3) Do not attach cable to
I-Beam mount pipe. Take up all excess slack in the Cable.
CAUTION: Use only the mounting hardware which is recommended for use on this fan.
4. Attache the remaining Cable Clamp as indicated in Step 2. The excess tail should be trimmed to extend 1 to 2 inches past the
Clamp.
5. Check the Assembly to assure the Blade is free of all obstructions.
CAUTION: Use of the secondary support cable does not guarantee protection against injury of persons. Mounting of both the
circulator and cable could fail if subjected to abuse, neglect or improper installation.
OPERATING INSTRUCTIONS
1. TO OPERATE: Plug cord into a grounded 120V, 60 Hz outlet. Select desired operating speed with pull cord on the rear of the motor:
First pull: High Second pull: Medium
Third pull: Low Fourth pull: OFF
WARNING:
This fan should be used only in a clean, dry environment.
Mounting of this product in any way other then specified in the instruction sheet
will null and void the manufacturer's warranty.
MAINTENANCE
WARNING: ALWAYS UNPLUG THE CORD BEFORE MOVING OR SERVICING.
WARNING: DO NOT IMMERSE FAN IN WATER!
CLEANING: Use a soft cloth and mild soap solution such as liquid dish washing detergent. Dry all parts completely before reconnecting
to power supply.
CAUTION: Do not use gasoline, benzine, thinner, harsh cleaners, etc. as they will damage the Fan. NEVER use ALCO-
HOL OR SOLVENTS.
SERVICING: All other servicing, with the exception of general user maintenance, should be performed by an authorized service repre-
sentative. Call 1-800-233-0268, Monday through Friday, between the hours of 8:00 a.m.and 5:00 p.m. Eastern for the location of your
nearest service center.
LUBRICATION: Precision bearings are sealed at the factory for life and do not require further lubrication.
STORAGE: Store the Fan, with these instructions, in a clean and dry place.
IMPORTANT INSTRUCTIONS - OPERATING MANUAL IMPORTANT INSTRUCTIONS - OPERATING MANUAL
DESCRIPTION
1. For mounting listed Air King® circulators from the ceiling.
2. Distance mounted from the ceiling can be changed by using a length of 1-1/2" NPT pipe. Simply substitute your pipe for the provided
pipe nipple.
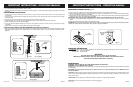
CEILING MOUNT INSTALLATION
1. Locate the four hole pipe flange and securely mount to ceiling structure. Ensure ceiling structure can safely support the
installed Fan.
2. Open one tube of Loctite #243 by snapping tube neck just below end cap. Be certain to follow all warnings noted on Loctite
#243 tube. (Inset)
3. Apply (1) entire tube of Loctite #243 onto the first 2 threads on the end of the steel nipple.
4. Screw steel nipple, (or your longer pipe), into adapter. Steel nipple must be screwed in at least 4 full revolutions.
5. Tighten provided 1/4" set screw in the yoke adapter.
6. Screw the yoke with adapter assembly onto the pipe. This assembly must also be turned at least 4 full revolutions into the
pipe flange.
7. Tighten the 1/4" set screw in the adapter down securely onto the steel nipple.
CAUTION: FAN IS HEAVY AND MAY REQUIRE TWO PEOPLE TO MOUNT.
8. Align Yoke with grill mounting threads. Loosely attach one Grill Knob and one Rubber Spacer to the Head Assembly. Attach the other
Grill Knob and Rubber Spacer to the Head Assembly and FIRMLY tighten. Return to the first Grill Knob and FIRMLY tighten.
(Figure 1)
2Rev. C 11/07
5084423
3Rev. C 11/07
5084423
Yoke
Rubber
Spacer
Large
Guard Wires
Figure 2
Secondary
Support
Cable
Figure 3
Set Screw
Steel Nipple
Floor Flange
20" Only (9320)
18" Only (9718)
Set Screw
Steel Nipple
Floor Flange
Application
Loctite #243
Loctite #243
Set Screw
Set Screw
Inset
Application
Loctite #243
Loctite #243
Inset