


6
2084060A
Rev. P 3/05
32084060A
Rev. P 3/05
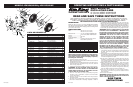
MODEL 4C630N/9012N and 4C631P/9016P
MODELO 4C630N/9012N y 4C631P/9016P
AIRKING THREE-YEAR LIMITED WARRANTY. Products are warranted by AirKing to the original user against defects in
workmanship or materials under normal use for three years on the motor and one year on all other parts, after date of purchase.
Any part which is determined by AirKing to be detective in material or workmanship and returned to an authorized service location,
as AirKing designates, shipping costs prepaid, will be, as the exclusive remedy, repaired or replaced at AirKing’s option. For
limited warranty claim procedures, see PROMPT DISPOSITION below. This limited warranty gives purchasers specific legal
rights which vary from state to state.
LIMITATION OF LIABILITY. To the extent allowable under applicable law. AirKing’s liability for consequential and incidental
damages is expressly disclaimed. AirKing’s liability in all events is limited to, and shall not exceed, the purchase price.
WARRANTY DISCLAIMER. AirKing has made a diligent effort to illustrate and describe the products in this literature accurately;
however, such illustrations and descriptions are for the sole purpose of identification, and do not express or imply a warranty the
products are merchantable, or fit a particular purpose, or that the products will necessarily conform to the illustrations or
descriptions. Except as provided below, no warranty or affirmation of fact, expressed or implied, other than as stated in “LIMITED
WARRANTY” above is made or authorized by AirKing.
PRODUCT SUITABILITY. Many states and locations have codes and regulations governing sales, construction, installation,
and/or use of products for certain purposes, which may vary from those in neighboring areas. While AirKing attempts to assure
that its products comply with such codes, it cannot guarantee compliance, and cannot be responsible for how the product is
installed or used. Before purchase and use of a product, please review the product application, and national and local codes and
regulations, and be sure that the product, installation, and use will comply with them.
Certain aspects of disclaimers are not applicable to consumer products; e.g., (a) some states do not allow the exclusion or
limitation of incidental or consequential damages, so the above limitation or exclusion may not apply to you; (b) also, some states
do not allow limitations on how long an implied warranty lasts, consequently the above limitation may not apply to you; and (c)
by law, during the period of the Limited Warranty, and implied warranties of merchantability or fitness for a particular purpose
applicable to consumer products purchased by consumers, may not be excluded or otherwise disclaimed.
PROMPT DISPOSITION. AirKing will make a good faith effort for prompt correction or other adjustment with respect to any
product which proves to be defective within limited warranty. For any product believed to be defective within limited warranty,
first write or call dealer from whom product was purchased. Dealer will give additional directions.
LIMITED WARRANTY
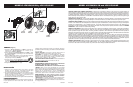
INSTALACIÓN
1. Coloque un perno prisionero detrás de la pared. Si no puede
encontrar un perno prisionero, usted podrá encontrar tipos
especiales de pernos de anclaje en su ferretería local.
2. Fije la Placa de Montaje a la pared con los Tornillos que vienen
incluidos (Tornillos para Madera #8 X 1 1/4"). Procure que la brida
apunte hacia arriba, como se muestra en la ampliación que se
encuentra más arriba (vea la ampliación #1)
3. El Ventilador ahora está listo para ser colgado en la Placa de Montaje.
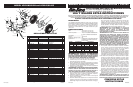
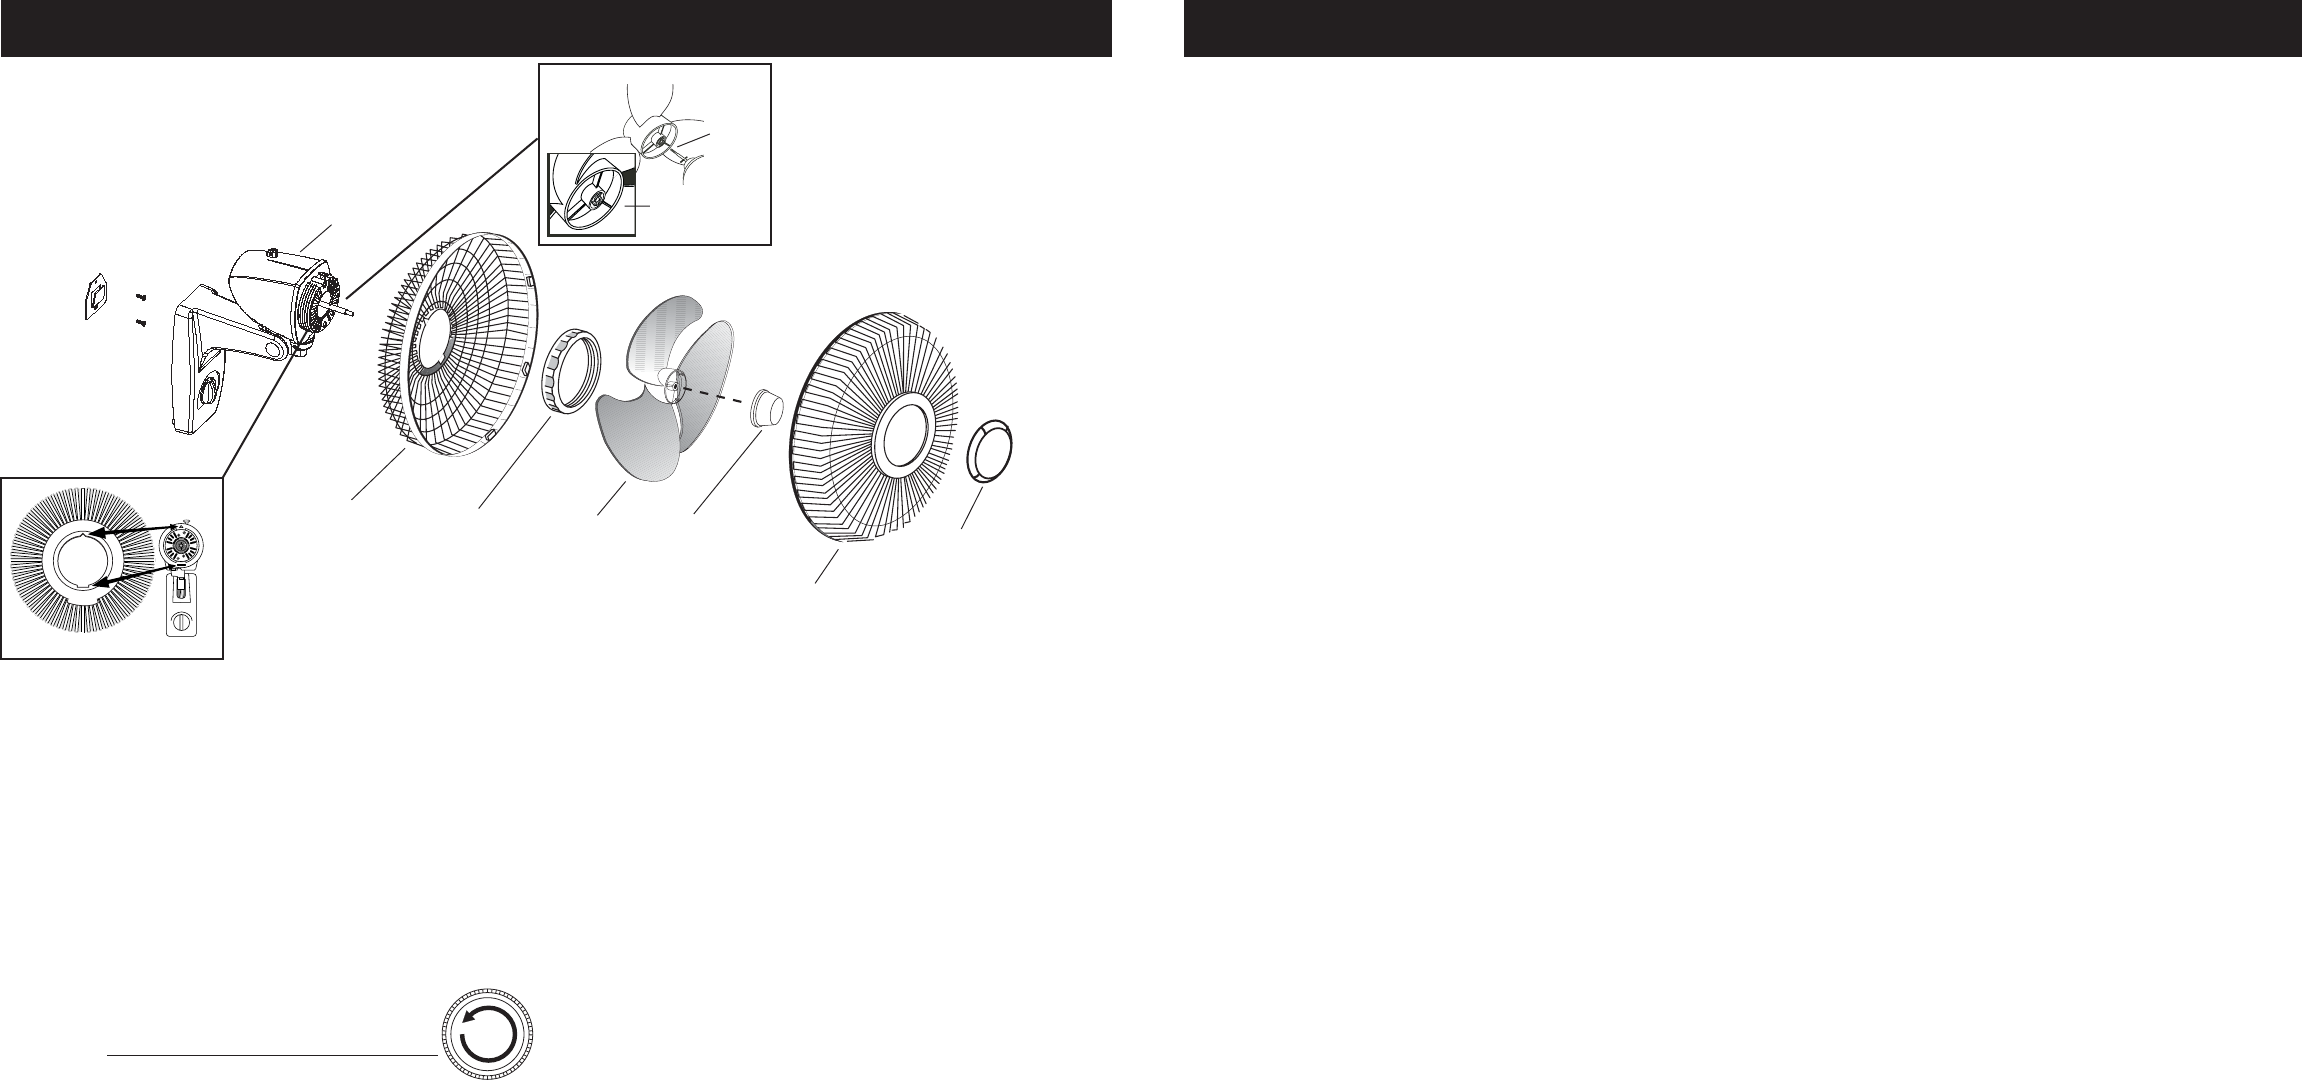
ARMADO
(Figura 1)
1. Coloque la Parrilla Posterior en el Motor, alineando la
lengüeta de la Parrilla Posterior con la ranura que se
encuentra en el Motor.
(Detalle1)
2. Asiente totalmente la Parrilla Posterior en el Motor y fíjela
con la Tuerca Plástica, haciéndola girar en el Sentido de las
Manecillas del Reloj.
3. Deslice el Aspa hasta montarla en el Eje del Motor. (Alinee la
ranura que se encuentra en el cubo del aspa con la
clavija del eje del motor.)
(Detalle 2)
4. Para fijar el Aspa, atornille el Rotador en el Eje en
el sentido
Contrario de las Manecillas del Reloj
hasta que se encuentre fijo en el cubo del Aspa.
5. Encaje la Parrilla Anterior en su lugar.
FUNCIONAMIENTO
OSCILACIÓN VARIABLE: Jale la perilla de oscilación ubicada en
la parte posterior del motor hacia arriba. Gire el cabezal del
MANTENIMIENTO
ADVERTENCIA: SIEMPRE DESENCHUFE EL CABLE ANTES
DE MOVER O DAR SERVICIO AL VENTILADOR.
ADVERTENCIA: ¡NO SUMERJA EL VENTILADOR EN AGUA!
LIMPIEZA: Utilice un paño suave humedecido con una solución
jabonosa liviana, tal como un detergente líquido para lavar platos.
Seque TODAS LAS PARTES POR COMPLETO antes de rearmar.
Después de dar mantenimiento o servicio, REARME POR
COMPLETO la unidad en la forma descrita en este manual de
instrucciones, antes de volver a conectarla a la fuente de poder.
PRECAUCIÓN: No utilice gasolina, bencina, acetona,
limpiadores abrasivos, etc. puesto que dañarán el Ventilador.
NUNCA use ALCOHOL O SOLVENTES.
LUBRICACIÓN: Los cojinetes de precisión vienen sellados de por
vida en la fábrica y no precisarán ninguna lubricación adicional.
ALMACENAMIENTO: Guarde el Ventilador con estas instrucciones
en un lugar fresco y seco.
Motor
Parrilla
Posterior
Tuerca
Plástica
Aspa
Rotador
Parrilla
Anterior
Ornamento
ventilador hacia la izquierda, derecha o hacia delante. Empuje la
perilla de oscilación hacia abajo y el ventilador oscilará describiendo
el ángulo fijado.
ÁNGULO VERTICAL: Para ajustar el ángulo vertical, incline el
cabezal del ventilador hacia arriba o abajo, según prefiera.
VELOCIDAD: La velocidad se controla mediante un interruptor
activado con una cadenilla de tiro. La velocidad fijada se indica
mediante la perilla del interruptor ubicada en la cubierta anterior
(Apagado – Baja – Mediana–– Alta – Apagado).
CABLE DE ALIMENTACIÓN ELÉCTRICA: Enchufe el cable eléctrico
en un tomacorriente de pared (120 Voltios CA, 60 Hz).
Detalle 2
Ranura
Clavija
Detalle 1