


9
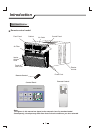
6. Installation of the cabinet
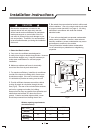
B. Ensure the "L" shaped mounting channel is
positioned in front of the sash. The bottom channel
of the cabinet should be positioned in the track
provided on the bracket assembly. Pull the window
down until it rests just behind the front of the "L"
shaped mounting channel. See (Fig. 11).
A. Align one hole in the bottom of the cabinet with one
hole in the bracket assembly. Secure the cabinet to the
bracket using (3) 1/4" screws provided. Repeat the
same procedure on the opposite side of the cabinet.
See (Fig. 10).
C. Check to make sure that the cabinet is slanted
slightly downward on the outside. If necessary,
re-adjust support bracket as shown in (Fig. 7).
Fig. 10
1/4" Screws
Fig. 11
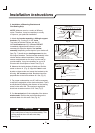
7. Secure Shutters
A. Carefully slide the air conditioner back into the
cabinet.(Please seek assistance for this procedure).
B. Reinstall the slide-out-chassis security screws
(removed earlier) on both sides of the cabinet.
See (Fig. 12).
Secure the top of the frames to the window sash with
(2) 3/4" screws.
C. Now, secure bottom frame of shutters using one
shutter clamp and one 3/4" screw on each side(Fig. 12).
8. Reinstalling Front Panel Assembly
A. Position the front panel on the cabinet starting at the
top. The front panel lock tabs must be inserted into the
retaining slots in the cabinet. Repeat this procedure on
all sides.
B. Secure the front grille to the cabinet using the Philips
screws removed earlier(Fig. 1).
Fig. 12
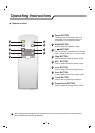
Installation instructions
Window Sash
"L"Shaped
Mounting
Channel
Seal
Coil
3/4" screws
Security Screw
"L"Shaped
Mounting
Channel
Seal
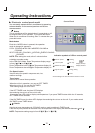
F
H
R
F
A
N
S
P
E
E
D
M
O
D
E
O
FF
O
N
/
T
I
M
E
R
A
ir
c
o
n
d
it
io
n
e
r
W
A
IT
T
H
R
E
E
M
IN
U
T
E
S
B
E
F
O
R
E
R
E
S
T
A
R
T
IN
G