


MAINTENANCE
SABER (SC) 86038350 01/29/07
4-
7
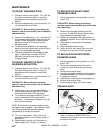
TO ADJUST SQUEEGEE PITCH
1. Choose a smooth, level surface. Turn “ON” the
key switch and vacuum switch. Lower the
squeegee and drive forward at least 2 feet
(60cm.).
2. With the squeegee down, stop the machine. Do
not allow machine to roll back.
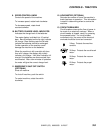
FOR SAFETY: Before leaving or servicing the
machine, stop on level surface, turn off machine
and remove key.
3. Determine the differences, if any, in deflection of
the squeegee blade between each end and the
middle. Proper adjustment is obtained when
deflection is equal all the way across the
squeegee blade.
4. To decrease the deflection of the squeegee
blade at the ends, adjust plastic knobs at the far
right or left of squeegee assembly.
5. Check the deflection of the squeegee blades
again. Repeat steps 1 through 4 until the
deflection is equal across the entire rear
squeegee blade.
TO ADJUST AMOUNT OF REAR
SQUEEGEE DEFLECTION
1. Choose a smooth, level surface. Turn “ON” the
key switch and vacuum switch. Lower the
squeegee and drive forward at least 2 feet
(60cm.).
2. With the squeegee down, stop the machine. Do
not allow machine to roll back.
FOR SAFETY: Before leaving or servicing
machine, stop on level surface, turn off machine
and remove key.
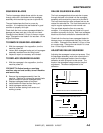
3. Observe the amount of squeegee deflection. It
should deflect approximately 3/8 in. (9.5mm)
across the entire width of the squeegee.
4. To increase the squeegee deflection, turn the
center knob above the lift carrier bracket
clockwise. To decrease the deflection, turn the
knob counterclockwise.
NOTE: The deflection should be consistent along
the length of the squeegee. If the deflection varies
from end to end the knobs can be adjusted
independently to correct the variation.
5. Turn on the key switch. Raise, then lower
squeegee assembly. Drive forward at least 2
feet (60cm).
6. Repeat steps 2 through 4 until deflection of
approximately 3/8 in. (9.5mm) is reached.
TO REPLACE OR ROTATE REAR
SQUEEGEE BLADE
1. With the squeegee in the up position, turn key
switch “OFF”.
FOR SAFETY: Before leaving or servicing
machine; stop on level surface, turn off machine
and remove key.
2. Remove the squeegee assembly from the
machine. Unlatch and remove blade retainer
strap and remove squeegee blade.
3. Rotate the squeegee to new edge position or
replace as required. Each blade has four edge
positions.
4. Install blade on locating tabs of squeegee
assembly.
5. Install squeegee retainer strap.
6. Fasten and lock latch, adjust latch only tight
enough to take up slack in retaining strap.
TO REPLACE OR ROTATE FRONT
SQUEEGEE BLADE
1. With the squeegee in the up position, turn key
switch “OFF”.
2. Remove the squeegee from the machine.
Loosen (3) thumb screws securing retainer
strap.
3. Remove front retainer strap.
4. Remove squeegees blade from locating tabs on
squeegee assembly and rotate to new position
or replace as required.
5. Install blade on locating tabs of squeegee tool.
6. Replace front retainer strap.
7. Secure strap by tighten (3) thumb screws.
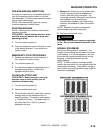
GREASING AXLES
1. Apply 1-2 strokes of MOBILTEMP®78 or
compatible clay-based or calcium-based grease
per service schedule.