


14
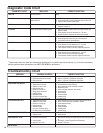
Diagnostic Code Chart
DIAGNOSTIC LIGHT
CORRECTIVE ACTION
*
LIGHT ON
INDICATES
No power to control board or diagnostic
light burned out
Normal operation
NO LIGHT
1 FLASH
2 FLASHES
Power on with no water in tank
Water temperature exceeded high limit
3 FLASHES Sensor failure
4 FLASHES Upper element circuit failure
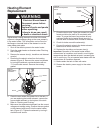
1. Remove power
2. Check element circuit for resistance of 5 - 25 ohms
3. Check wires at element and board for damage
4. If this 4 flashes condition continues, replace control board
1. Remove power
2. Check element circuit for resistance of 5 - 25 ohms
3. Check wires at element and board for damage
4. If this 5 flashes condition continues, replace control board
None
1. Check for blown fuses or tripped breaker
2. Check power leads on control board with meter for 240 volts
3. If power is okay, replace control board
1. Add water and reset temperature control system. See “Reset
Function” on page 10
1. Make sure upper and lower access doors and insulation are
properly in place
2. Check element circuits for resistance of 5 - 25 ohms
3. Replace element if necessary and reset control system
1. Remove power
2. Check temperature sensor for open or shorted circuit
3. If no problem is found, replace sensors
5 FLASHES Lower element circuit failure
*
These instructions are brief and intended as guidance for a qualified service technician. If you lack the necessary
skills to perform these procedures call 1-877-817-6750 for assistance.
PROBLEM
NO HOT WATER
INSUFFICIENT HOT WATER
HIGH OPERATION COSTS
SLOW HOT WATER RECOVERY
DRIP FROM T&P VALVE
WATER ODOR
POSSIBLE CAUSE(S)
1. No power to heater
2. High temperature limit shut-down
3. Defective sensor
1. Defective lower element
2. Temperature set too low
3. Sediment or lime in tank
4. Defective Dip Tube
5. Heater too small for job
6. Wrong piping connections
7. Leaking faucets
8. Wasted hot water
9. Long runs of exposed pipe
10.Hot water piping on outside wall
1. Temperature set too high
2. Sediment or lime in tank
3. Heater too small for job
4. Leaking faucets
5. Wasted hot water
6. Long runs of exposed piping
7. Hot water piping in exposed wall
1. Upper element defective
2. Leaking faucets
1. Excessive water pressure
2. Closed system
3. Defective T & P valve
1. Sulfides in the water
CORRECTIVE ACTION
1. Refer to “No Light” of Diagnostic Code Chart
2. Refer to “2 Flashes” of Diagnostic Code Chart
3. Refer to “3 Flashes” of Diagnostic Code Chart
1. Refer to “5 Flashes” of Diagnostic Code Chart
2. Set temperature to desired setting
3. Drain. Determine if water treatment is needed
4. Replace Dip Tube
5. Check and Install adequate water heater
6. Correct piping
7. Repair faucets
8. Advise customer
9. Insulate piping
10.Insulate piping
1. Lower temperature control or change to Energy Saver Mode
2. Drain. Flush-Provide water treatment if needed
3. Install adequate heater
4. Repair faucets
5. Advise customer
6. Insulate piping
7. Insulate piping
1. Refer to “4 Flashes” of Diagnostic Code Chart
2. Repair faucets
1. Use pressure reducing valve and pressure relief valve (See page
6)
2. See page 6, “Closed System/Thermal Expansion”
3. Replace T & P valve
1. See page 11, “Water Odor”
Troubleshooting Chart