


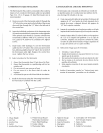

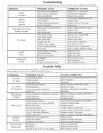
SPECIAL FUNCTIONS
KWIKSET Presets
Press the KWIKSET button to display the DAY or NITE
preset or to return to the standard display mode. Pressing
the KWIKSET button to either the DAY or NITE preset
causes the set point, FAN and COOL settings to assume
the values stored in memory. Settings for set point, FAN,
and COOL modes are displayed for each preset. The
coobr witl then operate with the displayed preset settings
until the user _eaves the KWiKSET mode or enters a
different preset.
ChangelSave a Preset: Press the KW_KSET button until
the desired preset is displayed. To initiate the edit mode,
press either COOL, FAN, Up or Down buttons. The edit
mode is activated when the DAY or NITE icon is flashing
on the display. Chose the new operating mode (COOL or
VENT), the new set point, and the new FAN mode (AUTO,
HIGH, LOW) with the appropriate buttons. To save the
new settings, press the KWIKSET button. The N_TE or
DAY icon will stop flashing indicating that the new
operating modes have been stored in memory.
Save a Preset With Delayed Stop Timer: Press
KWIKSET until the desired preset is displayed. Enter the
editing mode (press either FAN, COOL, Up or Down
bu_ons). The NITE (or DAY) icon should be flashing.
Activate the delay timer by pressing T}MER. Set the
desired de_ay using the '%" or "o" HOURS buttons. Make
any other changes to COOL, FAN, or set point as desired.
Save the changes by pressing the KWIKSET button. The
stop delay is now part of the preset. To remove the stop
delay from the preset, enter the editing mode, press the
TIMER button to turn off the timer, and save the changes.
Save a Preset With Delayed Start Timer: Press
KWIKSET untit the desired preset is displayed. Enter the
editing mode and make desired changes to set point, FAN,
and COOL modes (the NITE or DAY icon will be flashing).
Next, press the ON/OFF button. The control will
automatically set the system OFF and start delay timer
when the edit mode is active. Adjust the sta_ delay time
using the "+" and "-" HOURS buttons. Change any of the
operating modes (COOL, FAN, and set point) as desired.
Press the KWIKSET button to save the preset with start
delay. To remove the start delay from the preset, Press
KWIKSET until the desired preset is displayed, initiate
editing, and press either the ON/OFF or the TIMER button.
The control wiii automatica{ly be set to ON. Press the
KW _KSET button to save the preset without the start delay.
Advanced De_ay Timer
If a preset is saved with a delayed stop, it is possible to set
a delayed start for this preset (this feature only works for
presets with delayed stop). Press the K\^,qKSET button
until the desired preset (with stop delay) is displayed.
Press the ON!OFF button to turn the system OFF. Press
the TIMER button to activate the stad de_ay and use the
%" and %'°HOURS buttons to adiust the sta_ delay, The
start deiay will count down until the preset is activated and
then the stop delay will count down until the system is
turned OFF. Changes t:o the operating modes made while
the advanced start delay is active will not affect the preset,
but will be temporarily saved and will be displayed when
the system is turned ON after the preset is finished
running.
Change Scale
To change the temperature scale, press COOL to view
set point. Press and hold the SET TEMP up and down
buttons and release when the displayed temperature
changes from °F to °C or vise versa. The new
temperature scale will remain active until an ERASE
command is issued. Scale change can only occur in
the COOL mode.
Erase Function
The ERASE function will restore all settings to the
factory default values. First, turn the system ON and
hold the ON!OFF button down until ERASE is
complete. Wait for 1 second, and then hold the SET
TEMP up and down buttons down. After about 3
seconds, the number "0.9" will be displayed and will
begin to count down, to "0.0". When the set point of
72.5 °F is displayed, the ERASE funct on s complete.
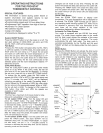
Program D_fferential Value
The differential value is the difference between the turn
off temp and the turn on temp. To change the
differential, press and hold the ROOM TEMP and SET
TEMP down buttons until the display changes to the
program display. Press the SET TEMP up button to
increase the differential and the down bu_on to
decrease the differential. Press the ROOM TEMP
button to save the new differential. The new differentiai
will remain active until the ERASE function is executed.
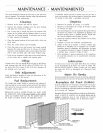
Reset
To pedorm a control reset, press and held the timer
buttons (T_MER and both HOURS buttons) until the
display goes blank. Re,ease the buttons and the
display wil! return to normal NOTE: if the operating
mode was changed or if a delay timer was set after the
last power up or power failure, the changes will not be
recalled. Only the last saved data will be restored.
KWIKSET presets and differentia[ settings will remain
intact, in the event of power failure, delay timer se_ings
will be maintained for a minimum of 8 hours and up to
15 hours. At the end of the 15 hours, the timers will no
longer be updated. Any remaining time left in the delay
will continue after power is restored.