


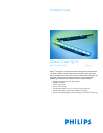


Scope Of This Guide 3
http://www.colorkinetics.com
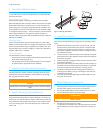
3. Assemble Additional Items
To wire and mount an iColor Cove QLX fixture, you may need addi-
tional parts and tools.
Power Supplies and Wiring
Install all power supplies, including any interfaces with controllers,
before installing the iColor Cove QLX fixtures. One iColor Cove QLX
leader cable is required to connect each run or series of fixtures to a
power supply port. (The power supply and external controllers send
control signals to the iColor Cove QLX fixtures over the leader cable.
To configure the power supply — fixture connection, you will need the
power supply installation or user guide for specific instructions.)
If jumper cables are required to add space between fixtures, make sure
that they are available.
Mounting Tracks
iColor Cove QLX fixtures can be mounted directly to a wall, ceiling,
cabinet or other secure surface. For straight linear applications, several
iColor Cove QLX fixtures may be snapped into an optional four-foot
long mounting track to ensure a straight run. If the track is specified in
the plans, make sure it is available.
Tools and Supplies
You will need these tools and supplies:
• General tools to secure fixtures and mounting tracks (drill, screw-
driver, level, measuring tools, etc.).
• #6 mounting screws or other hardware (bolts, nuts and washers,
for instance) that is appropriate for the substrate.
4. Inspect The Fixtures and Accessories
Carefully inspect the cartons and boxes containing the iColor Cove
QLX fixtures, the fixtures themselves, and all cables for any damage
that may have occurred in transit.
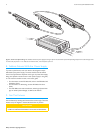
5. Install Mounting Tracks (Optional)
If the optional mounting tracks are used, install them now. Tracks can
be easily cut to fit with a hacksaw or nippers. Make sure the tracks are
firmly attached to the substrate with screws or other suitable connec-
tors in all mounting holes. The screw heads may not rise above the
interior rails.
Figure 1: Mounting Track Detail
6. Install The Fixtures
(See “iColor Cove QLX Wiring” on page 4 for an overview of these
steps.)
1. Position the first fixture in the series. If a track is used, snap the
fixture into the track and slide it into position. The leader cable
will connect to this fixture’s male connector, so make sure that
the fixture is installed so that the next fixture can plug into this fix-
ture’s female connector.
2. Use four screws to secure the fixture. Most materials will require
pilot holes for the screws. Mark the location of the holes using the
fixture base as a guide.
3. Drill the pilot holes (through the track, if used) and mount the fix-
ture with four #6 screws.
4. Position the next fixture in the series. Match its male connector to
the female connector of the previous fixture. Snap it into the track
(if used) and secure the fixture with four mounting screws.
5. Continue mounting the fixtures, making direct connections or
inserting jumper cables as you go, until all lights in the series are
mounted and connected.
6. Insert the terminator (packaged with the leader cable) into the
last fixture of the series.
7. Make Electrical Connections
1. Verify that power in the line circuit to the power supply is OFF or
that the power supply’s power cord is not connected.
2. Connect the leader cable to the first fixture in the run or series.
3. Connect the leader cable to the power supply.
4. Energize the power supply’s line circuit.
It is normal for some fixtures not to illuminate, because communi-
cations between the power supply and fixtures has not been set
up.
ƽWARNING
DO NOT USE A FIXTURE IF THE LENS, HOUSING, OR POWER CABLES ARE
DAMAGED.
FIXTURES HAVE NO USER SERVICEABLE PARTS. DO NOT ATTEMPT TO OPEN
THEM.
ƽWARNING
ENSURE THAT MAIN POWER SUPPLY IS OFF BEFORE INSTALLING OR
WIRING A FIXTURE.
OK