


IMPORTANT SAFEGUARDS AND WARNINGS
Prior to installation and use of this product, the following warnings should be observed.
1. Installation and servicing should only be done by qualified service personnel and conform
to all local codes.
2. Installation shall be done in accordance with all local and national electrical and mechanical
codes utilizing only approved materials.
3. Use only installation methods and materials capable of supporting four times the maximum
specified load.
4. Use stainless steel hardware to fasten the mount to outdoor surfaces.
5. To prevent damage from water leakage when installing a mount outdoors on a roof or wall,
apply sealant around the bolt holes between the mount and mounting surface.
The product and/or manual may bear the following marks:
C210M-C (7/99)
PM105
Medium-Duty Wall Mount
300 W. Pontiac Way,
Clovis, CA 93612-5699
USA
In North America & Canada:
Tel (800) 289-9100
FAX (800) 289-9150
International Customers:
Tel (1-559) 292-1981
FAX (1-559) 348-1120
www.pelco.com
®
This symbol indicates that dangerous
voltage constituting a risk of electric
shock is present within this unit.
This symbol indicates that there are
important operating and maintenance
instructions in the literature accompa-
nying this unit.
CAUTION:
RISK OF ELECTRIC SHOCK.
DO NOT OPEN.
LISTED
U
L
®
Please thoroughly familiarize yourself with the information in this manual prior to installation
and operation.
DESCRIPTION
The PM105 is a medium-duty wall mount designed for mounting PS7, PS7-24 Scanners and
PT270P, PT270-24P, PT280-24P, PT175-24P, and PT180-24P Pan/Tilts. The PM105 is capable
of handling loads up to 40 pounds (18 kg).
INSTALLATION
When mounting the PM105 wall mount, make certain that the mounting surface is capable of
supporting the full load of the mount, scanner or pan/tilt, and camera.
1. Drill holes in the mounting surface using the mount as a template, and attach the mount
securely with fasteners of suitable size.
If you install the mount outdoors, rain water could leak through the holes for the mounting
bolts and damage the wall. This could be a problem only if the mounting bolts go completely
through the wall.
To prevent water damage, seal the bolt holes with an appropriate sealant. Apply the sealant
around the bolt holes between the mount and the mounting surface.
2. Attach the scanner or pan/tilt to the mount.
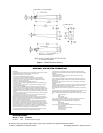
SPECIFICATIONS
Positioning Adjustment: Fixed
Pan/tilt Mounting: Secure with three 1/4-20 x 1.00-inch fasteners (supplied) (part #
ZH1/420X1.00SS)
Scanner Mounting: Secure with three 10-32 x 1.00-inch fasteners (not provided). (A
hex socket head style bolt with a lock washer is recommended.)
Maximum Load: 40 lb (18 kg)
Construction: Cast aluminum
Finish: Gray polyester powder coat
Dimensions: See Figure 1
Weight: 2.40 lb (1.09 kg)
NOTE:
The two fasteners to
secure the mount to the mount-
ing surface (minimum 1/4-inch
diameter is recommended) and
the three fasteners (10-32 x
1.00-inch) to secure the scanner
to the mount are not supplied.