


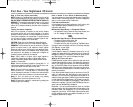
Part One – Your Nighthawk CO Alarm
How to Install Your Alarm
Your Nighthawk CO alarm with its removable adapter allows you
to install the alarm as a wall mounted unit, a direct plug unit, or
as a table top unit.
To install the battery, open the back door and snap battery
connector onto battery. You will hear the alarm sound briefly to
indicate the unit is receiving power. Place battery into battery
compartment and replace back door
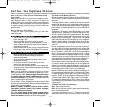
Direct Plug Alarm
First, refer to “Where to Install Your CO
Alarm” on page 1-3 for general guidelines as
to where to locate your CO alarm.
In its “as shipped” configuration, your
Nighthawk CO alarm is ready to be plugged
directly into a wall socket.
To install:
1. Choose a standard 120V outlet to plug
alarm into.
2. Pull slide support out approximately .25” until slide snaps in
place (this will help support unit in wall outlet).
3. Simply plug in.
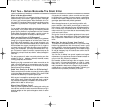
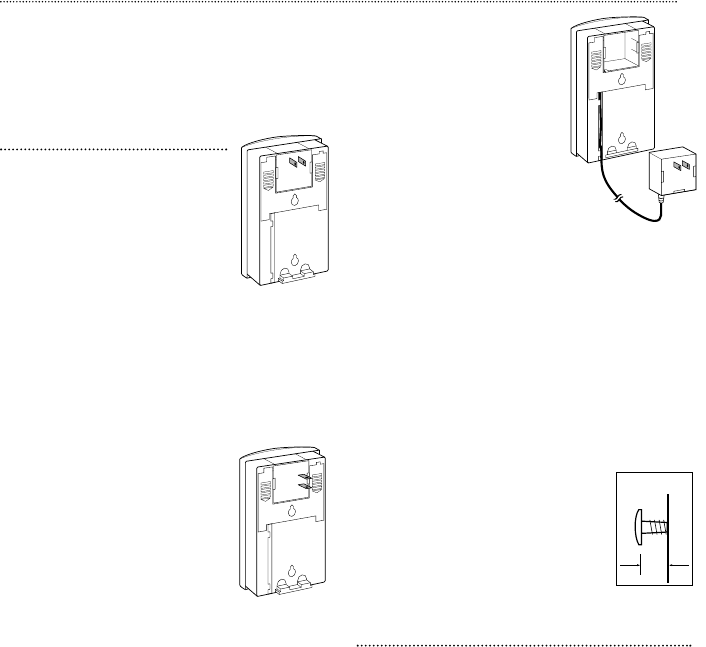
If outlet is mounted horizontally (sideways):
If you are going to use your alarm as a direct plug and you are
going to plug in to an outlet that is mounted horizontally (side-
ways), you will need to rotate the adapter 90˚. This simple process
is outlined below.
To rotate adapter:
1. With back of unit facing you (with adapter
at top), place your thumbs on thumb grips.
2. With your thumbs, push down in the
direction of the arrows on the thumb grips
and slide back door off.
3. Next, place your thumbs on the adapter
thumb releases.
4. Spread adapter thumb releases out and
carefully turn alarm over. This will allow
adapter to slide out.
5. Rotate the adapter 90˚ to the right
(clockwise), and snap firmly back into place.
6. Carefully replace back door by making sure “latches” on all
four corners of door are lined up, then firmly press into place.
7. Now simply plug in to outlet.
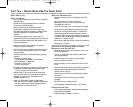
Wall Mounted Alarm
First, refer to “Where to Install Your CO
Alarm” on page 1-3 for general guidelines
as to where to locate your CO alarm.
Installation tips for power cord models:
The power cord option provides more
flexibility in mounting locations and
allows the alarm to be easily installed at
eye level.
Note: If you mount the alarm high on a
wall, make sure it is at least 6" from the
ceiling. Any higher than this, it will be in
“dead air space” and carbon monoxide
may not reach the sensor.
Below is a list of suggested mounting
locations if you wish to conceal the
power cord:
• Above a tall bureau, chest of drawers or bookcase
• Above a doorway or closet, securing the cord to the
side of the molding
Note: Do not cover the alarm with a curtain.
For a wall-mount, you will need to pull out the removable
adapter and power cord. This simple process as outlined below.
To install:
1. Follow steps 1 - 4 in the previous column under “To Rotate
Adapter.”
2. With adapter out, pull out power cord and unwrap it.
3. With cord extended, press last few inches into cord recess.
Gently pull cord at bottom of cord recess until cord becomes
taught and lays flat in cord recess.
4. Carefully replace back door by making sure
“latches” on all four corners of door are lined up,
then firmly press into place.
5. Insert the screws provided until head is approx.
1/8” from wall (If mounting in plaster board or dry-
wall, drill 3/16 hole and use plastic anchor provid-
ed). Use mounting guide template in back of user’s
guide to locate holes.
6. Hook the Nighthawk CO alarm unit over the screw onto key-
hole in back of unit.
7. Plug cord into electrical outlet.
Table Top Alarm
You can also use your Nighthawk CO alarm as a table top unit.
Simply follow the above steps for removing adapter, then instead of
mounting to a wall, simply pull out slide support and stand on table,
bedside stand, chest of drawers, etc. (refer to diagram on page 1-1).
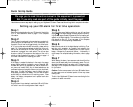
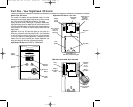
Back of unit when
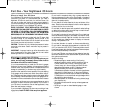
used as direct plug
Back of unit when
used as direct plug
for sideways outlet
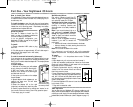
Back of unit when used
as a wall mount
WALL
1/8"
1-4
810-1368 AC PP 12/99 8/24/00 2:06 PM Page 9