Drain hose
Liquid pipe
Gas pipe
Felt tape
Indoor/outdoor unit
connecting wire
CAUTION
•
Be careful not to make mis-wiring.
•
Firmly tighten the terminal screws to prevent them from loosening.
•
After tightening, pull the wires lightly to confirm that they do not move.
•
If the connecting wire is incorrectly connected to the terminal block, the unit does
not operate normally.
•
If an earth is incorrect, it may cause an electric shock.
4-5 AUTO RESTART FUNCTION
•
These models are equipped with an auto restart function. If you do not want to use this
function, please consult the service representative because the setting of the unit needs
to be changed.
•
When the indoor unit is controlled with the remote controller, the operation mode, the
set temperature, and the fan speed are memorized by the indoor electronic control P.C.
board. The auto restart function sets to work the moment the power has restored after
power failure, then the unit will restart automatically. If the unit is operated in “AUTO”
mode before power failure, the operation mode (COOL, DRY or HEAT) is not stored in
the memory. When the main power is turned on, the unit decides the operation mode
by the initial room temperature at restart and starts operation again.
Operation
1 If the main power (230V AC) has been cut, the operation settings remain.
2 When three minutes have passed after power was restored, the unit will restart
automatically according to the memory.
Notes:
•
The operation settings are memorized when 10 seconds have passed after the
remote controller was operated.
•
If the main power is turned off or a power failure occurs while AUTO START/STOP
timer is active, the timer setting is cancelled. As these models are equipped with the
auto restart function, the air conditioner should start operating at the same time that
a power has restored.
•
If the unit has been off with the remote controller before power failure, the auto
restart function does not work as the power button of the remote controller is off.
•
To prevent breaker off due to the rush of starting current, systematize other home
appliances not to turn on at the same time.
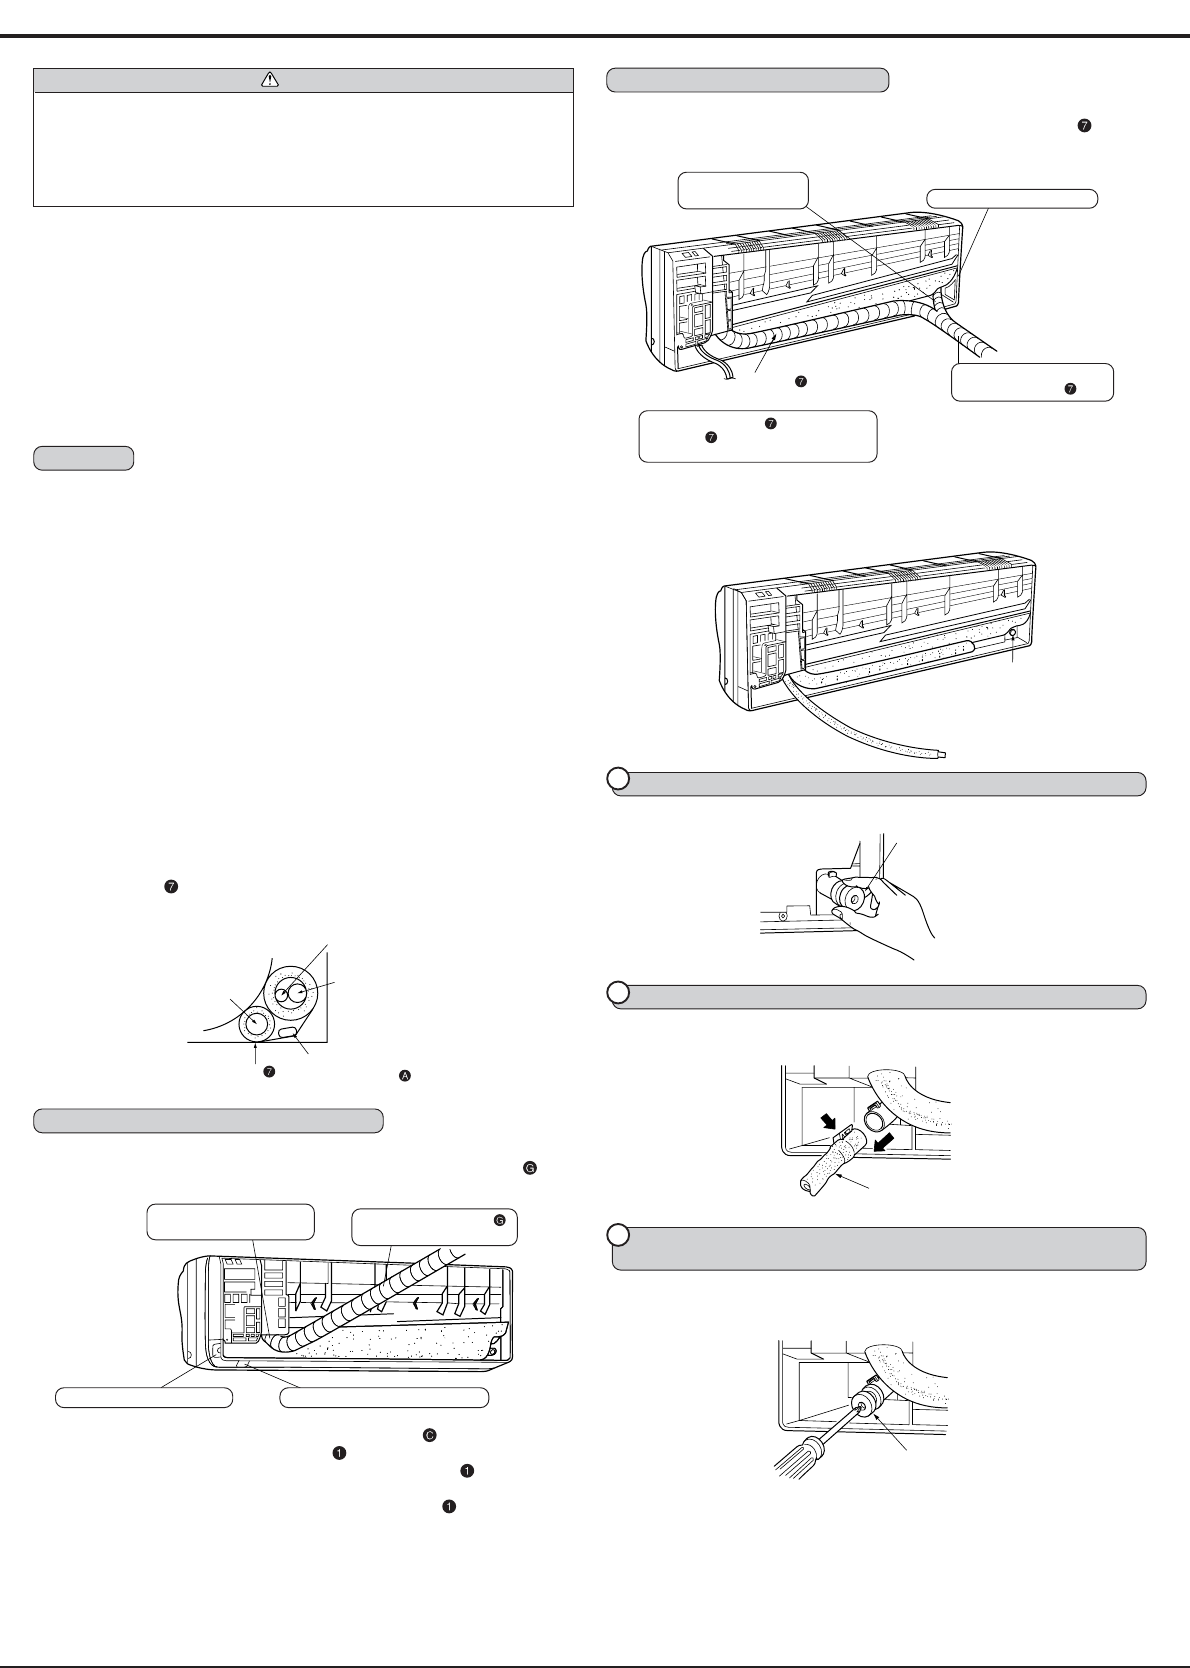
4-6 PIPE FORMING
•
Place the drain hose below the refrigerant piping.
•
Make sure that the drain hose is not heaved or snaked.
•
Do not pull the hose to apply the tape.
•
When the drain hose passes the room, be sure to wrap insulation material (obtain-
able at a store) around it.
•
Wrap the felt tape around the pipe and the drain hose, then put the pipe in the
back space of the indoor unit.
Drain hose
Be careful drain hose is not
heaved.
Cut off in case of right piping. Cut off in case of downward piping.
Drain cap
FOR REAR, RIGHT OR DOWNWARD PIPING
•
Pipe arrangement
Put the refrigerant piping and the drain hose together, then apply piping tape
to
them.
•
Insert the piping and the drain hose into the wall hole sleeve , and hook the upper
part of the indoor unit on the installation plate
.
•
Check if the indoor unit is hooked securely on the installation plate by moving the
unit to left and right.
•
Thrust the lower part of the indoor unit into the installation plate .
FOR LEFT OR LEFT-REAR PIPING
•
Pipe arrangement
Put the refrigerant piping and the drain hose together, then apply felt tape
to them.
REATTACHING DRAIN HOSE
Be sure to reattach the drain hose and the drain cap in case of left or left-rear piping.
Otherwise, it could cause drops of water to drip down from the drain hose.
1
Pull out the drain cap at the rear right of the indoor unit.
Hold the convex section at the end and pull the drain cap.
2
Pull out the drain hose at the rear left of the indoor unit.
Hold the claw marked by the arrow and pull out the drain hose forward.
3
Put the drain cap into the section to which the drain hose is to be
attached at the rear of the indoor unit.
Insert the screwdriver, etc. (not sharp-edged tool) into the hole at the end of the cap and
insert the cap fully into the drain pan.
Cut off in case of left piping.
Felt tape
Firmly apply felt tape from the end.
(Felt tape
overlap width should be 1/3
the tape width.)
Be careful drain
hose is not heaved.
Use a bandage stopper at
the end of felt tape
.
Drain cap
Drain cap
Firmly apply piping tape
from the end.


