


7
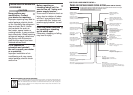
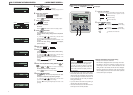
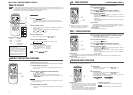
Selection of Weekly timer mode
You can set up to four ON/OFF timers per day.
Note : Set time every month in Weekly timer mode.
1 Press TIMER button.
2 Press ▼ button for four times.
[ ]
[ ]
[ ]
[
]
[ ]
3 Press SET button.
“ ”is displayed in the display area.
4 Press ▲ or ▼ button.
By pressing ▲ or ▼ button, it is possible to choose the item to set.
“
” (for setting the timer)
↕
“ ” (for setting the selected day of the week to
holiday)
↕
“ ” (for checking the timer setting and canceling
individual settings)
5 Press SET button.
The selected mode is fixed.
3
•
5
2•4 1
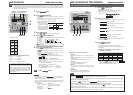
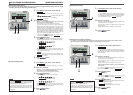
WEEKLY TIMER SETTING
1 In the Weekly timer mode, select “ ”
and press SET button to confirm.
☞
See step 1 to 5 in “Selection of Weekly timer mode” above
“ ” (▼ is flashing)
“
” is displayed in the display area.
2 Press ▲ or ▼ button.
Set the ▼ mark above the day of the week to the day to be set
for timer setting. Press ▲ and ▼ to move to the right and left
respectively, ▲ and ▼ will move flashing.
If you press the ▲ button, the day (“SUN” to “SAT”) indicated with
the flashing “▼” mark will change one day at a time. If you press
the ▲ button when the “▼” mark is indicating “SAT”, multiple “▼”
marks will appear and flash above “MON” to “FRI”. Press the ▲
button again, and multiple “▼” marks will appear and flash above
“SUN” to “SAT” (every day). The same schedule can be applied to
all the days indicated with the “▼” marks by using this function.
Press
RESET button to return to “selecting Weekly
timer mode screen”, and “ ” is displayed.
☞
See the above step 3.
3 Press SET button.
The “▼” mark above the day stops flashing and lights, which
indicates that the setting is fixed.
“ ” is displayed as the left image.
4 Press ▲ or ▼ button.
Up to four schedules can be set for each day. Select the timer
schedule number you want to set. Set either ON timer or OFF
timer for each single operation. (See the left EXAMPLE ).
Press ▼ button to make the ◄ mark next to the number flash and
move downwards.
Press the ▲ button to move the mark upwards.
1◄
2
3
4
Press the
RESET button to return to the display in step 1.
3•5•7•9•11•13
2•4•6•8•10
WEEKLY TIMER MODE
<In case Monday is set>
• If you press button while timer mode
is under setting, timer mode is canceled and the
display will return to the original one.
• If you do not press any button for several minutes
after entering the timer mode, the timer mode
ends and the display returns to the original one.
NOTICE
[EXAMPLE]
Number 1 :
Number 2 :
Number 3 :
Number 4 :
* Four operations can be set
with only ON timer or only OFF
timer.
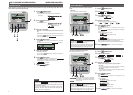
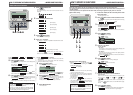
HOW TO PERFORM THE TIMER OPERATION < WIRED REMOTE CONTROL >
1 Press TIMER button.
2 Press ▼ button for three times.
[ ]
[ ]
[ ]
[
]
3 Press SET button.
[EXAMPLE] “ ” flashes,
“
” lights.
4 Press ▲ or ▼ button.
Set the preferred time to start the operation
Set “Hour”•
If you press ▲ or ▼ button for a while, “Hour” display is changed
by one hour, and stops when you stop pressing.
Set “Minute”•
If you press ▲ or ▼ button, the number in the display becomes
larger or smaller by ten minutes.
5 Press SET button.
ON timer has been set.
The left image is displayed in the display area.
<If set to 10:00 AM >
“
” (lights)
“ ” (lights)
If you press the
RESET button, the remote control will
return to the previous screen.
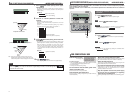
6 Press ▲ or ▼ button.
Press ▼ button and “ ” is displayed
Press ▲ button and “ ” is displayed
Select either of the above two.
Go to step •
7 if temperature is set.
Go to step •
9 if temperature is not set.
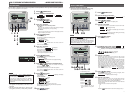
7 Press SET button.
The left image is displayed in the display area.
<If set to 10:00 AM >
“
”(lights)
“27°C” (The current set temperature is displayed flashing)
“ ” (lights)
8 Press or button to set temperature.
If you press or button, the number in the display
becomes larger or smaller by 1°C.
Set temperature at which you want to start the operation.
If you press the RESET button, the remote control will
return to the previous screen.
9 Press SET button.
ON timer is set, and after “ ” is displayed, the display
in step 2 returns.
<If set to 10:00 AM >
“
” (lights)
“ ” (lights)
“ ” (lights)
“
” (lights)
Set temperature is displayed only in case it is set.
The unit starts to operate at setting time with set temperature.
The time display is turned off.
10
Press button.
The timer mode is finished.
10
8
3 2 1
• •
5 4
7 6
•
9
•
•
The unit starts to operate at the set time. It is possible to set temperature at which you want to start the operation.
Only one setting is applicable to each operation.
ON TIMER MODE
•
ON timer and either Sleep timer or OFF timer are
set together, the temperature of ON timer is not
displayed.
• ON timer and either Sleep timer or OFF timer are
set together, OFF timer (or Sleep timer) precedes.
• If you press the button while timer
mode is under setting, timer mode is canceled
and the display will return to the original one.
• If you do not press any button for several
minutes after entering the timer mode, the
timer mode ends and the display returns to the
original one.
NOTICE