


13
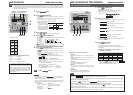
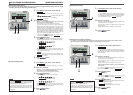
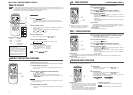
WHEN THE CHECK INDICATOR LIGHT (RED) FLASHES
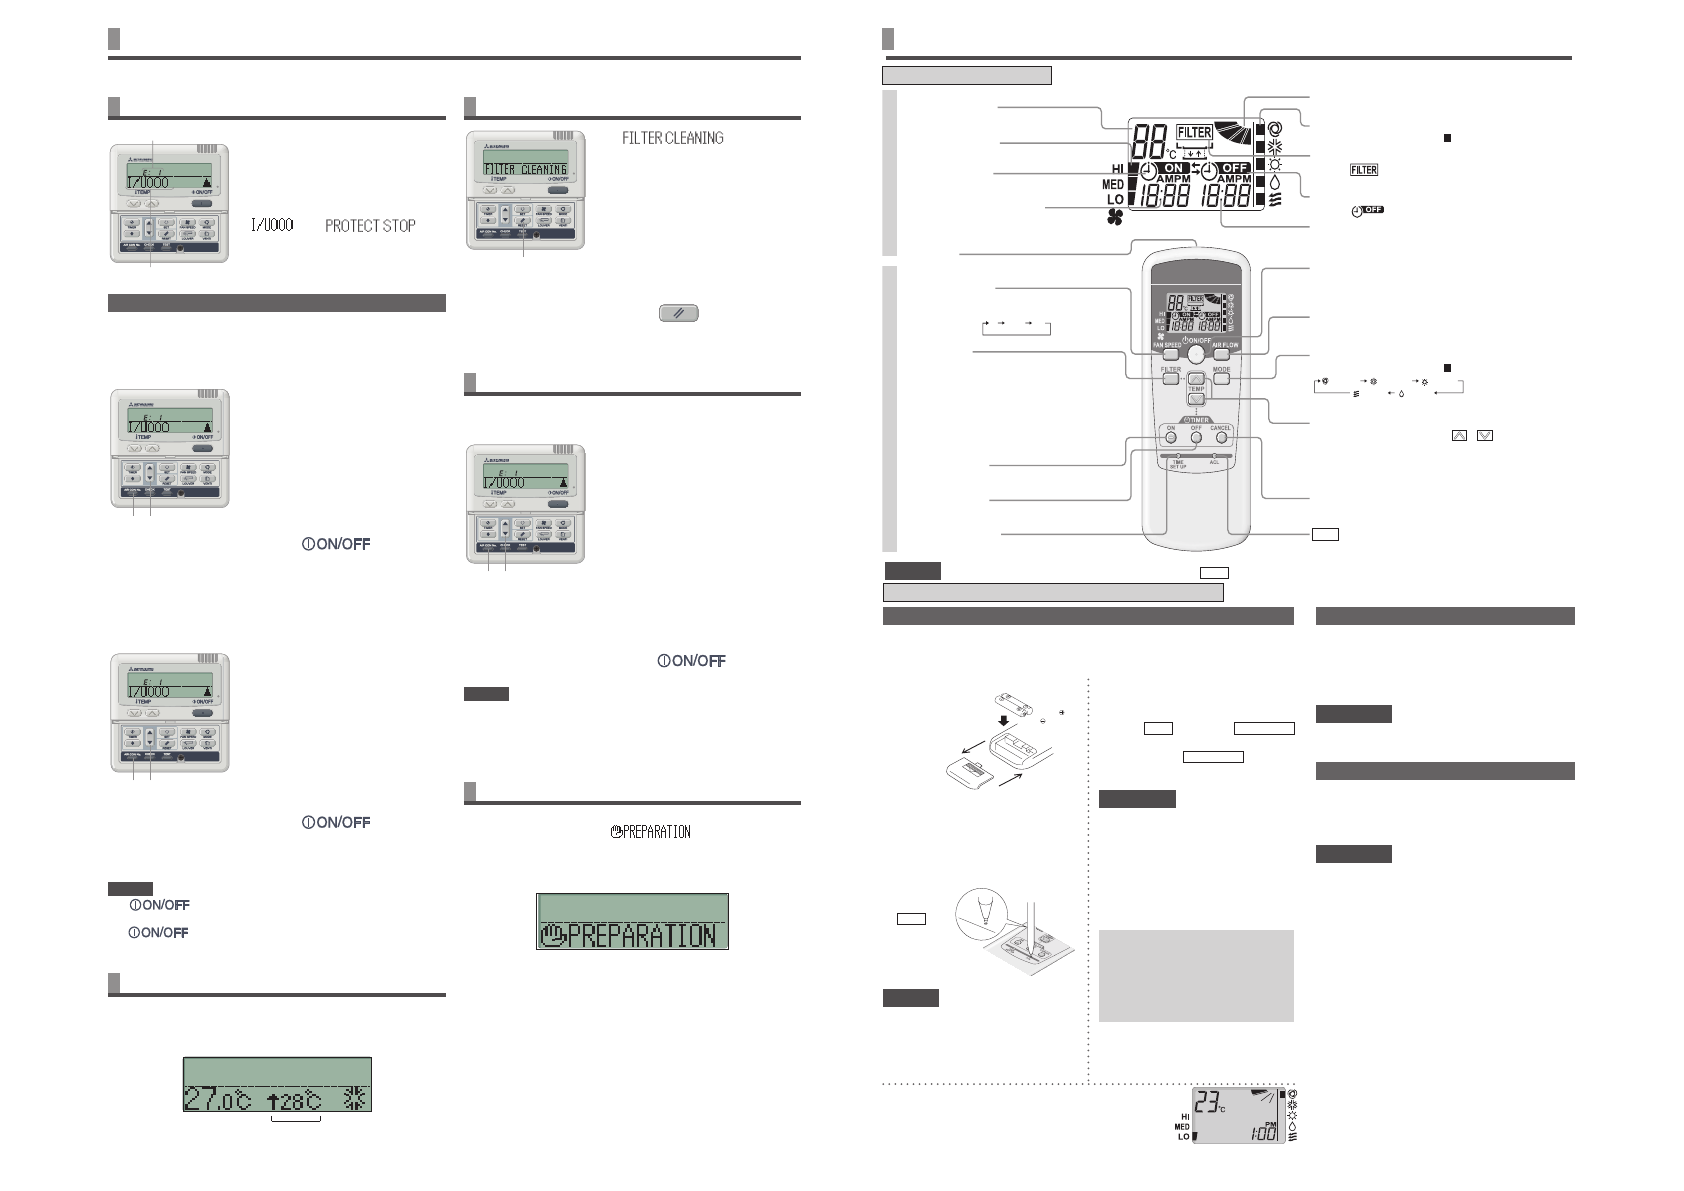
INSPECTION DISPLAY, FILTER SIGN, AIR CONDITIONER NUMBER, STANDBY AND ROOM TEMPERATURE DISPLAY
< WIRED REMOTE CONTROL >
J The air conditioner stops in the event
any trouble occurs.
At the same time, the check indicator
light flashes in red and the error code is
displayed in the ON timer display area and
the following is displayed in the display area.
“ ” ⇔ “ ”
(Air conditioner number)
(lights for 2 seconds by turns)
Error code
Air conditioner No.
1
Press AIR CON No. button.
Enter AIR CON No. display mode.
2 Press ▲ button.
AIR CON No. and error codes are
displayed in order from the lowest.
Press ▼ button to display in the
reverse order.
3 Press button.
Return to the AIR CON of the lowest
number.
1 2
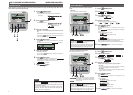
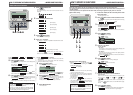
ERROR display when multiple indoor units are connected
J
If errors have occurred for all the connected air conditioning units.
Initially, the error display shows the formation of the air
conditioning unit whose number is the lowest.
Errors of other air conditioning unit can be checked with the
following procedure.
1
Press AIR CON No. button.
AIR CON No. display mode appears.
2 Press ▲ button.
AIR CON No. are displayed in order
from the lowest. And error codes are
displayed on the unit in trouble.
Press ▼ button to display in the
reverse order.
3 Press button.
Return to the AIR CON of the lowest
number.
J If errors have occurred for some of the connected AIR CON
units.
Only the units for which errors have occurred stop operating.
The remote control shows the operating units.
NOTICE
• If button is pressed once while errors are displayed,
the errors display is turned off, and the stop mode returns.
If
button is pressed again, the errors are displayed.
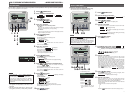
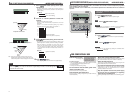
HOW TO DISPLAY AIR CON NO.
By operating AIR CON No. button, the number of the connected AIR CON
unit and error codes of the units which have the record are displayed.
1
Press AIR CON No. button.
AIR CON No. display mode appears
and the AIR CON of the lowest number
is displayed. Other displays all turn off.
2 Press ▲ button.
AIR CON No. are displayed in order
from the lowest. In addition, if any
errors have occurred to the unit in
the past, error codes can be found
here too.
Press ▼ button to display in the
reverse order.
3 Press button.
Return to the original display.
1 2
NOTICE
•The AIR CON No. can be displayed without relation to its modes of
operation, stop, forcible stop due to an error.
•Buttons other than “AIR CON No.” “▲” “▼” “ON/OFF” cannot be
operated.
1 2
STANDBY DISPLAY
During the first operation after breaker power supply input or the
recovery from power failure, “
” can be displayed on
the remote control for max 30 minutes.
The refrigerant oil protection control is activated to protect the
compressor and this isn’t a failure. Please wait till the display turns
off.
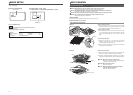
WHEN THE FILTER CLEANING MESSAGE IS DISPLAYED
The “ ” is displayed
when the cumulative operation time
reaches to the predetermined number
of hours in order to notify the time for
cleaning.
JClean the air filter.
☞
See page 16
“FILTER CLEANING” is displayed in the
display area. It is displayed for one second
every five seconds while the unit is running.
It stays lit while the system stopped.
After cleaning
1 Press RESET button.
The cumulative operation hours are
reset and the “FILTER CLEANING”
message turns off.
1
ROOM TEMPERATURE DISPLAY
If room temperature display setting is activated, room temperature is
displayed on the remote control display. Then airflow display turns off,
but airflow adjusting button is operative. Consult your dealer for settings.
The room temperature display
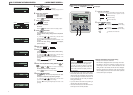
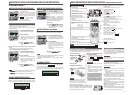
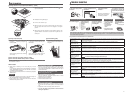
WIRELESS REMOTE CONTROL
•
In order to explain the displays in the liquid crystal display, all of them are shown in the figure below.
AIR FLOW display
Indicates the status of swing louver. ☞See page 15
OPERATION MODE display
Indicates selected operation with .
ON TIMER setting time display
Indicates the ON-TIMER setting time.
Nothing displayed when ON-TIMER is not set.
☞See page 14
FAN SPEED button
Every time this button is pressed, the mode is switched
as below.
HI MED LO
ON-TIMER display
Indicates when ON-TIMER is set. ☞See page 14
ROOM TEMP display
Indicates set temperature.
FILTER display
Indicates for two seconds
when FILTER button is pressed.
OFF-TIMER display
Indicates when OFF-TIMER is set. ☞See page 14
OPERATION MODE select button
Every time this button is pressed, displays switch as below
(AUTO) (COOL) (HEAT)
(FAN) (DRY)
ROOM TEMP/TIME SETTING button
Sets room temperature by pressing or button.
Sets time when setting the time.
ACL switch
Used to reset the microcomputer.
TIME SET UP switch
Sets current time. ☞See page 14
ON TIMER button
Sets ON TIMER operation. ☞See page 14
OFF TIMER button
Sets OFF TIMER operation. ☞See page 14
FAN SPEED display
Indicates the selected airflow volume
FILTER button
AIR FLOW button
Used to swing the louver. ☞See page 15
ON/OFF button
When this is pressed once, the AIR CON starts to
operate and when this is pressed once again, it stops
operating.
TIMER CANCEL button
Used to cancel the TIMER SETTINGS.
Transmitter
Sends signal to the air conditioner.
OFF-TIMER setting time display
Indicates OFF-TIMER setting time. Indicates the
current time when the OFF-TIMER is not set. ☞See page 14
Used to reset (turn off) the filter sign.
Press the button only after completing the filter cleaning.
Operation section Display section
When you press each button of wireless remote
control, directing properly to the receiving part of
the air conditioner, the signal is transmitted. If the
air conditioner receives the signal correctly, the light
of operation indicator will flash.
ATTENTION
The operation of remote control must be performed
slowly and steadily.
HOW TO OPERATE
ABOUT REMOTE CONTROL HOLDER
The remote control can be mounted on the wall or
pillar with the remote control holder.
Slide from the upper part of the holder to place or
take out the remote control.
ATTENTION
J
Do not place the remote control to the following
places.
•
The place exposed to direct sunlight or other
strong lighting.
•
The place exposed to high temperature, for
EXAMPLE, on the electric carpet or near a stove.
JIf the signal receiving part of the air conditioner is
exposed to direct sunlight or other strong lighting,
it may not receive the signal. In this case, shut
out the sunlight or turn down the lighting.
J
Do not place anything between the remote control
and the unit.
J
Do not operate the remote control for other electric
appliances which can be operated with a remote control.
JHandle it with utmost attention.
JRemove the batteries when the remote control is
not used for a long time.
J
Even if the remote control is not found or damaged,
you can operate the air conditioner
with itself. See
“How to use the backup button” on page 15.
NOTICE
If the display of remote control has troubles, press
ACL
switch.
WIRELESS REMOTE CONTROL HANDLING PROCEDURE
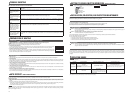
REPLACING THE BATTERIES
1 Pull out the cover.
2 Replace the old
batteries with
new ones.
(R03×2)
3 Close cover.
4 Adjust the current time.
☞
See page 14
JWhen any error occurs on the
display,
Press
ACL
switch with
a ballpoint
etc.
NOTICE
If the remote control is set as “Radio
Interference Prevention Setting”, it
returns to default when the batteries
are removed. It is necessary to
perform the next procedures again.
If the following occurs, the batteries are exhausted. Replace them with new ones.
•When the signal is transmitted, the AIR CON does not display reception.
•The display fades away or does not show anything.
J How to set Radio Interference
Prevention Setting
It is possible to be sent in two ways.
Press
ACL
switch with
AIR FLOW
button kept pressing or insert the
batteries with
AIR FLOW
button
kept pressing.
ATTENTION
•Do not use old and new batteries
mixed.
• Remove the batteries when the
remote control is not used for a long
time.
•
The recommendable effective period
of a battery is about 6 to 12 months.
(It depends on the usage.)
When the batteries are inserted, each operation mode
is set as the right figure. Adjust the current time referring
to page 14. (The figure is for operation, and only the
current time is displayed for stopping)
Pay attention
to the and
marks
•The recommendable effective
period is printed on the battery.
This may be shorter due to
manufacturing time of the unit.
•However the battery may be still
working in order after expiry date.
NAMES AND FUNCTIONS OF REMOTE CONTROL BUTTONS
<WIRELESS REMOTE CONTROL>