


Service and Maintenance (cont'd)
L.P.GasControl Valve & Burner Burner Cleaning
Assembly Replacement
Information In the event your burner needs cleaning, usethe following
AWARNING instructions:
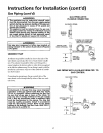
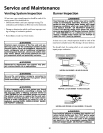
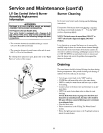
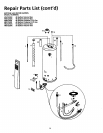
PROPANE (L.P.) GAS CONTROL VALVE AN BURNER
ASSEMBLY REPLACEMENT INFORMATION. If inspection of the burner shows that cleaning is required,
For Propane (L.R) Gas Models Only: turn the gas control knob clockwise ((_",) to the "OFF"
Your water heater is equipped with a Propane (L.R) position, depressing slightly.
gas control valve and a main burner assembly with
left hand threads for the following fittings and their NOTE: The knob cannot be turned from "PILOT" to
connections. "OFF" unless knob is depressed slighdy. DO NOT
FORCE.
• The connection between the manifold and the gas control
valve (A to B) are left hand threads. Loose deposits on or around the burner can be removed by
carefully using the hose of a vacuum cleaner inserted through
• The connection between the main burner orifice and the mani- the access door of the water heater. If the burner needs to be
fold (C to D) are left hand threads, removed for additional cleaning, call Maytag Customer Service
at 1-800-788 8899 for an authorized servicer to remove and
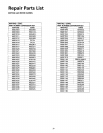
For ordering these replacement parts, please refer to the "Repair clean the burner and correct the problem that required the
PartsList" section of this manual, burner to be cleaned.
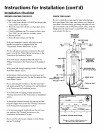
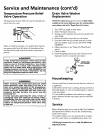
Draining
The water heater should be drained if being shut down during
freezing temperatures. Also periodic draining and cleaning of
sediment from the tank may be necessary.
A _ • Turn the gas control knob to the "OFF" position.
• CLOSE the cold water inlet valve to the water heater.
• OPEN a nearby hot water faucet and leave open to allow
C for draining.
• Connect a hose to the drain valve and terminate to an ade-
quate drain.
• OPEN the water heater drain valve to allow for tank
draining.
NOTE: If the water heater is going to be shut down and
drained for an extended period, the drain valve should be
left open with hose connected allowing water to terminate
to an adequate drain.
• Close the drain valve.
• Follow instructions in the "Filling The Water Heater"
section.
• Follow the lighting instructions in the "Lighting" section to
restart the water heater.
23