


READ AND UNDERSTAND THESE INSTRUCTIONS BEFORE INSTALLING FIXTURE
This fixture is intended for installation in accordance with the National Electrical Code and local regulations.
To assure full compliance with local codes and regulations, check with your local electrical inspector before
installation. To prevent electrical shock, turn off electricity at fuse box before proceeding.
Retain these instructions for maintenance reference.
LIGHTOLIER a GENLYTE company.
631 Airport Road, Fall River, MA 02720
INSTRUCTION SHEET NO.
IS:LW6U
A0397 Page 1 of 1
INSTALLATION PROCEDURE FOR: LW6CLP; LW6GDP; LW6BKP; LW6CLW; LW6GDW;
LW6BKW; LW7CLP; LW7GDP;LW7BKP; LW7CLW; LW7GDW; LW7BKW — LENS WALL
WASHER CONE TRIM AND LW7U — LENS WALL WASHER LAMP/YOKE ASSEMBLY
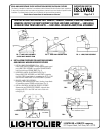
FIG.1 – LAMP/YOKE ASSEMBLY
& LENS WALL WASHER TRIM
FIG. 2 – LENS WALL WASHER TRIM FIG. 3 – LAMP/YOKE ASSEMBLY
6” I.D.
7 1/4” I.D.
FIG.4
LAMP
RING
TAB
SLOT
WALL
FRAME
SPRING
FRAME
RING
LAMP/YOKE
ASSEMBLY
FIG.6
LAMP
RING
YOKE
SLOT
LENS WALL WASHER TRIM
TORSIONTITE SPRING
WALL
FIG.5
PULL ASSEMBLY DOWN
A. INSTALLATION PROCEDURE FOR LAMP/YOKE ASSEMBLY
AND LENS WALL WASHER IN PROSPEC FIXTURES
1. INSTALL LAMP/YOKE ASSEMBLY (Figs. 1 & 3)
Insert LAMP/YOKE ASSEMBLY through aperture opening and
push LAMP/YOKE ASSEMBLY up against FRAME SPRINGS
until flush with top of FRAME RING. (Fig. 4)
2. HORIZONTAL ANGLE ADJUSTMENT/LOCK (Fig. 4)
Rotate LAMP/YOKE ASSEMBLY so LAMP RING is opposite
the WALL (358°). Insert blade of screwdrive into SLOT of TAB
and twist into FRAME RING to lock ASSEMBLY in position.
3. REMOVE LAMP/YOKE ASSEMBLY
By pushing TAB outward reverse Step 2 Locking. Insert blade
of screwdriver against SPRING and pull down. (Fig. 5)
4. INSTALL LENS WALL WASHER IN PROSPEC FIXTURES
Squeeze the two TORSIONTITE SPRINGS and push them
through the SLOTS in the YOKE until trim is flush with
ceiling. (Fig. 6)