


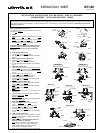
INSTALLATION INSTRUCTIONS FOR MR-16/ES16 TRIM IN PRE-WIRED
INCANDESCENT 12V OR 120V MOUNTING FRAME
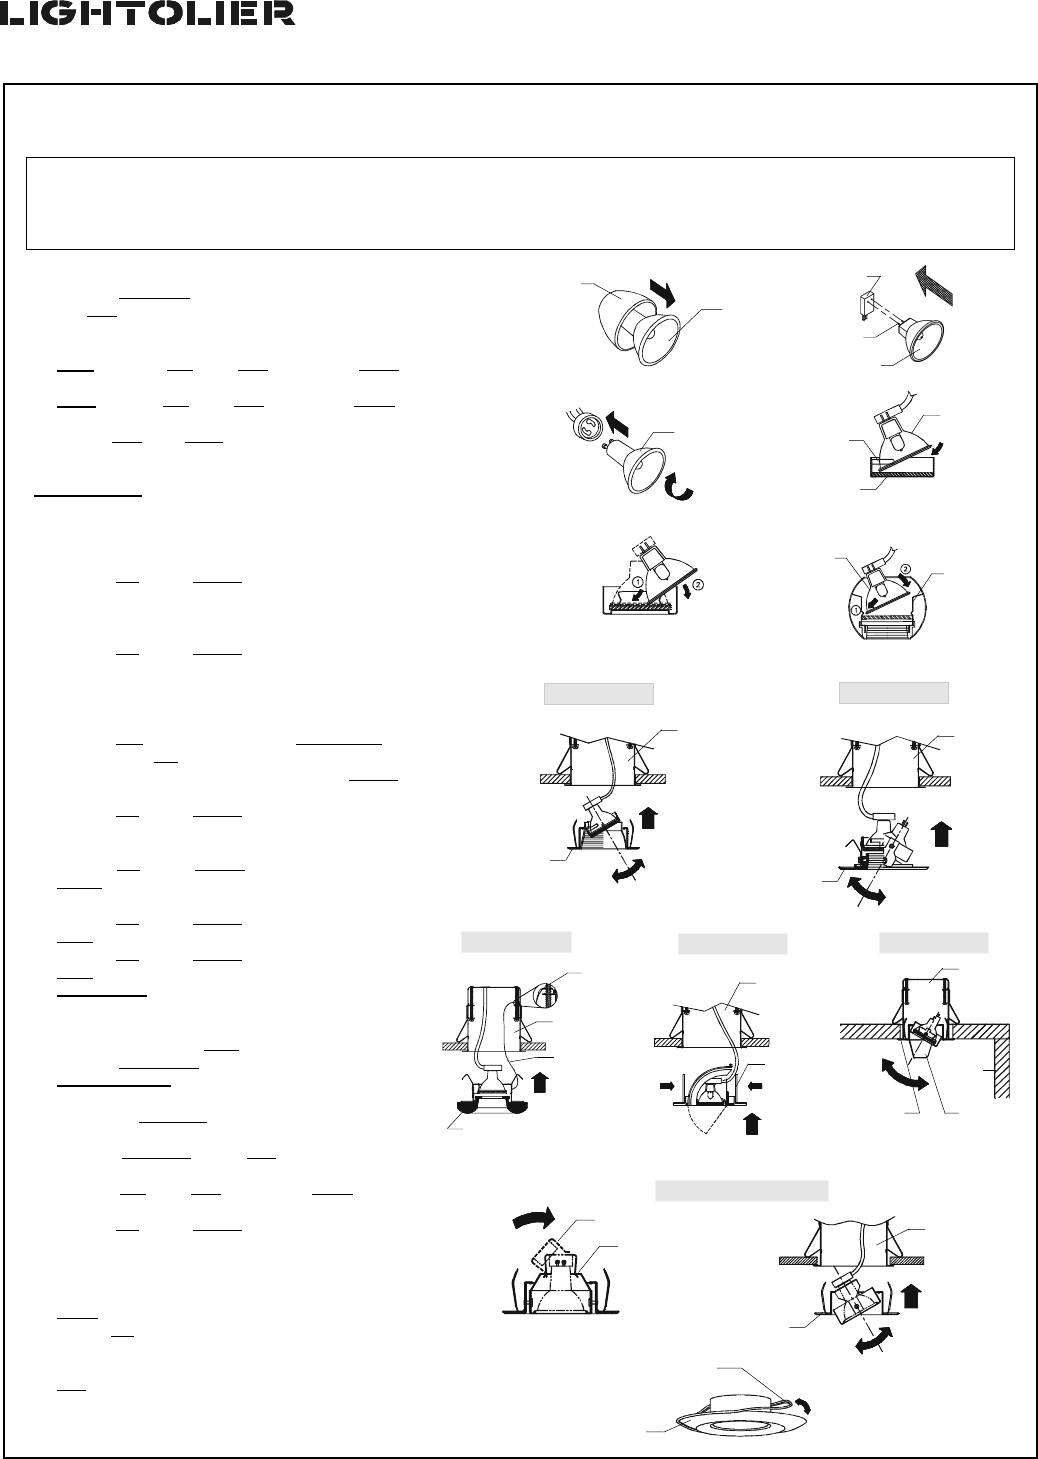
Note: For the 50W IC frame-in kit
Put down the
lamp shield (included with the IC frame-in kit)
onto the
lamp. (Fig.1)
A. LAMP:
1.
MR16: Insert the pins of the lamp base into the socket.
(Fig.2)
2.
ES16: Insert the pins of the lamp base into the socket.
and rotate the lamp clockwise. (Fig.2A)
3. Turn the
lamp under spring (if applicable). (Fig.3,4,5)
CAUTION: Lamp manufacturer recommends that the
protective glass be in place before energizing the
lamp. Insure that the lamp is fully cooled before
relamping.
B. TRIM: Standard (Model 305)
1. Push the
trim into the housing. (Fig.6)
2. Aim the lamp beam at the desired angle if necessary.
(Fig.12)
C. TRIM: Adjustable pinhole (Model 308)
1. Push the
trim into the housing. (Fig.7)
2. Gently rotate the trim to fit it to the ceiling.
3. Aim the lamp beam at the desired angle if necessary.
(Fig.11)
D. TRIM: Glass (Model 322)
1. Take the
loop found at the end of the security cable
attached to the
trim and secure by passing the loop
over either one of the screws found within the
housing.
(Fig. 8)
2. Push the
trim into the housing. (Fig.8)
3. Gently rotate the trim to fit it to the ceiling.
E. TRIM: Adjustable elbow (Model 478)
1. Push the
trim into the housing ,compressing the (2)
springs as shown. (Fig.9)
F. TRIM: Wall Washer (Model 315)
1. Push the
trim into the housing and position the lamp
shield as shown. (Fig.10)
2. Push the
trim into the housing and position the lamp
shield as shown. (Fig.10)
Wall Washer:
1. Position the fixture a minimum of 12 away from the
wall. (Fig.10)
2. Adjust the angle of the
beam towards the baffle by
using the
frosted glass. (Fig.9)
Accent Lighting:
1. Adjust the angle of the beam to the required position
by using the
clear glass.
G. ES16 TRIM: (Models 325, 330)
1. Install the
spring tabs into the slots in the base.
(Fig.11)
2. Insert the
pins of the lamp base into the socket.
and rotate the lamp clockwise. (Fig.2, 2A)
3. Push the
trim into the housing. (Fig.12)
4. Aim the lamp beam at the desired angle if necessary.
(Fig.12)
H. TRIM: Contour (Model 316)
1. For added protection in shower application , install the
gasket for water-tightness (included). Gently fasten
onto the
trim. (Fig.13)
I. MAINTENANCE of ALZAK® REFLECTORS OR
ALZAK® CONES: (if applicable)
Note: Handle the reflector or the Alzak® cone with
clean gloves or plastic film to avoid fingerprints.
1. Clean Alzak® surfaces with a clean soft cloth
dampened in a mild detergent solution.
2. Rinse then wipe dry with a dry cloth or a paper towel.
Avoid abrasives.
ATTENTION: Read and understand these instructions before installing fixture. This fixture is intended for installation in accordance with the National
Electrical Code or Canadian Electrical Code (if applicable) and local regulations.To ensure full compliance with local codes and regulations, check with your
local electrical inspector before installation. To prevent electrical shock, turn off electricity at fuse box before proceeding. Retain these instructions for
maintenance reference.
SOCKET
LAMP
FIG.2A FIG.3
FIG.4
LAMP
SPRING
FIG.5
LAMP
SPRING
PINS
FIG.2
FIG.6
FIG.7
FIG.8 FIG.10
FIG.12
PROTECTIVE
GLASS
TRIM
TRIM
Model 305
HOUSING
Model 322
Model 315
TRIM
HOUSING
HOUSING
Model 308
SHIELD
WALL
Model 325,330
HOUSING
TRIM
FIG.11
SPRING
TABS
SLOTS
TRIM
HOUSING
FIG.13
LOOP
TRIM
GASKET
LAMP
SECURITY
CABLE
LAMP
LAMP
SHIELD
FIG.1
INSTRUCTION SHEET
09-01/Rev-03
IS T:300
Model 478
HOUSING
SPRINGS
FIG.9