


INSTRUCTION SHEET NO.
INSTALLATION OF PRE-WIRED CALCULITE FRAME-IN-KllS
INSTRUCTION SHE~ FOR ITEMS
G41O, E61O, F71O
IS:E610
R0291
Page 1 of
2
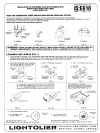
READ AND UNDERSTAND THESE INSTRUCTIONS BEFORE INSTALLING FIXTURE.
This fixture is intended for installation in accordance with the National Electrical Code and local regulations.
To assure full compliance with local codes and regulations, check with your local electrical inspector before installation. To prevent
electrical shock, turn off electricity at fuse box before proceeding.
Retain these Instructions for maintenance referencw
R
..
‘a-.”-:
RETAINING
SPRING
SECTION
,l#G T ti:EmoR
HOUSING
A. FRAME-IN
B. CLOSE.IN C. SNAP-IN
b. PUSH-IN
FIG. 1 FIG. 2 FIG. 3
FIG. 4
WARNING+RISK OF FIRE)DO NOTINSTALLinSUlatiOn WITHIN3 INCHESOF FIXTURESIDESOR
WIRING COMPARTMENT, NOR ABOVE FIXTURE IN SUCH A MANNER SO AS TO ENTRAP HEAT.
A. FRAME-IN AND WIRE-IN (FIG. 1)
1,Install FRAME-IN SECTION using ADJUSTABLE MOUNTING BRACKET (see below). Wire to supply leads. White fixture lead
to neutral supply lead. Black fixture lead to hot (120V.) supply lead. Bare fixture wire to supply ground. Use wirenuts (local
hardware items). Place all electrical connections in the J-BOX. Attach J-BOX COVER onto J-BOX.
s
2. Adjust MOUNTING FRAME,
o
- MOUNTING
@
– MOUNTING
a. For Flangeless Trim FRAME b. For Overlapping Trim
FRAME
Plaster Ceiling.
[-3
FIG. 9 :? ;
Plaster or Dry Ceiling.
FIG. 8
.J
31,” Max
T
Set MOUNTING FRAME so the
Set MOUNTING FRAME so the bottom edge
bottom edge is flush with finished ceiling, as shown.
is flush with, no higher than %“ above finished ceiling, as shown.
1-1<31-170 1-11= I?” ;V:::::L,N::EV::, E:A:Y:;