


READ AND UNDERSTAND THESE INSTRUCTIONS BEFORE INSTALLING FIXTURE
his fiXtIIrO
k intendedfor installationin acmrdsnca with the NationalEbafrisalCode and IOCA
INSTRUCTION SHEET NO.
!gulations.To assure full mmpliansa with Iosal rndes and regulations, shesk with your local elestrissl
lspestorbeforeinstallation. To prevent elestrisal shosfr,tum ofi eleatdsityatfuse boxbefore prmeeding.
IS:5453
Retain Iheae instructions for maintenance reference.
1291
INSTRUCTIONS FOR INSTALLATION OF 5453
CAUTION
DO NOT MOUNT TOP EDGE OF FIXTiJRE CLOSER THAN 6 INCHES TO CEILING.
FOR OCTAGONALOUTLETBOXES
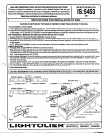
. Position BACKPWTE ASSEMBLY centered over OUTLET BOX with bottom edge of BACKPLATE in fine with bottom of OUTLET SOX. (Fig. 1).
Using allMOUNTING HOLESin BACKPL4TEASSEMBLY, semretowallusingwood stiews,toggleklts, oralternatefasteners (notprovided)depending
on WSIImaterial. NOTE BACKPLATE ASSEMBLY should be leveled horizontally and outlet box completely covered before final tightening to wall.
‘OR HORIZONTALLY MOUNTED RECTANGULAR GEMORSWITCHOUTLETBOXES
. Remove COVER PIATE horn BACKPLATE ASSEMBLY aa shown in Fig 3.
:,Position BACKPIATE ASSEMBLY centered over OUTLET BOX with bottom edge of BACKPMTE in line with botiom of OUTLET BOX.(Fig. 2).
. Uaingall MOUNTING HOLES inBACKPIATEASSEMBLY, aecuretowall usingwoodaixews, togglebolta,oralternatefasteners (notprovided) depending
on wall material.
NOTE BACKPUTE ASSEMBLY should be leveled horizontally and outlet box completely covered before final tightening to wall.
VIRING PROCEDURE
. Pull supply wires through WIREWAY OPENING and make conneofions
Blaak fixture lead (or fixture lead without tramr mark) to black supply Ieact white fixture lead (or fixture lead with tracer mark) to white supply wire.
Uninaulstad wire isa GROUND WIRE and must bernnneciad to agroundkrgtarminal orgroundwire inthe OUTLET SOX, Use wire nuts(local hardware
item), Push the”splisea intothe OUTLET BOX.
!,Raiae,FIXTURE ASSEMBLY and alignMOUNTING STUD HOLES and SOCKET HOLES withSOCKETS and MOUNT STUDS on BACKPMTE. Gently
slide FIXTURE ASSEMBLY backwards untilthe MOUNTINGSTUDSprotrudethroughtheholesin FIXTUREASSEMBLY,Secureinplacewith
BAITERY NUTS provided.
CAUTION: MAKE CERTAIN THAT NO WIRES ARE PINCHED BETWEEN THE BACKPlATE ASSEMBLY AND THE FIXTURE ASSEMBLY.
1.From top of fixture, position DIFFUSER DISHES over shsular openings (ss shown in Fig.4) and gently lower untildishes sit securely in each opening.
i. Cover INSPECTION WINOOW with INSPECTION COVER PLATE and secure with screws (Fig. 4).
i. Install remmmended lamps.
CAUTION MAXIMUM WAllAGE AS MARKED ON FIXTURE MUST NOT BE EXCEEDED. FOR HORIZONTAL MOUNTING ONLY.
Front View
WIREVAAYOPENING
VI’4
------ ~TE
}0
o Oo
:000.:
MOUNTINGHOLE~
WTAGONAL BOx~ L eACKPIATEASSEMaLY
ouTLETsox COVERPLATE--J
\-
=ig. 1
1
- OiRWSER
WIREWAYOPENING>
:0
000;
~:o o
GEMaOX~
~ BACKPlATEASSEMaLY
1A
w
=
WIREW,AY OPENING
Fig.3
::= V-BA”ERYNUTS