


READ AND UNDERSTAND THESE INSTRUCTIONS
BEFORE INSTALLING LUMINAIRE.
This luminaire is intended for installation in accordance with the National Electrical Code and local regulations.
To assure full compliance with local codes and regulations, check with your local electrical inspector before
installation. To prevent electric shock, turn off electricity at main power supply before proceeding.
Retain these instructions for maintenance reference.
INSTALLATION PROCEDURE FOR: LYTECASTER® 2000LV, 2000LVE1, & 2000LVE2 LOW VOLTAGE
FRAME-IN KITS
CAUTION: USE ONLY WITH REFLECTOR TRIMS PROVIDED BY LIGHTOLIER. USE OF OTHER MANUFACTURER’S TRIMS
MAY VOID THE UNDERWRITERS LABORATORIES LISTING AND COULD CONSTITUTE A FIRE HAZARD.
INSTRUCTION SHEET NO.
IS:2000LV-
A
S0607
Page 1 of 2
A COMPANY
631 Airport Road, Fall River, MA 02720
CAUTION: BEFORE INSTALLING FRAME-IN KIT AND REFLECTOR TRIM, READ ALL MARKINGS ON FRAME-IN KIT AND
REFLECTOR TO DETERMINE LAMP WATTAGE AND TYPE APPLICABLE FOR YOUR INSTALLATION.
WARNING— (RISK OF FIRE) DO NOT INSTALL INSULATION WITHIN 3 INCHES OF FIXTURE SIDES OR WIRING
COMPARTMENT
,
NOR ABOVE FIXTURE IN SUCH A MANNER TO ENTRAP HEAT.
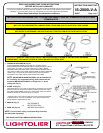
1. FRAME- IN AND WIRE-IN (Fig. A)
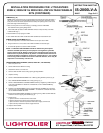
Fasten MOUNTING FRAME to wood joist. Line up bottom edge of
ADJUSTABLE MOUNTING BAR with bottom of wood joist (Fig. E). Wire to
supply leads. (For Cable, use built-in Cable Clamp in J-Box). WHITE
FIXTURE LEAD to NEUTRAL SUPPLY LEAD. BLACK FIXTURE LEAD to
HOT SUPPLY LEAD (120V). BARE FIXTURE WIRE to SUPPLY GROUND
(2000LV only). Use wirenuts (local hardware item). Place all electrical
connections in the J-BOX. Attach J-BOX COVER onto J-BOX.
NOTE: ADJUSTABLE MOUNTING BARS can be extended for
24” mounting. For suspended ceiling, make certain that the
bottom of MOUNTING FRAME is no higher than 1” above
ceiling line (Fig. F)
2. CLOSE- IN (Fig. B)
Install plasterboard, or any other dry type ceiling, as required. Hole in board
must be cut either on the ground or after the board is nailed to the ceiling,
using MOUNTING FRAME opening as a cutting guide. (Make sure ROTO-
CLIPS are rotated out of hole area to be cut.) (Fig. G)
* Lightolier offers a hole cutter (HC-356) that can be purchased separately
to assist with quick, clean trim installations. In this case, follow the hole
cutting directions supplied with HC-356.
3. SNAP-IN (Fig. C).
→
4. PUSH- UP (Fig. D).
NOTE:
For wet plaster ceiling, use Plaster Ring Accessory
No.1959 (order separately).
SEE SEPARATE
REFLECTOR TRIM
INSTRUCTION SHEETS
SEE BACK PAGE FOR LAMPING INSTRUCTIONS.