


READ AND UNDERSTAND THESE INSTRUCTIONS BEFORE INSTALLING FIXTURE
This fixture is intended for installation in accordance with the National Electrical Code and local regulations. To
assure full compliance with local codes and regulations, check with your local electrical inspector before
installation. To prevent electric shock, turn off electricity at fuse box before proceeding.
Retain these instructions for maintenance reference.
INSTALLATION INSTRUCTIONS FOR 4” MATRIX RECESSED MR-16
DOWNLIGHT
,
ADJUSTABLE ACCENT and LENSED WALLWASH TRIMS.
INSTRUCTION SHEET NO.
IS:C4
X
4MR
B0707
Page 1 of 2
A GENLYTE COMPANY
631 Airport Road, Fall River, MA 02720
CAUTION: (RISK OF FIRE) DO NOT INSTALL INSULATION ABOVE NOR WITHIN 3 INCHES (76mm) OF ANY
PART OF THE LUMINAIRE (LIGHTING FIXTURE)
CAUTION: USE ONLY ROUGH-IN SECTIONS PROVIDED BY LIGHTOLIER. USE OF OTHER MANUFACTURERS’ ROUGH-IN KITS
WILL VOID THE UNDERWRITERS LABRATORIES LISTING AND COULD CONSTITUTE A FIRE HAZARD.
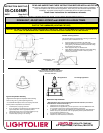
SUB-
A
SSEMBL
Y
SUB-
A
SSEMBL
Y
LAMP
OPENING
LOWER
REFLECTOR
Downlight Trim:
This trim is provided with a downlight sub-assembly, lampholder assembly,
and a lower reflector unit.
1. Separate LOWER REFLECTOR from SUB-ASSEMBLY. Set LOWER
REFLECTOR aside.
2. Feed SOCKET through lamp opening as shown above. Install SUB-
ASSEMBLY into F.I.K. (in ceiling) by pushing through ceiling opening
until flush with ceiling.
3. ** To install MR16 Incandescent lamp, see LAMPING
INSTRUCTIONS FOR MR16 INCANDESCENT instructions on page 2.
** To install HID MR16 please refer to the lamping
instructions that ship with the lampholder in the HID frame.
4. Install LOWER REFLECTOR into SUB-ASSEMBLY until flange is flush
with ceiling.
FINISHED INSTALLATION
CEILING
CEILING
SPRING
CLIPS
ADJUSTMENT
MECHANISM
SOCKET
Adjustable Accent Trim:
This trim is provided with a lampholder assembly, lamp
adjustment mechanism/sub-assembly and a lower reflector unit.
1. Separate LOWER REFLECTOR from SUB-ASSEMBLY. Set
LOWER REFLECTOR aside.
2. Feed SOCKET through lamp opening as shown. Install
SUB-ASSEMBLY into F.I.K. (in ceiling) by pushing through
ceiling opening until flush with ceiling.
3. ** To install MR16 Incandescent lamp, see LAMPING
INSTRUCTIONS FOR MR16 INCANDESCENT instructions
on page 2.
** To install HID MR16 please refer to the lamping
instructions that ship with the lampholder in the HID frame.
4. Lamp tilt angle is adjusted via screw marked “TILT”.
5. To adjust rotational position of lamp, loosen screw marked
“ROTATION”, and manually rotate lamp assembly until
desired position is reached. Tighten screw to lock.
6. Install LOWER REFLECTOR into SUB-ASSEMBLY until
flange is flush with ceiling.
LOWER
REFLECTOR