


1
NOTE: DIAGRAMS & ILLUSTRATIONS ARE NOT TO SCALE.
INSTALLATION INSTRUCTIONS FOR BRICKADED PANEL LINER KITS
FOR USE WITH MLBV AND SLBV SERIES FIREPLACES
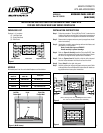
PACKAGING LIST
Package 1 of 1 contains:
(1) - Left Side Panel
(1) - Right Side Panel
(1) - Rear Panel
Brickaded PaNeL LiNer kit
(MLBV/SLBV)
506019-68
Rev. NC 12/2010
INSTALLATION INSTRUCTIONS
Step 1. Follow the procedure “Turning Off Gas To Unit,” located on the
Lighting Instructions pullout label in the control compartment
of the unit and also in the appliance Installation Instructions.
Step 2. Remove the front glass enclosure panel (see appliance Instal-
lation Instructions).
Step 3. If applicable, carefully remove the log set from the firebox, and
place them in a safe location.
Note: Ceramic fiber logs are FRAGILE!
Handle carefully to prevent breakage.
Step 4. Refer to Figure 3. Carefully bend the Tab to the RIGHT; then
place the rear panel against the rear wall of the firebox. Return
the Tab to its original vertical position after installation.
Step 5. Refer to Figures 3 and 4. Carefully slide the left side panel
into the firebox between the firebox wall and the lintel.
Step 6. Repeat Step 5 for the right side panel.
Step 7. Carefully replace the log set and glass enclosure panel. Refer
to the appliance Care and Operation Instructions for details on
log placement enclosure panel installation.
HEARTH PRODUCTS
KITS AND ACCESSORIES
Ceramic Brickaded Panel Liner Kits
Fireplace
Model No.
Panel Liner Kit
Model No.
Description
MLBV-35 MBLPKB-35B Buff Rustic, 35"
MLBV-40 MBLPKB-40B Buff Rustic, 40"
SLBV-35 BLPKB-35TB Buff Traditional, 35"
SLBV-40 BLPKB-40TB Buff Traditional, 40"
MODELS
Brickaded panel liner kits and related fireplaces are listed below.
Figure 2 (MLBV shown)
Left Side
Firebox Wall
Right Side
Firebox Wall
Lintel
~
~
~
~
Tab
Left Side Panel Right Side PanelRear Panel
Figure 1
Lintel
Tab
(Before inserting Rear Panel, carefully bend Tab to RIGHT;
then, return to vertical position after installation.)
~
~
Figure 3
Figure 4
Left Side
Panel
Right Side
Panel
Rear
Panel