1
INTRODUCTION:
The Digital Atomic Wall Clock features radio-controlled time, date, forecast icons,
indoor and outdoor temperature on an easy to read display. Receives signal from
the Atomic Clock in Colorado, for accurate time!
THIS STATION LEARNS!
Please allow 3-4 weeks for barometer calibration to generate an accurate
forecast.
DIGITAL ATOMIC WALL CLOCK:
SETUP INSTRUCTIONS STEP BY STEP:
Step 1:
Remove battery cover from Digital Wall Clock, slide
tab down and pull out to remove the cover.
Insert 2 NEW AA batteries (not included) into the
back of the Digital Wall Clock. Observe the correct
polarity (see marking inside the battery
compartment). Do NOT mix old and new batteries.
The Digital Wall Clock will show, time (12:00) date
(1/1) and indoor temperature.
Step 2:
Install batteries into the outdoor transmitter.
Slide the battery cover down and lift off the front of the transmitter
Insert 2 NEW AA batteries (not included) into the transmitter.
Observe the correct polarity.
Keep the Digital Wall Clock and the transmitter close to each
other (within 10 feet) for 15 minutes.
Within 3 minutes the outdoor temperature should be displayed.
Note: Use Alkaline batteries (or Lithium for temperatures below - 20°F/-28.8°C).
Trouble shooting:
After 3 minutes of waiting, if the Outdoor temperature does not show up in the
designated area on the Digital Wall Clock, remove batteries from both units and
start the setup process again.
If the outdoor temperature does not show up after a second attempt, please slide
open the battery cover of the outdoor transmitter to reveal the TX button. Push
down on the TX button for 3 seconds to send a wireless signal to the Digital Wall
Clock.
Hold the + button on the Digital Wall Clock to search for the transmitter.
For optimal reception performance, of the 433 MHz signal, the outdoor transmitter
should be placed within 200 feet (60 meters) from the Indoor LCD display.
WWVB RADIO CONTROLLED TIME
The NIST radio station, WWVB, is located in Ft. Collins, Colorado and transmits the
exact time signal continuously throughout the United States at 60 kHz. The signal
can be received up to 2,000 miles away through the internal antenna in the Atomic
Digital Wall Clock. However, due to the nature of the Earth’s Ionosphere, reception
is very limited during daylight hours. The Atomic Digital Wall Clock will search for a
signal every night when reception is best. The WWVB radio station derives its signal
from the NIST Atomic Clock in Boulder, Colorado.
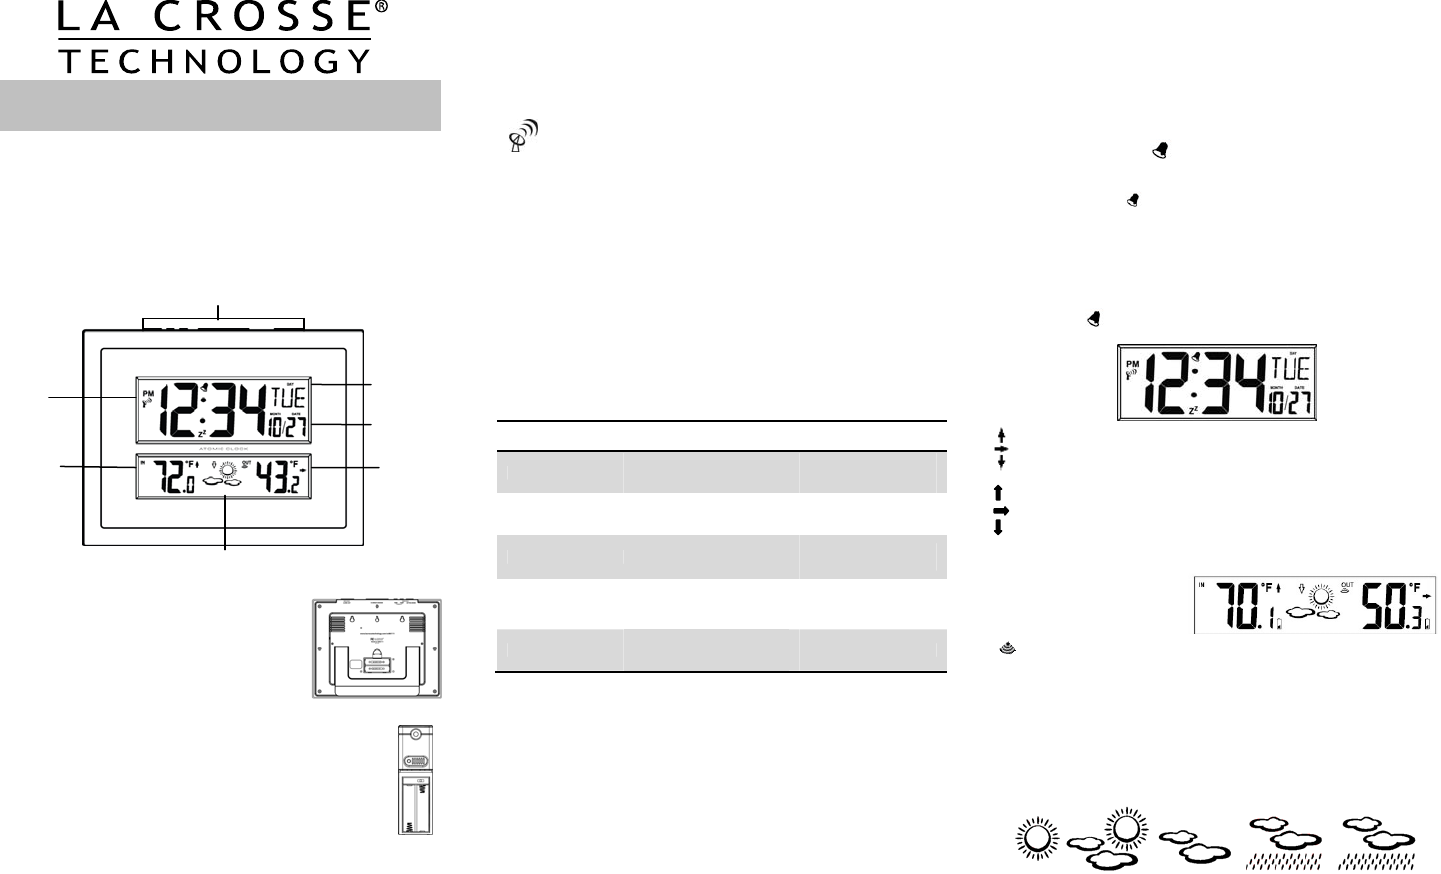
WWVB RECEPTION ICON with full signal strength will appear on
screen if the reception of atomic time is successful.
The tower icon will show solid when the Digital Wall Clock has received the
WWVB signal.
No tower icon shows. The Digital Wall Clock was unable to receive a signal at this
time.
Reposition the Digital Wall Clock for better signal reception or try again at
bedtime.
The Digital Wall Clock will start searching at UTC: 07:00 and if no reception on the
first attempt they will try again at 08:00, 09:00, 10:00, and 11:00. Each attempt
will be at least 2 minutes and the most will be 10 minutes.
If there is no signal or too much interference the receiver will only be on for 2
minutes.
If the signal is good it may catch a signal in ABOUT 2-3 minutes.
If the signal is marginal it will try to catch a signal for up to 10 minutes.
Manual Search: Hold the -/TIME button to start a manual signal search.
Note: In case the Atomic Digital Wall Clock is not able to detect the WWVB signal
(disturbances, transmitting distance, etc.); the time can be manually set.
BUTTON FUNCTIONS:
Button
Press and Release
Functions
Hold 2 seconds
°F/°C
Move through program menu
(setup)
Select temperature in °C/°F
Enter program menu,
set time, date, etc.
(setup)
+ 1 step forward (setup)
Search for outdoor
Transmitter
Fast advance (setup)
- 1 step backward (setup)
Fast backward (setup)
WWVB Search
SNOOZE
Trigger snooze alarm (ringing)
ALARM
Once: View Alarm
Twice: Activate or Deactivate
Alarm
Alarm set
PROGRAM MENU:
The °F/°C button will move through the program menu. The + or - button will
change a value if needed.
WWVB ON/OFF: Hold the °F/°C button for 5 seconds. WWVB and the word ON
will flash. Press and release the + or - button to turn this to OFF if you do not
wish WWVB reception. Confirm with the °F/°C button and move to the next item.
TIME ZONE: EST will flash. Press and release the + or - button to select a
different Time Zone: AST=Atlantic, EST= Eastern, CST= Central, MST= Mountain,
PST= Pacific, AKT= Alaska, HAT=Hawaiian time zone. Confirm with the °F/°C
button and move to the next item.
DAYLIGHT SAVING TIME: DST will flash and the word ON. Press and release
the + or - button to turn this to OFF if you do not observe DST. Confirm with the
°F/°C button and move to the next item.
12/24 HOUR TIME: 12H will flash. Press and release the + or - button to select
24H. Confirm with the °F/°C button and move to the next item.
HOUR: The hour will flash. Press and release the + or - button to select the
correct hour. Confirm with the °F/°C button and move to the next item.
MINUTES: The minutes will flash. Press and release + or - button to select the
correct minutes. Confirm with the °F/°C button and move to the next item.
YEAR: The year will flash. Press and release the + or - button to select the correct
year. Confirm with the °F/°C button and move to the next item.
MONTH: The month will flash. Press and release the + or - button to select the
correct month. Confirm with the °F/°C button and move to the next item.
DATE: The date will flash. Press and release the + or - button to select the correct
date. Confirm with the °F/°C button and exit the program menu.
Note: The weekday will set automatically after the year month and date are set.
FAHRENHEIT/CELSIUS: Press and release the °F/°C button to select temperature
readings in Fahrenheit or Celsius.
ALARM SET:
ALARM HOUR: Hold the ALARM button to enter alarm time setting mode. The
Alarm Hour will flash. Use the + or - button to set the Hour. Press and release the
ALARM button.
ALARM MINUTE: The Alarm Minutes will flash. Use the + or - button to set the
Minutes. Press and release the ALARM button to exit.
ALARM ACTIVATION ICON
Press and release the ALARM button once to show Alarm Time.
With the Alarm time showing, press and release the ALARM button to activate the
alarm. The alarm icon appears when alarm is activated.
With the Alarm time showing, press and release the ALARM button to deactivate
the alarm. The alarm icon will disappear when alarm is activated.
SNOOZE:
When the alarm sounds, press the SNOOZE button to trigger snooze alarm for 10
minutes. The snooze icon Zz will flash when the snooze feature is active.
To stop alarm for one day, press AL button, while in snooze mode.
The alarm icon will remain solid.
TEMPERATURE TREND ICONS:
The indoor and outdoor temperature trend indicators are updated every 30
minutes. Trends represent temperature changes over the past three hours.
Temperature rising more than 2°F (1°C) in the past three hours
Temperature did not change more than 2°F (1°C) in the past three hours
Temperature falling more than 2°F (1°C) in the past three hours
The temperature trend indicators are shown next to the indoor temperature and
outdoor temperature readings.
OUTDOOR TRANSMITTER RECEPTION ICON:
When the signal is successfully received from the outdoor transmitter, this icon will
be solid.
This icon will flash when searching for the outdoor transmitter signal.
If reception is not successful, the icon will not be shown in LCD.
WEATHER FORECAST ICONS:
The unit predicts weather condition of the next 12-hours based on the change of
atmospheric pressure. The weather forecast is about 70-75% correct. As weather
conditions cannot be 100% correctly forecasted we cannot be responsible for any
loss caused by an incorrect forecast.
The Icons shown Forecast the Weather in terms of getting better or worse and not
necessarily sunny or rainy as each icon indicates.
THIS STATION LEARNS!
Please allow 3-4 weeks for barometer calibration to generate an accurate
forecast.
IMPORTANT: As the forecast station builds memory, it will compare the current
average pressure to the past forty day average pressure for increased accuracy.
The longer the forecast station operates in one location the more accurate the
forecast icons will be.
Digital Atomic Wall Clock
Model: W86111 | Quick Setup Guide
Function Buttons
Time
WWVB
Tower
Indoor
Temp
Weekday
Date
Outdoor
Temp
Forecast icons
SUNNY PARTLY SUNNY CLOUDY RAINY STORMY
(Raindrops will blink)


