


08161 / TH110-DP-P / TL8230 69-2023-01 2010-02-05 1/2
Programmable Thermostat - Installation and User Guide
08161
TH110-DP-P
TL8230
This programmable thermostat can be connected to an electric heating sys-
tem such as an electric baseboard, a radiant ceiling, a floor heating system,
an electric convector, etc. It is not compatible with a central heating system.
* Set the switch to Off to cut power to the heater. This will not affect the time and tem-
perature settings.
TURN OFF POWER TO THE HEATING SYSTEM AT THE MAIN POWER
PANEL TO AVOID ELECTRICAL SHOCK.
• The installation must be carried out by an electrician.
• All cables and connections must conform to the local electrical code.
• Special CO/ALR solderless connectors must be used when connecting
with aluminum conductors.
• Install the thermostat onto an electrical box.
• Install the thermostat about 5 feet high, on an inside wall facing the
heater.
• Avoid locations where there are air drafts (such as the top of a staircase
or an air outlet), dead air spots (such as behind a door), or direct sun-
light.
• Do not install the thermostat on a wall that conceals chimney or stove
pipes.
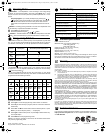
n Connect the thermostat wires to the
power and to the load using solderless
connectors for copper wires.
o Push the excess wire back into the
electrical box to prevent interference
with the thermostat.
p Secure the thermostat using two 6-32
screws.
q Return power to heating system.
NOTE: Always keep the thermostat's vents
clean and unobstructed.
The configuration switches are on the back of the thermostat. Default (factory)
settings are inside the gray cells.
Upon power-up, the thermostat is in manual mode ( ) and displays the room
temperature.
n Press the Hour and Min buttons to set the thermostat’s clock.
o Press the Day button to set the day.
Setpoint
The thermostat normally displays the room temperature. To view the set tem-
perature, press the or button briefly. The set temperature will appear for
5 seconds.
To change the setpoint, press the or button until the desired temperature
is displayed. To scroll faster, hold the button.
Using a preset temperature
The thermostat has 3 preset temperatures:
Comfort temperature
Economy temperature
Vacation temperature
• To use the Comfort or Economy temperature, press the or button
respectively. The corresponding icon will be displayed.
• To use the Vacation temperature, press both and buttons simulta-
neously. The icon will be displayed.
Storing a preset temperature
To store the Comfort or Economy temperature:
Set the desired temperature using the or button. Press and hold
the appropriate button ( or ) for approximately 3 seconds until the
corresponding icon is displayed.
To store the Vacation temperature:
Set the desired temperature using the or button. Press and hold
both and buttons simultaneously for approximately 3 seconds until
the icon is displayed.
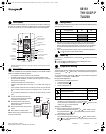
n
Description
1.
o
Connection
2.
To select the
operating mode
To set the day
To set the time
Time and day
Temp er at ur e
Operating
mode icons
On/Off
switch
To skip a period
To program the schedule
Preset temperature
icons
Temperature
adjustment
Temperature
preset buttons
Heating
indicator
Periods
Appears during the
setpoint display
Power
Load
Load
Black
Red
p
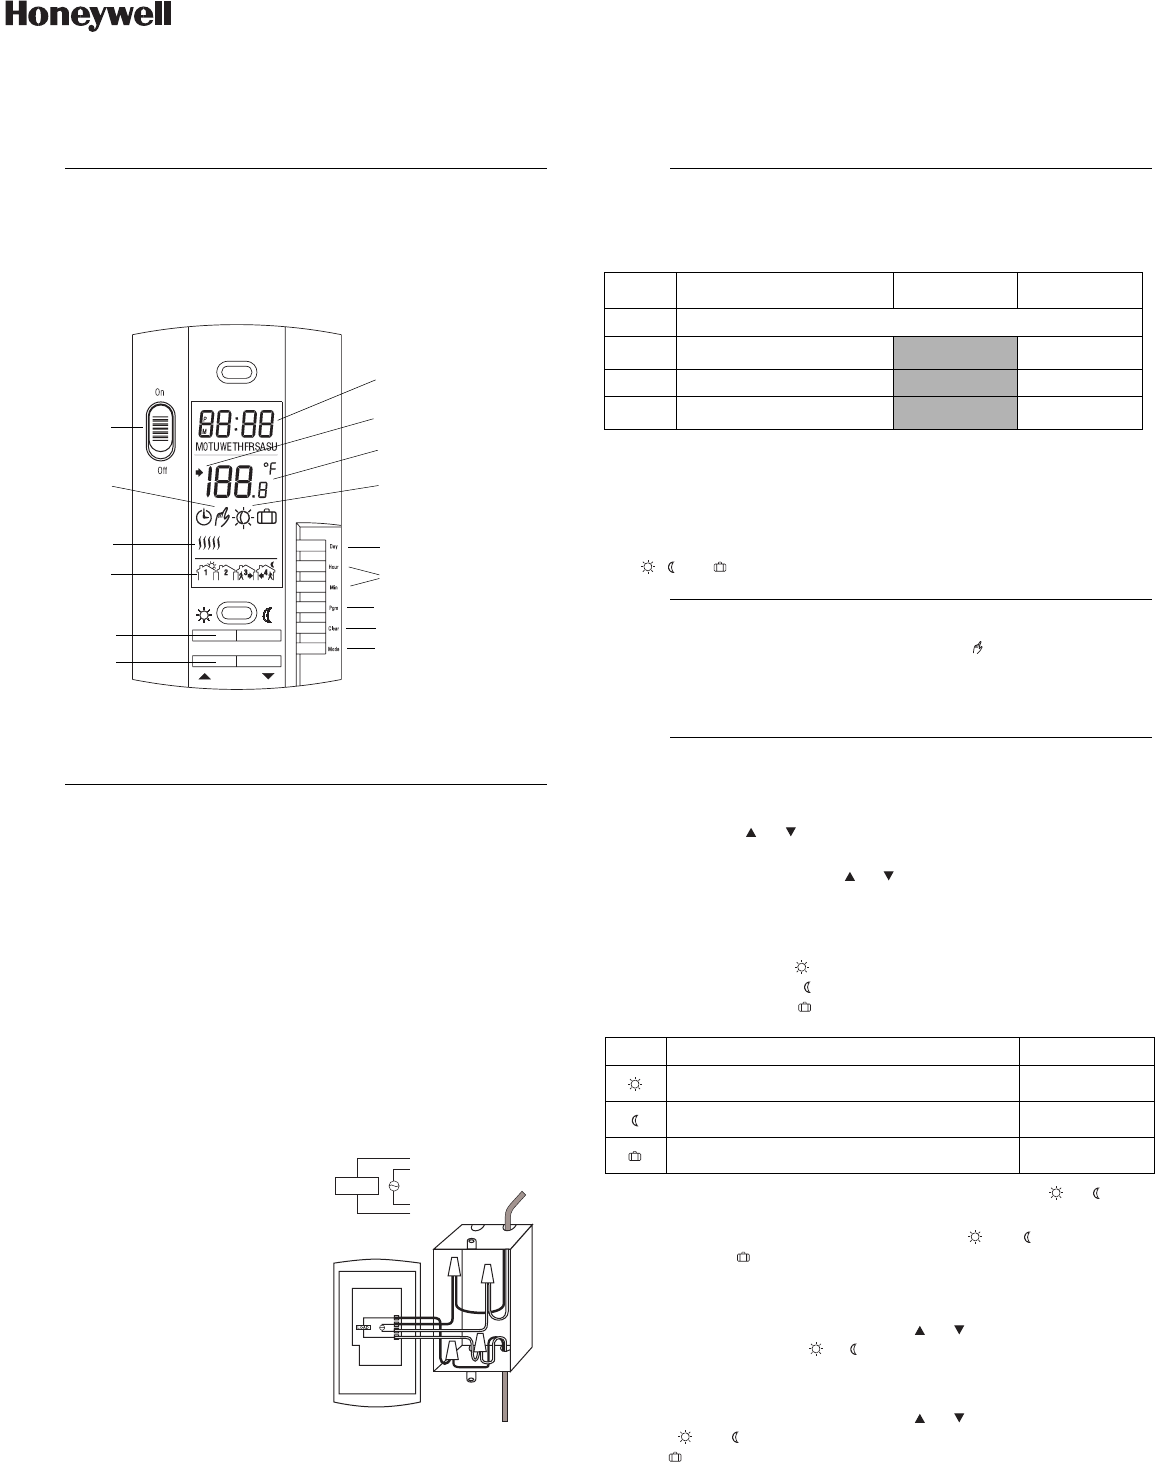
Configuration
3.
# Configurations UP DN
SW1 Not used
SW2
Early Start
a
a. Early Start can be used in Automatic mode only. When this function is
enabled, the thermostat calculates the optimal time to start heating in
order to obtain the desired temperature by the set time. The thermostat
re-assesses the start time daily based on the previous day’s perfor-
mance.
Disable Enable
SW3 Time format
12-hour 24-hour
SW4
Temperature format
b
b. If you change the temperature display format, the preset temperatures
( , and ) will return to their default settings.
°F °C
q
Power-up
4.
r
Temperature Setting
5.
Icon Intended use Default setting
Comfort (when at home) 70 °F (21 °C)
Economy (when asleep or away from home) 62 °F (16 °C)
Vacation (during prolonged absence) 50 °F (10 °C)
400-110-007-B_69-2023-01 (TH110-DP-P Cadet TL8230) ENG.fm Page 1 Friday, February 5, 2010 2:10 PM