


9.Testoperation.Ifthechimedoesnotwork,see
TROUBLESHOOTING.
Ifyoudonotwanttodrillholesinyourdoorframe,you
canusethesupplieddoublesidedtapeforinstallation.
1.Cleanallmountingsurfaceswitha50/50mixtureof
isopropylalcohol.
2.Removethebackingfromonesideofthedouble
sidedtapeandpresstheexposedsideagainstthe
backplateofthepushbutton.
3.Removetheotherbackingstripandpressthe
exposedsideagainstthedoorframewhereyouwant
thebuttoninstalled.
Operation
1.Plugthechimeintoa120VACoutletandslidethe
powerswitchtothe“On”positiontoturnonthe
chime.TheredLEDpowerindicatorwilllight.
2.Gentlypresstransmitterbuttontosoundchime.
Troubleshooting
Chimedoesn’twork:
1.Makesurepushbuttonswitchisdepressedandheld
foratleast1second.
2.Makesurehousecodeswitches1-4onchimeand
pushbuttonmatchexactly.
3.Verifybatteryorientationinpushbutton.
4.Tryfreshbatteries.
5.Makesurechimeisnotfartherthan150feetaway
frompushbutton.
6.Ensurepushbuttonisnotmountedonmetal,near
metalstuds,orneartheoor.
7.Tryanewlocationforthechime.
Functionalrangemaybeadverselyaffectedbyoneor
moreofthefollowingfactors:weather,radiofrequency
interference,lowtransmitterbatteryandobstructions
betweenthetransmitterandreceiver.
ThisdevicecomplieswithPart15oftheFCCrules.
Operationissubjecttothefollowingconditions:
1.Thisdevicemaynotcauseharmfulinterference,and
2.Thisdevicemustacceptinterferencereceived,
includinganyinterferencethatmaycauseundesired
operation.
For technical support contact Jasco Products
Company at 1-800-654-8483
or www.jascoproducts.com
GEModel19234
www.jascoproducts.com
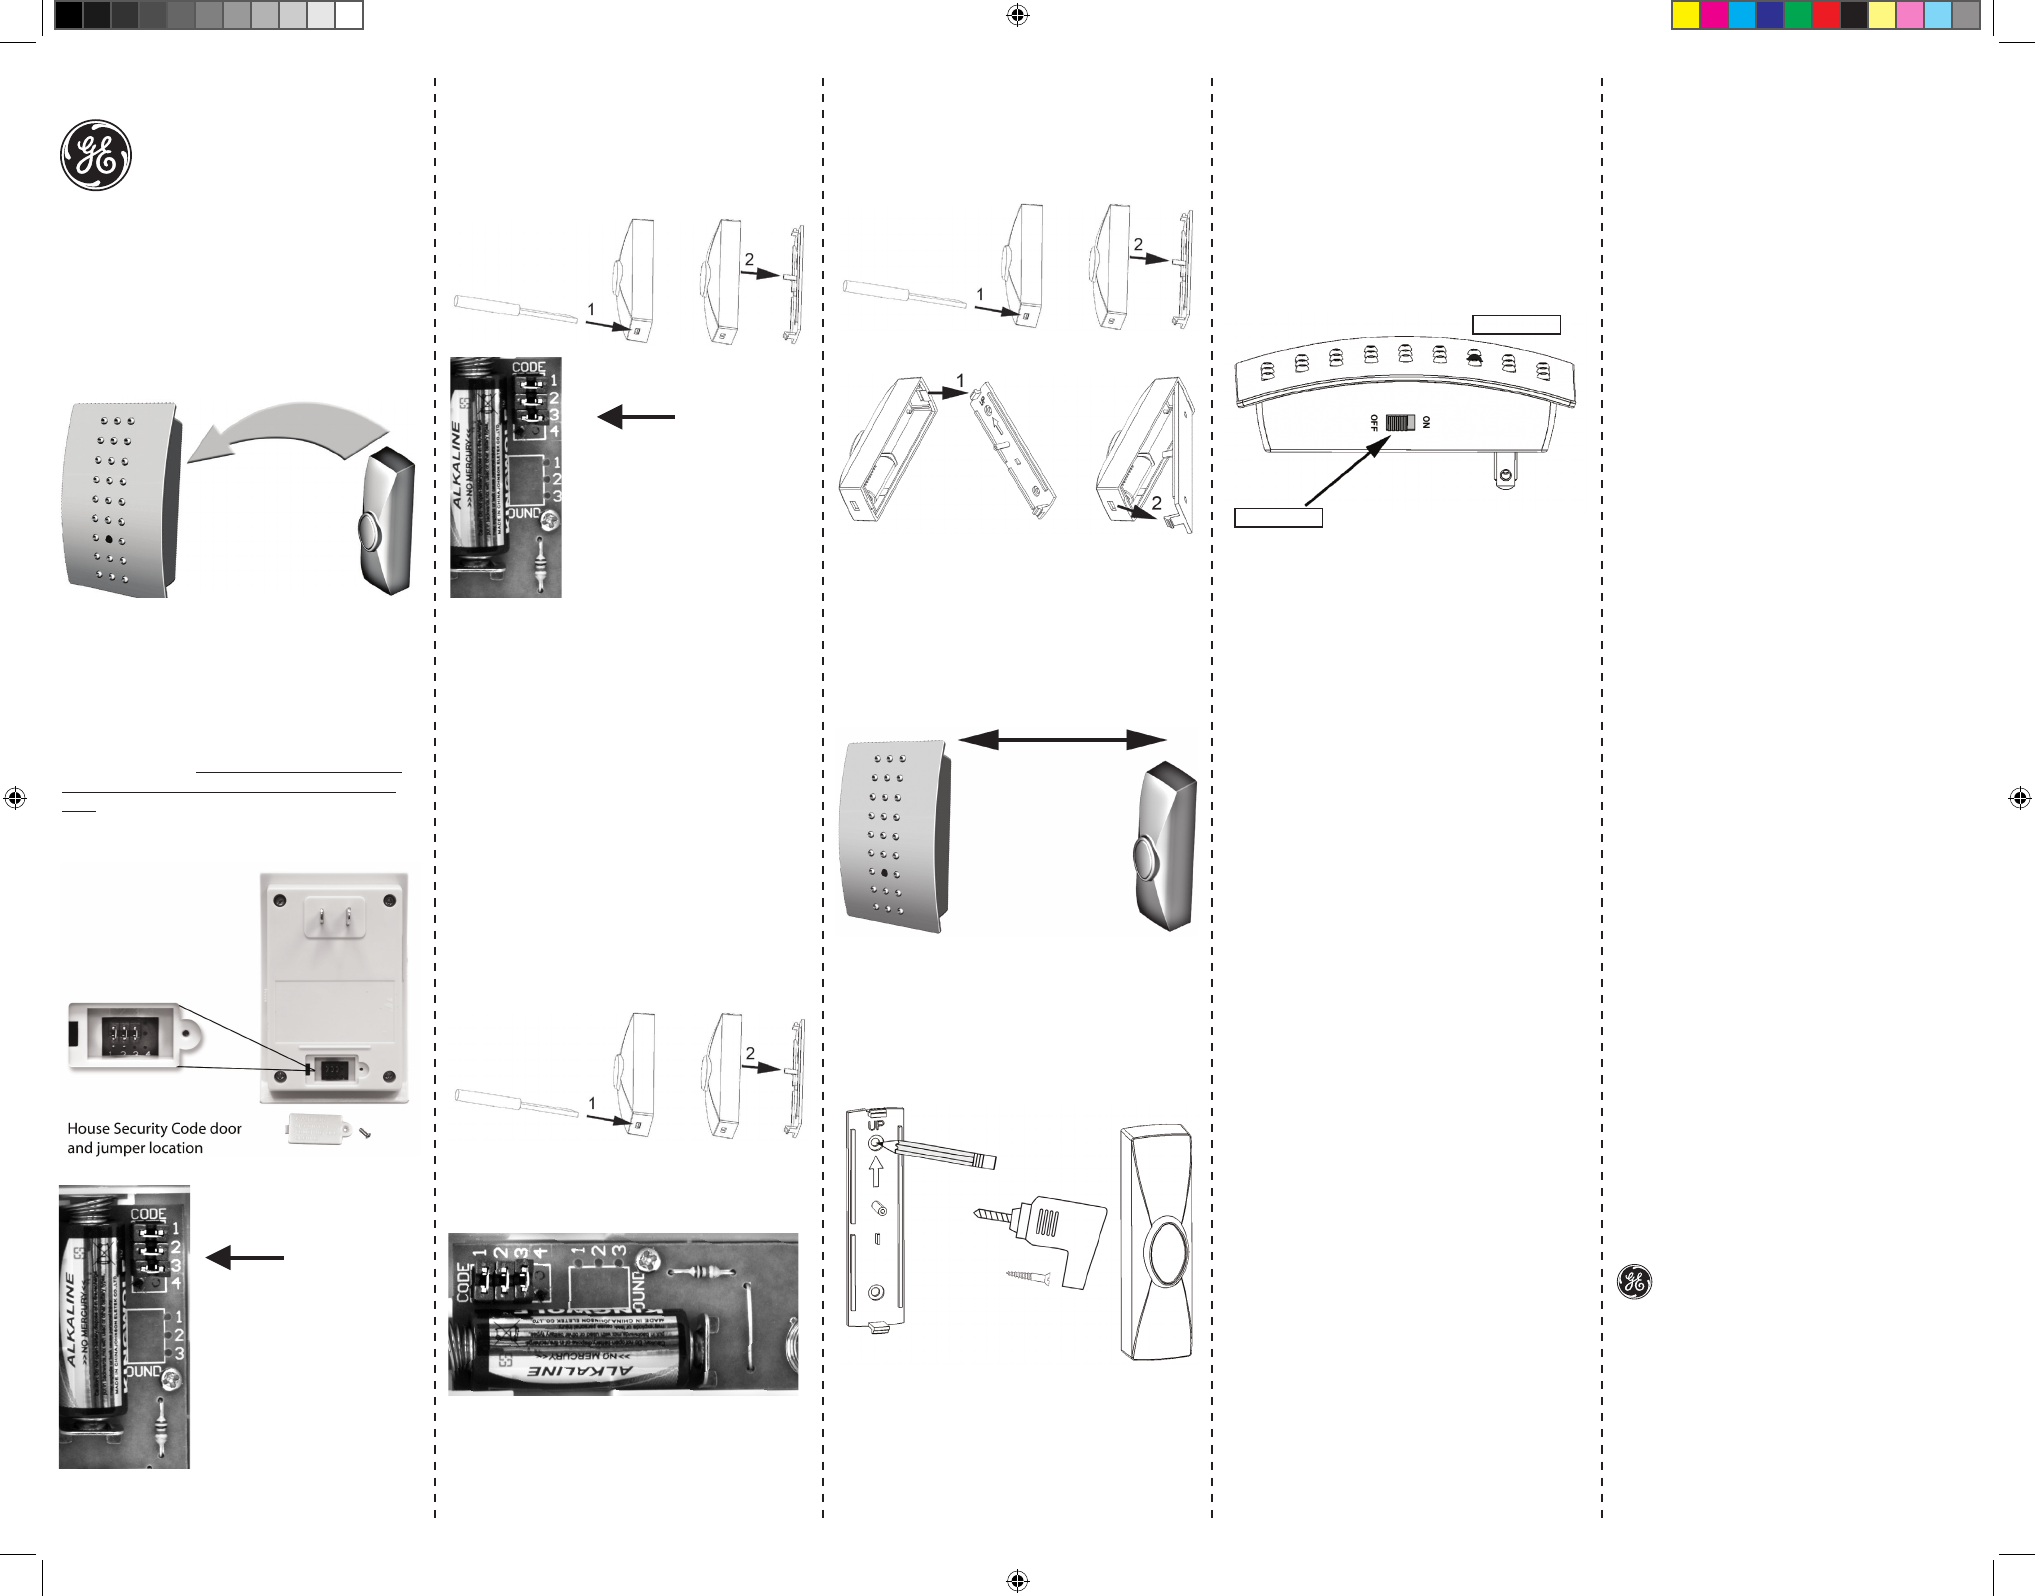
Wireless Door Chime Kit
Installation Instructions AC Wireless Chime Kit
Required Tools: Small at blade screwdriver, drill,
1/16” drill bit, and phillips screwdriver.
Included Hardware:
(2)3x20mmscrews
(1)Doublesidedadhesivepad
Thewirelessdoorchimekithastwocomponents:
BatteryOperated
Chime(Receiver) PushButton(Transmitter)
Plugsinto120Voutlet Batteryincluded
Setting The House Security Code
Eachchimecomponenthas3jumpersforsettingthe
housesecuritycode.Inmostcasesyouwillnotneed
tochangethefactorysettingsforthehousesecurity
code.Ifyourchimeactivatesintermittentlyordoesnot
workatall,youmaybeabletosolvetheproblemby
changingyoursecuritycode.
Thechimeandpushbuttonmustbesettothesame
housesecuritycodeforthecombinationtooperate
together.
1.Removepowerfromthechime.
2.Toremovethebatteriesfromthepushbutton,
openthepushbuttoncaseasshownbelow.
3.LocatetheHouseSecurityCodedoorandscrew
locatedonthebackoftheChime.Removethe
screwandtakeoffthedoor.
4.Locatethechimeandpushbuttonjumpersshown
above.
5.Tochangethehousecode,addorremovejumpers
asneeded.Itisrecommendedtochangeonlyone
jumperatatimeandthentestthesystemforproper
operation.Thejumpersonthechimeandpushbutton
mustmatchexactly.
Wireless push button battery
Toinstallorreplacethebatteryinthewirelesspush
button.
1.Removethebackcoverofthepushbutton.
2.InstalltheA23(12volt)batterywiththenegative
sideofthebattery(-)towardthespringandthe
positivesideofthebattery(+)towardthepositive
batteryholderasshownbelow.
3.Replacebackcoverasshownbelow.
PushButtonMountingInstructions
Note:Avoidmountingonmetalsurfaces,asitmay
resultinareducedrangeoftransmission.Donotmount
inanareawhereexposedtodirectrain.
a.Removingthebackcover
b.Replacingthebackcover
Mounting Push Button
1.Pushbuttonsaretypicallymountedatthesame
heightasthedoorknoborhandle(between36”and
44”abovetheoor).
2.Beforemounting,chooseamountinglocationthat
isnotfartherthan150feetfromthechimeunit
location.
Not further than 150 feet
3.Beforeplacingthepushbuttonwhereyouwouldlike
tomountit,placethechimeasclosetonalposition
aspossible.Testtheoperationbeforedrilling.Ifit
works,mountthepushbutton.Ifitdoesnotwork,
seeTROUBLESHOOTING.
4.Usebackcoverofpushbuttonasatemplatetomark
twoscrewholes.
5.Drilltwoholeswith1/16”sizedrillinmarked
locations.
6.Securebackcovertothemountingsurfacewithtwo
suppliedmountingscrews.
7.Installthesupplied12Vbatteryobservingproper
polarity.(seebatteryinstallationsection)
8.Pressfronthousingontobackcover.
MadeinChina/HechoenChina
isatrademarkof
GeneralElectricCompany
andisusedunderlicenseto
JascoProductsCompanyLLC,
10E.MemorialRd.,
OklahomaCity,OK73114.
www.jascoproducts.com
Rev.04-10
19234
Pushbutton
HouseCode
Jumpers
Pushbutton
HouseCode
Jumpers
PushbuttonJumpers
4
5
6
8
PowerIndicator
On/OffSwitch
19234-1.indd 1 4/14/10 3:58 PM