


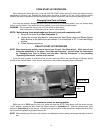

CORN START-UP PROCEDURE
When starting the stove with corn, push the “AIR ON TEMP” button and hold, which will rotate the stirrer
mechanism in the burn pot. Release the button when the stirrer is strait up (in the “12:00” position) before
following the above instructions concerning placing the handful of pellets in the fire pot and starting your fire.
Changing from Corn to Pellets
Your unit was primarily designed to burn corn, but will also burn hardwood pellets. Your unit comes ready
to burn corn by default; if you wood like to burn pellets in your unit, follow the steps below.
WARNING: Do not open the door on this unit if the stirrer is still moving!
See instructions on “Setting the Stirrer” earlier in this manual.
NOTE: Before doing these steps make sure the unit is out and completely cold!!
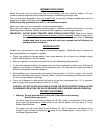
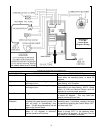
1. Remove the stirrer shaft (See Illustration 2)
2. Unplug the unit and plug back in, then press the Heat Range down and Blower Speed
down buttons at the same time and release. You should see a “P” in the Heat Range
window.
3. Follow lighting instructions.
PELLET START-UP PROCEDURE
NOTE: When burning only pellets, remove stirrer from fire pot. See Illustration 2. While you will not
follow the instructions in the above “Corn Start-Up Procedure,” you will follow the instructions
on “Changing from Corn to Pellets” and the other “Start-Up Procedures” in the preceding
“Operating Instructions” section of this manual.
If the unit does not start or maintain a fire, you will receive an E-2 in the Heat Range and Blower Speed
window of the Control Board. If this occurs, wait until unit has cooled completely down and repeat.
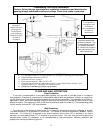
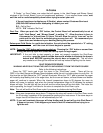
Locking
Collar
Set Screw
Illustration 2
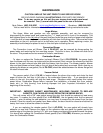
To remove the stirrer for burning pellets
While the unit is COLD and the unit is off, press and hold the Air On Temp button until the stirrer is at the
“12:00” position; loosen the Allen head Set Screw (marked in Illustration 2). Slide the locking collar (also
marked in Illustration 2) to the fire pot. Lifting the fire pot and stirrer at the same time, remove the stirrer from
the fire pot and replace fire pot back into the unit.
NOTE: When replacing the fire pot, notice there is a welded piece that is always set toward the back of the fire
box.
14