


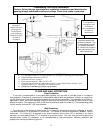

Through the Ceiling
When venting the stove through the ceiling, the pipe is connected the same as through the wall,
except the clean out tee is always on the inside of the house, and a 3” adapter is added before the
clean-out tee. You must use the proper ceiling support flanges and roof flashing supplied by the pipe
manufacturer -- follow the pipe manufacturer’s directions and Illustration 1 in this manual.
It is
important to note that if your vertical runs of pipe are more than fifteen feet (15’) at this point, the corn
vent pipe should be increased to four inches (4”) in diameter. Do not exceed four feet (4’) of pipe on
a horizontal run, and do
attempt to use the least number of elbows in the flue system. If an offset is
used it is better to install a 45-degree elbow whenever possible. Please remember, installing elbows
may inhibit your draft by up to 30% per elbow.
Outside Air (Outside Combustion Air Intake)
Outside air is mandatory for this unit to operate properly
. This unit has been designed and tested
with this connection, because so many homes are airtight and there is not adequate combustion air
available inside the dwelling. The air intake pipe is located on the bottom side of the burn pot (from
the rear) and measures 1 ½” inside diameter (I.D.). The connection can be made with a metal 1
7
/
8
”
I.D. coupler and pipe (see “Important Information” section of manual), and should exit through the
wall. Be sure to secure the pipe to the unit with a clamp or aluminum tape. The outside end of the
pipe should be covered (screened) to prevent foreign matter from entering the system.
Our Outside
Air Kit (Part Number PU-OAK) can be used.
If the unit is located below ground level, you will need to
run the pipe up and then outside the dwelling. NOTE: If the total run of the connection exceeds 6’, if
more than 2 elbows are used, or if a basement installation, use 3” metal pipe (and coupler) instead.
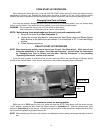
Mobile Home Installation
Secure the heater to the floor using the two holes in the pedestal. If the unit is on a combustible
surface, you will need to drill matching holes in the floor protection that you choose (see Floor
Protection section). Do not disturb the structural integrity of the home, and be sure the unit is
permanently electrically grounded to the chassis of your home. Remember that outside combustion
air is mandatory, and not to install the unit in a sleeping room of the home.
Important Notes Concerning Installation:
*IMPROPER INSTALLATION: The manufacturer will not be held responsible for damage
caused by the malfunction of a stove due to improper venting or installation.
Call
(
800-245-6489
)
and/or consult a
p
rofessional installer if
y
ou have an
y
q
uestions.
IMPORTANT SAFETY NOTE: If the unit or chimney connector pipe “glows” red (or white), the stove
is over-fired. This condition could cause a house or chimney fire. Do
not operate your unit too hot, or over-firing may result.
IMPORTANT: Improper hook-up (too much pipe, too many elbows, etc.) will cause
the unit not to operate. Call Customer Service (800-245-6489) if you have questions
about your hook-up or if your unit will not operate.
11