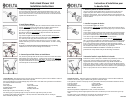
1. Remove Existing Shower Head
Turn the existing shower head counter-clockwise with adjustable wrench or pliers. Use
care not to unscrew the shower arm; hold the shower arm secure. Note: If your shower
arm has a ball on the end of it, it will not work with this shower unit and will need to be
replaced with a standard shower arm.
Delta Hand Shower Unit
Installation Instructions
10-Year Warranty:
Delta Faucet warrants to the owner of this product that the product is free from defects in material or
workmanship for the period stated above from the date of purchase.
If this product malfunctions or becomes damaged, stop use and return it to the dealer where purchased or the manufacturer
(we recommend United Parcel Service):
If in the USA: If in Canada:
Alsons Corporation Masco Canada Limited
3010 West Mechanic Street 46 Bosworth Court
Hillsdale, MI 49242 Brantford, ON N3T 5N9
We will repair or replace, at our discretion, at no charge.
This warranty gives you specific legal rights. You may also have other rights that vary where you reside.
For assistance with problems with installation: In the USA, call toll free 1-800-421-0001, 8:00 a.m. to 6:00 p.m.
Eastern Standard Time, Monday - Friday.
Ridged
Nut
Hose With
Vaccum
Breaker
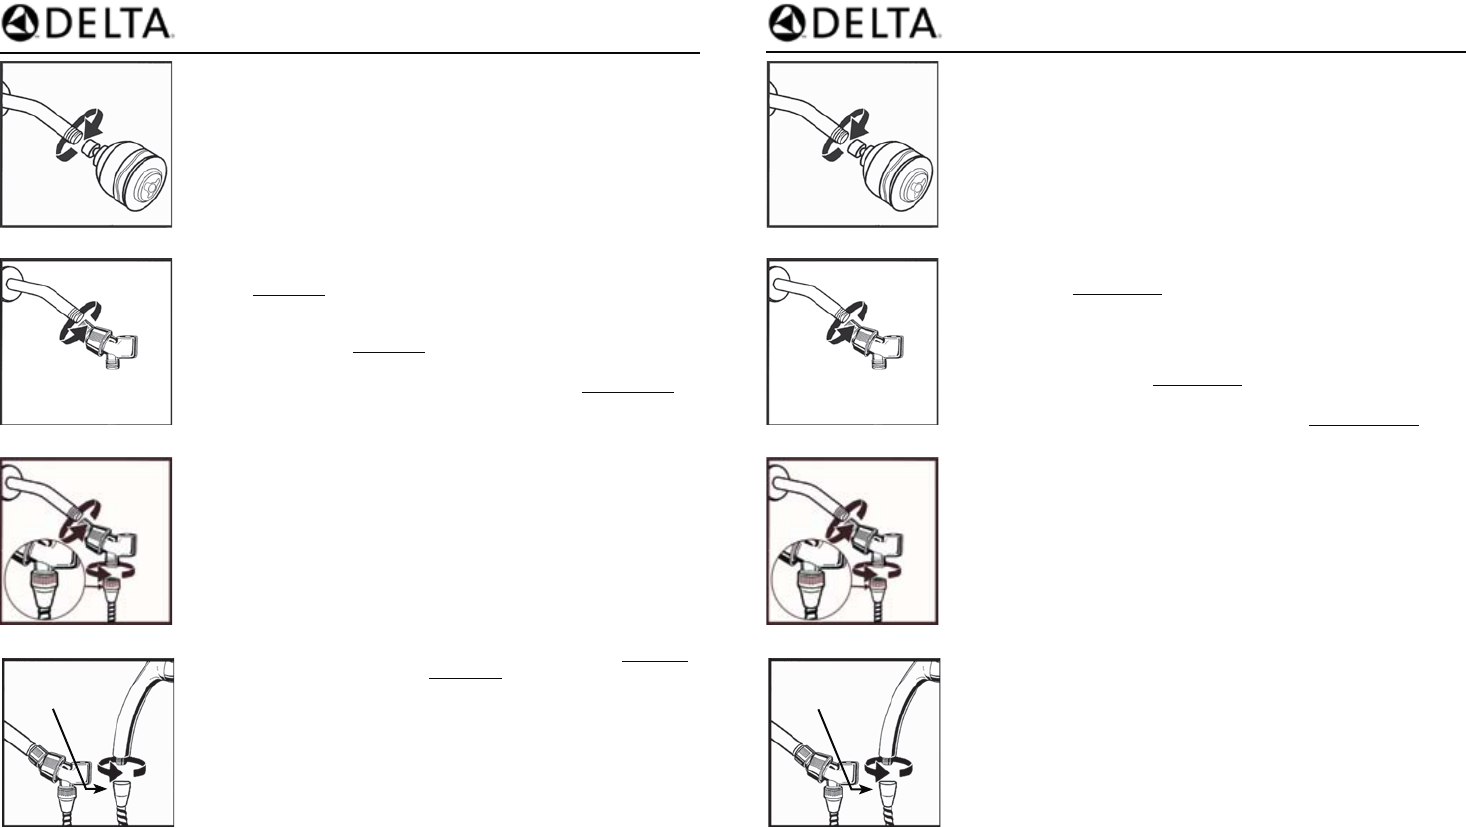
1. Enlever la pomme de douche existante.
Tourner la pomme de douche existante dans le sens anti-horaire à l'aide d'une clef
anglaise ou de pinces. Faire attention de ne pas dévisser le bras de douche; tenir
fermement le bras de douche. Note : Si le bras de douche est muni d'une boule à son
extrémité, il ne fonctionnera pas avec cette douche et il devra être remplacé par un bras
de douche standard.
Instructions d'installation pour
la douche Delta
2. Installer le support de douche
Il est recommandé d'appliquer du ruban de
douche seulement. Visser à la main le gros bout du support du bras de douche dans le
sens horaire sur les filets exposés du bras de douche jusqu'à ce qu'il soit serré. N'utiliser
ni clef ni pinces.
Un casse-vide est installé en permanence dans l'extrémité du tuyau flexible comportant
un écrou cannelé. Premièrement, enlevez le ruban jaune à l’extrémité du tuyau flexible
qui se visse sur la douche à main. Visser à la main l'écrou cannelé dans le sens horaire
sur la sortie du support du bras de douche. N'utiliser ni clef ni pinces.
Si vous fixez l’écrou à arête à la douche à main, le casse-vide
ne fonctionnera pas.
Note : un casse-vide (ou reniflard) est un dispositif qui est requis par certaines autorités
pour protéger l'approvisionnement en eau de votre collectivité contre les refoulements
d'eau. Le casse-vide laisse passer normalement une petite quantité d'eau quand la
douche est activée. Il peut aussi laisser s'écouler de l'eau quand le robinet est fermé. Ces
deux conditions sont normales : l'eau s'écoule, il n'y a pas de fuite.
NE PAS ESSAYER DE SERRER OU D'ENLEVER LE CASSE-VIDE qui est installé en
permanence dans le tuyau flexible. Cela pourrait endommager le mécanisme.
3.Raccorder fuselée le tuyau flexible à la douche.
Premièrement, enlevez le ruban jaune à l’extrémité du tuyau flexible qui se visse sur la
douche à main. Enfoncer fermement la rondelle dans l'écrou pivotant. Aligner
soigneusement les filets de l'extrémité fuselée du tuyau flexible directement sur la
douche à main. Visser à la main - n'utiliser ni clef ni pinces. Ensuite, déposer la douche
à main dans le support du bras de douche. Tourner le support du bras de douche dans la
position désirée pour tenir la douche à main. Tourner les écrous sur le tuyau flexible pour
veiller à ce qu'ils pivotent en vue d'une utilisation sans enchevêtrement.
Garantie de 10 Ans :
Delta Faucet garantiza al propietario de este producto que se encuentra libre de defectos en
materiales o mano de obra, según lo indicado arriba, a partir de la fecha de compra.
Si este producto no funciona o se daña, deje de usarlo y devuélvalo al fabricante (recomendamos United Parcel Service):
Si está en los EE.UU.: Si está en Canadá:
Alsons Corporation Masco Canada Limited
3010 West Mechanic Street 46 Bosworth Court
Hillsdale MI 49242 Brantford, ON N3T 5N9
Nosotros lo repararemos o reemplazaremos sin costo, a nuestra sola discreción.
Esta garantía le otorga derechos legales específicos. Podría tener otros derechos que varían de acuerdo al lugar en que
reside.
Para recibir ayuda o si tiene problemas con la instalación: En los EE.UU. llame gratis al:
1-800-421-0001, de 8:00 a.m. a 6:00 p.m., hora del Este, de lunes a viernes.
Écrou
cannelé
Casse-vide
2. Install Shower Mount
It is recommended to wrap plumber tape (not included) around the threads of the shower
arm only. Hand tighten the large end of the Shower Arm Mount clockwise onto the
exposed shower arm threads until tight. Do not use a wrench or pliers.
Your shower is equipped with a Vacuum Breaker, permanently installed in the end of the
hose that has a ridged nut. Hand tighten the ridged nut clockwise to the Shower Arm
Mount outlet. Do not use a wrench or pliers.
If you attach the ridged nut to the hand shower, the Vacuum Breaker will not function.
Note: A Vacuum Breaker is a device that is required by certain code authorities to protec
t
your community’s water supply from the back-flow of water. The Vacuum Breaker
usually discharges a small amount of water each time you turn on your shower. It may
also drain water when you shut it off. Both are normal conditions - the water is draining,
not leaking.
DO NOT TRY TO TIGHTEN OR REMOVE THE VACUUM BREAKER which is permanently
installed into the hose. This could cause damage to the mechanism.
Tapered
End
Fuselée Du
Tuyau
3. Connect Tapered End of Hose to Hand Shower
First, remove the yellow tape from the end of the hose that screws onto the hand shower.
Seat the Washer firmly into the Hose nut. Carefully align the threads of the tapered end
of the Hose directly to the Hand Shower. Hand tighten - do not use a wrench or pliers.
Then place the Hand Shower into the Shower Arm Mount. Rotate the Shower Arm Mount
into desired position to hold the Hand Shower.
#2688CNR4 #2688CNR4