Alarm Settings!
Setting up Alarm Mode!
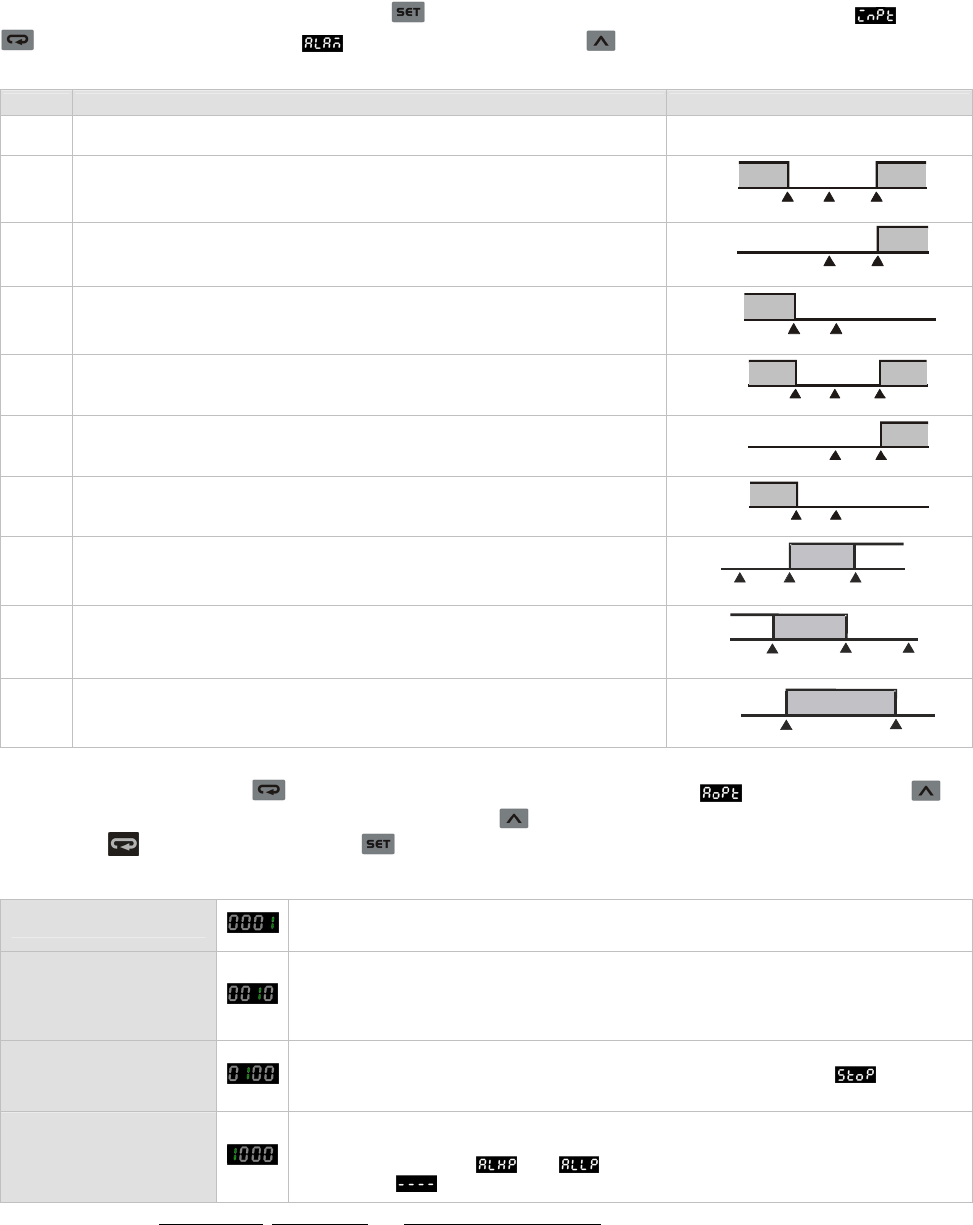
DTD offers 9 alarm modes and 4 alarm options. Press
for more than 3 seconds and PV will display the parameter . Press
for 6 times to display the parameter for setting up alarm modes. Use to select a desired alarm mode. Mode 9 is only
available in the programmable control mode. See the table below for the explanation of every alarm mode.
Mode Alarm Type Alarm Output Operation
0 No alarm Off
1
Deviation upper- and lower-limit:
Alarm will be enabled when the PV exceeds SV + AL-H or falls below SV - AL-L.
ON
OFF
SV - (AL-L) SV SV + (AL-H)
2
Deviation upper-limit:
Alarm will be enabled when the PV exceeds SV + AL-H.
ON
OFF
SV
SV + (AL-H)
3
Deviation lower-limit:
Alarm will be enabled when the PV falls below SV - AL-L.
ON
OFF
SV - (AL-L) SV
4
Absolute value upper- and lower-limit:
Alarm will be enabled when the PV exceeds AL-H or falls below AL-L.
ON
OFF
AL-L
AL-H
0
5
Absolute value upper-limit:
Alarm will be enabled when the PV exceeds AL-H
ON
OFF
AL-H
0
6
Absolute value lower limit:
Alarm will be enabled when the PV falls below AL-L.
ON
OFF
AL-L
0
7
Hysteresis upper-limit:
Alarm will be enabled when the PV exceeds SV+AL-H and disabled when the PV
falls below SV+AL-L.
SV + (AL-H)
ON
OFF
SV
SV + (AL - L)
8
Hysteresis lower-limit:
Alarm will be enabled when the PV falls below SV - AL-H and disabled when the
PV exceeds SV - AL-L.
SV - (AL-H)
ON
OFF
S
V
SV -
(
AL - L
)
9 Alarm will be enabled only during the execution of the program.
ON
OFF
Prog. Start
Prog. End
Setting up Alarm Option!
To set up the alarm function, press
after you have set up the alarm mode and the parameter will be displayed. Use to
set up the desired option and the parameter to be set will flash. Press
again to change the setting. When the parameter is flashing,
you can press
to move to other digits. Press to complete and save the setting. The initial setting of the alarm option is 0000,
i.e. all alarm options are not enabled. If you need to enable all the alarm options, set the parameter to 1111.
Standby alarm output
Set the first digit in right hand side as 1 to enable the standby mode. The alarm output will be
enabled when the PV is SV± 2 and the system is in execution.
Alarm output inversion
Set the second digit in right hand side as 1, when the alarm output is enabled, the alarm
output contacts will be normally open. When there is no alarm output, the relay terminals will
be short-circuit. Please be noted that the alarm indicator only relates to whether the control
criteria are true and has nothing to do with the alarm output contact.
Holding alarm output
Set the second digit in left hand side as 1 to hold the alarm output. In this function, after the
alarm output is enabled, the alarm will keep being enabled unless you stop
the
operation of DTD.
Displaying alarm peak value
Set the first digit in left hand side as 1 to display the peak value. When the alarm output is
enabled, DTD will be able to record the highest and lowest alarm temperature and display the
two values in parameter
and . Before the alarm is enabled, the parameter will be
displayed as
. The values will not be kept after the power of DTD is switched off.
Note: DO NOT use standby alarm, holding alarm and displaying alarm peak values in alarm mode 7, 8 and 9.
Exceptions in Alarm Functions
1. When DTD is switched on, in STOP state or alarm mode 0, the alarm will not be enabled and the standby status will be cleared.
2. Where there is no input sensor connected to DTD or input error, the status of the alarm output will remain.
3. Modifying alarm mode will not clear the standby status. The standby alarm will only be cleared when you STOP the operation of DTD
and re-RUN it again.
5


