


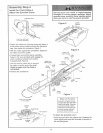

Installation Step 6
InstMt the Wall Control
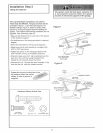
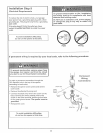
, Stdp 1/4° of [ns@ation from one end of the be{{
wre; connect the wire to the two screw terminals
on the back of the Wail Centre/: white to 2 and
white!red to 1
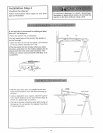
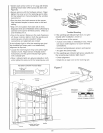
Locate the Wall Control within sight of the door
at a minimum height of 5 feet where small
children cannot reach_ and away from all
moving parts of the door and door hardware.
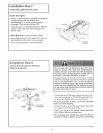
Fasten the Lighted Push Button Wa_l Contro_
securely with 6ABxl 1,'2" screws The consote
style uses 6AB×I" screws _finstalling into d_waIL
dri!_ 5/32" hoes and use the anchors provided
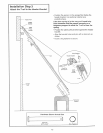
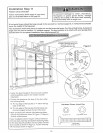
Run the be/[ wire up the wall and across the ceiling
to the opener_ Use insulated staples to secure the
wre in severa_ @aces. Be cater@ not to pieree the
wire with a stapIe, thereby resulting in a sho_.
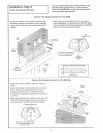
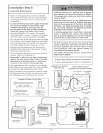
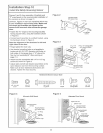
Receiver terminal _rews and the antenr@ are
_ocated on the back pane_of the opener. Position
the antenna wire as shown.
Then connect the bell wire to Ihe opener terminal
screws: white to 2; whitdred to I.
Remember to affix the User Safety Instruction
tube[ to the walf near the Wall Control, and the
Maintenance _nstruetion [abe_ in a prominent
_oeat_on oe the {aside of the garage d_r.
ff the label adhesive will not adhere to your garage
wail surface (or becomes bose with time) use _acks
to secure the [abe_ alongs de the wa_l control
Page 32 explains bow to operate the opener using
the lighted push bar or button as w@/as the L.._k
and L.ight features on the Deiuxe Wail CorstroL
Hardware Shown Actual Size
6AB x ¢* 8_tew
Lghed Co_tsole Wail r;on tel D0' Wa;i Ar_chocs
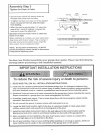
Children operath_g or p_ay_n9 w_th a garage
door opener can injure themselves or others_
The garage door could dose and cause serious
injury or death
Install the Wall Control (or any additionat push
buttons) out of the reach of chHdrer_ and away
from aH moving parts of the door and door
hardware, but where the door is visJbleo
Do not allow children to operate the p_eh
buYeR(s) or the remote contro{(s)o
A moving garbage door could injure someone
under it Activate the opener on_y when the
door is pro_r[y adjusted, you can s_ it e_ear_y,
and there are no obstructions to door travel
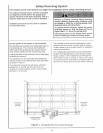
Do NOT connect the power and operate the
opener at this dine. The trolley wH[ trave_ to the
f@! open position but will not return to the
c_oee posft_on until the sensor beam is
connected and proper_y aligned.
See Safety Reversing Sensor _nstructions
begirming on page 2t.
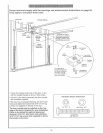
Outdoor Key Switch Accessory Connections
To opener termin_ screws: white to 2; whitdr¢_d to I
Deluxe Waft Control
Lighted Console Waif Control
Deh_A_ W_# O_vt_'@
[ igh[_ Con_ole Ugh_t
Wt_ Con_to_ P_sh auAe#
wa_ Coa{_ea
18