


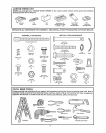


installation
i, u,,,, i,,,. i, ,u i
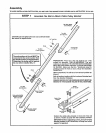
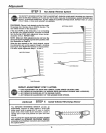
STEP 6 Install Waft Push Button
i i i, i, ii ii ,,11 nl, liH,m
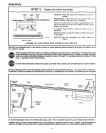
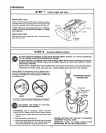
LOCATE WALL PUSH BUTTON (OR ANY ADDITIONAL PUSH BUTTONS) WHERE THE GARAGE DOOR
IS VISIBLE, AWAY FROM DOOR AND DOOR HARDWARE AND OUT OF THE REACH OF CHILDREN, "
SERIOUS PERSONAL INJURY FROM A MOVING GARAGE DOOR MAY RESULT FROM MISUSE OF THE
OPENER. DO NOT ALLOW CHILDREN TO OPERATE WALL PUSH BUTTON(S) OR THE TRANSMITTER,
FASTEN THE CAUTION LABEL ON THE WALL NEAR WALL PUSH BUTTON AS A REMINDER OF SAFE
OPERATING PROCEDURES
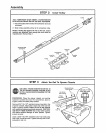
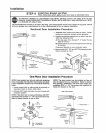
PROCEDURE: Remove about a 114" of insulation from
each end of the 2-strand bell wire. Connect one end to the
screw terminals on the back of wal! push button (or
doorbell-type push button) as shown.
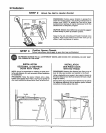
Fasten the wall push button with 6ABxl" sheet mete}
screws, The doorbell4ype push button has 6ABxl-1/2"
sheet metal screws, Use anchors if attaching to dry watlo
Install on an inside garage deor A convenient place is
side the _i_ _r and OUT OF REACH OF CHILDREN.
Run the belf wire up the wall and acres the ceiling to the
garage d_r o_ner. Secure with insulated stapEes,
The receiver terminals and the antenna are located on the
back panel of the opener chassis F_sition antenna wire
as showm Then cennect the wire by color to the white and
red o_ner terminal screws,,
DOOR BELL-TYPE
LIGHTED PUSHBUTTON
WALL PUSH BLrTTON
Terminal Screws
Terminal Screws Top Installation
Flange
Borlom Ins_allation
Flange
Ughted
Pushbut_on
Opener
Terrn_n,ld Screws
Rear Pa,,lel
of Opener
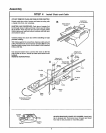
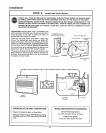
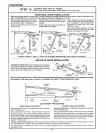
OPERATION OF THE WALL PUSH BUTTON
Press and release to open or close door.
Press and rele_ again to REVERSE door during
CLOSING cycle or to STOP door during OPENING
cycie.
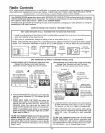
WIRING INSTRUCTIONS FOR ACCESSORIES
Infrared Reveming Sensor:
To white and black opener terminals
Outdoor Key Switch:
To red and white opener terminals
i lll i ii iiiii,!l Ill, Illl ulull,_ nL
13