


IMPORTANT: Dual voltage and multi-tap ballasts are factory wired for 277 Volt input. Before installation make certain power supply and ballast voltages are
compatible. For use with other line voltages, remove wire nut splicing the black lead from the quick disconnect plug and 277V lead from ballast. Cap off
lead with wirenut. Splice black lead from the quick disconnect plug with the desired voltage lead from ballast.
APPLICATIONS:
• 70W HID and 42W CFL fixtures are not suitable for operation in ambients exceeding 40°C. 100W HID
fixtures are not suitable for operation in ambients exceeding 25°C.
• Minimum supply wire conductor requirements 90°C in J-box. 150°C supply wire is required for through
wire applications.
• Thread sealing compound (not provided) must be applied to all unused plugs when
used in wet location applications.
• Caulking (not provided) must be used between ceiling and upper cover when used
in wet location applications.
TO ENSURE PROPER GROUNDING AND POLARITY:
• Connect the fixture ground wire (Green) to the supply ground.
• Connect the fixture neutral wire (White) to the supply neutral.
• Connect the fixture line wire (Black) to the supply line.
NOTE: If you are unsure which wires are ground, neutral or line, consult an electrician.
TOOLS REQUIRED:
• Phillips screw driver
• Slotted screw driver
• 1/8” Allen wrench
INSTALLATION INSTRUCTIONS:
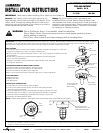
1) Loosen Allen set screw and remove guard and globe.
2) Loosen (3) #12 Phillips pan head screws and remove lower ousing assembly.
Disconnect plug and receptacle.
3) Knockout desired holes in upper cover. Make electrical splices, push leads into J-Box
and install upper cover to ceiling or J-Box using appropriate fasteners (not provided).
4) Reconnect plug and receptacle and reassemble lower housing to upper cover.
5) Install lamp and reinstall globe and guard.
NOTE: For Metal Halide application, a glass globe or lens must be used unless an open rated lamp is installed.
INSTALLATION INSTRUCTIONS
IMPORTANT: Read carefully before installing fixture. Retain for future reference.
General: Upon receipt of fixture thoroughly inspect for any
freight damage, which should be brought to the attention of the
delivery carrier. Compare the catalog description listed on the
packing slip with the fixture label on the housing to be sure the
correct merchandise has been received.
Safety: This fixture must be wired in accordance with
the National Electrical Code, National Electrical Safety Code
and applicable local codes and ordinances. Proper grounding is
required to insure personal safety. Carefully observe grounding
procedure under installation section. This fixture is not suitable
for Hazardous or Classified Locations.
VS SERIES VAPORTIGHT
CEILING MOUNT
PAGE 1 OF 2
11/1/06 IMI-661
LUMARK 1121 HIGHWAY 74 SOUTH PEACHTREE CITY, GEORGIA 30269 11/1/06 IMI-661 ADH061573
These instructions do not claim to cover all details or variations in the equipment, procedure, or process described, nor to provide directions for meeting every possible
contingency during installation, operation or maintenance. When additional information is desired to satisfy a problem not covered sufficiently for user’s purpose, please
contact your nearest Cooper Lighting representative.
WARNING: Risk of Fire/Electric Shock. If not qualified, consult an electrician.
Risk of Electric Shock. Disconnect power at fuse or circuit breaker panel or fuse box
before installing or servicing.
Risk of Burn. Allow fixture to cool before changing bulb or handling fixture.
J-Box
(Not Provided)
Upper Cover
Quick Disconnect
Receptacle
Quick Disconnect
Plug
(4) #10 Fasteners
(Not Provided)
Lower Housing
(3) #12 Philips
Pan Head Screw
Loosen Set Screw with
1/8” Allen Wrench to
Remove Guard
Ceiling
Apply Caulking between
Ceiling and Fixture when used
in Wet Location Applications
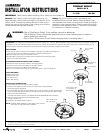
(12) Ø.210 KO
(5.33)
Ø2.75
(69.8)
Ø3.50
(88.9)
Ø4.75
(120.6)