


6405/4410 Install
PAGE 4
4. Repeat steps 1 through 3 for the passenger side identifying the right side active turn signal wire
(recommend trying dark blue w/white tracer wire) and tapping the passenger mirror into it using a
scotchlok.
5. Take the black wire from inside the driver side two-strand harness that you have run into the cab and the
black wire from the passenger side and crimp them together in the ring terminal provided. The turn
signal system can then be grounded under the dash.
6. Test the turn signal system by turning on your turn signals and checking to see that the turn signal
indicators in the mirror glass light up. If they do not, re-check to see that you have scotchloked into the
correct wires.
MIRROR WIRING:
(BEFORE YOU START THE WIRING PROCESS, PLEASE DISCONNECT THE NEGATIVE
CABLE FROM THE BATTERY)
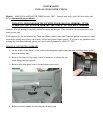
1. Using the templates and measurements provided with your switch kit
assembly, prepare the driver side trim panel for the in/out switch and
glass tilt switch.
In/Out Rocker Switch: We recommend placing the in/out switch on the
triangular-shaped trim piece as shown. The center of the switch should
be 2” from the left side of the trim and 2” from the bottom of the trim
piece. If you choose to put it in another location, be sure to check the
clearance before you cut the hole. You will need at least 1¼” clearance
for the back of the switch. It is important to follow measurements on the
diagram provided - - the switch should fit snugly, but not bind. If hole
is cut too small it will cause the in/out switch to stick in a running
position and burn the motors and/or the switch out. The in/out
switch will be snapped into place later in the installation.
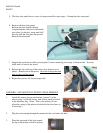
Glass Tilt Switch: We recommend placing the glass tilt
switch on the driver’s side door trim panel, as shown.
Make sure there is clearance on the back of the trim
panel and you will need at least 1 5/8” depth for the
glass tilt switch.