


MODELS 387LM & 387LMC
Universal Wireless Keyless Entry
Read instructions thoroughly BEFORE beginning. Start with garage door
closed. Determine garage door opener type - Smart/Learn button or DIP
Switch. The Smart/Learn button or DIP Switches are located on motor unit
or external receiver. Refer to owner’s manual if necessary.
To prevent possible SERIOUS INJURY or DEATH from a moving gate or garage door:
• ALWAYS keep remote controls out of reach of children. NEVER permit children to operate, or
play with remote controls.
• Activate gate or door ONLY when it can be seen clearly, is properly adjusted and there are no
obstructions to door travel.
• ALWAYS keep gate or garage door in sight until completely closed. NEVER permit anyone to
cross path of moving gate or door.
STOP
Determine Garage Door Opener Types:
© 2008, The Chamberlain Group, Inc.
114A3495B All Rights Reserved
www.LiftMaster.com • 1-800-442-1255
Chamberlain, LiftMaster and Moore-O-Matic are Trademarks of Chamberlain Group. Genie is a Trademark of Overhead Door Corporation. Overhead
Door is a Trademark of Overhead Door Corporation. Linear is a Trademark of Linear Corporation. Master Mechanic is a Trademark of TruServ.
Sears is a Trademark of Sears & Roebuck. Stanley is a Trademark of The Stanley Works. Wayne Dalton is a trademark of Wayne Dalton
Corporation. Do It is a trademark of Do It Best Corporation.
1. Remove cover.
2. Remove battery cover to expose mounting holes.
3. Remove battery and mount keypad using screws provided.
4. Reassemble.
MOUNT THE KEYPAD
NOTICE: To comply with FCC and or Industry Canada (IC) rules, adjustment or modifications of this receiver and/or transmitter
are prohibited, except for changing the code setting or replacing the battery. THERE ARE NO OTHER USER SERVICEABLE PARTS.
Tested to Comply with FCC Standards FOR HOME OR OFFICE USE. Operation is subject to the following two conditions: (1) this
device may not cause harmful interference, and (2) this device must accept any interference received, including interference that
may cause undesired operation.
BATTERY
Replace the 9-Volt battery when keypad light becomes dim
or does not light up. Slide cover up, remove battery cover,
and replace battery. Re-programming may be necessary.
To prevent possible SERIOUS INJURY or DEATH:
• NEVER allow small children near batteries.
• If battery is swallowed, immediately notify doctor.
Install out of the reach of children at a minimum height of 5 feet (1.5 m). Secure keypad to
a smooth surface. Mount the keypad out of the path of the moving garage door, but within
sight of it (4" (10 cm) clearance is needed for the cover.)
CHANGING YOUR 4-DIGIT PIN
Enter existing PIN, press *, enter new PIN and press *. To test and use, enter your new
PIN and press the 0 key.
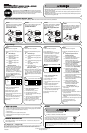
TYPE 1
Programming:
Proceed with instructions according to your garage door opener type. NOTE: Your motor unit and/or remote control may look different.
Chamberlain, Sears Craftsman, LiftMaster,
Master Mechanic and Do It garage door
openers or receivers with:
3 position DIP switches.
TYPE 1 TYPE 2 TYPE 3
Opener
Chamberlain, Sears Craftsman, LiftMaster,
Master Mechanic, Do It, Genie Intellicode,
Overhead Door, Stanley, Wayne Dalton or
Linear garage door openers with:
Smart/Learn button.
TYPE 4
1. Select and write a 4-digit PIN:
__ __ __ __
2. Determine your opener ID using the list
below.
ID DIP Switch Type
• 11 = 9 DIP switch garage door
openers (U.S.)
• 12 = 9 DIP switch garage door
openers (Canada)
• 15 = 8 DIP switch garage door
openers
• 19 = 7 DIP switch garage door
openers
(Write opener ID here: __ __)
3. The first DIP switch must be set to the
“-” position on your remote and opener.
Record your DIP switch sequence for
remaining DIP switches. If the DIP
switch is in the “+” position place a 1,
“0” position place a 2, “-” position place
a 3 in the corresponding box in the
chart below: NOTE: Leave any unused
switch locations blank.
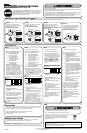
Genie, Linear and Moore-O-Matic garage
door openers or receivers with:
2 position DIP switches.
+
0
-
123456 789
DIP Switch
Sequence
3
Write your DIP switch sequence below:
_________________________
4. Press * and # keys together until
keypad stops flashing.
5. Enter PIN from step 1, press #.
6. Enter ID from step 2, press #.
7. Enter DIP switch sequence from step 3
and press # key.
8. To test and use, wait until lights turn off,
enter your PIN and press the 0 key.
If opener does not function, repeat
programming.
TYPE 2
1. Select and write a 4-digit PIN:
__ __ __ __
2. Determine your opener ID using the list
below.
ID DIP Switch Type
• 13 = 12 DIP switch Genie garage door
openers
• 14 = 10 DIP switch Linear garage door
openers
• 16 = 10 DIP switch Stanley garage door
openers
• 17 = 9 DIP switch Genie garage
door openers
• 18 = 8 DIP switch Linear,
Moore-O-Matic garage door openers
(Write opener ID here: __ __)
3. Record your DIP switch sequence. If DIP
switch is in the “on” or “up” position place
a 1, “off” or “down” position place a 2 in
the corresponding box in the chart below:
NOTE: Leave any unused switch locations
blank.
Write your DIP switch sequence below:
_________________________
4. Press * and # keys together until
keypad stops flashing.
5. Enter PIN from step 1, press #
6. Enter ID from step 2, press #.
7. Enter DIP switch sequence from step 3
and press # key.
8. To test and use, wait until lights turn off,
enter your PIN and press the 0 key.
If opener does not function, flip DIP
switches, so if a switch is “on” or “up” flip
it “off” or “down” in step 3.
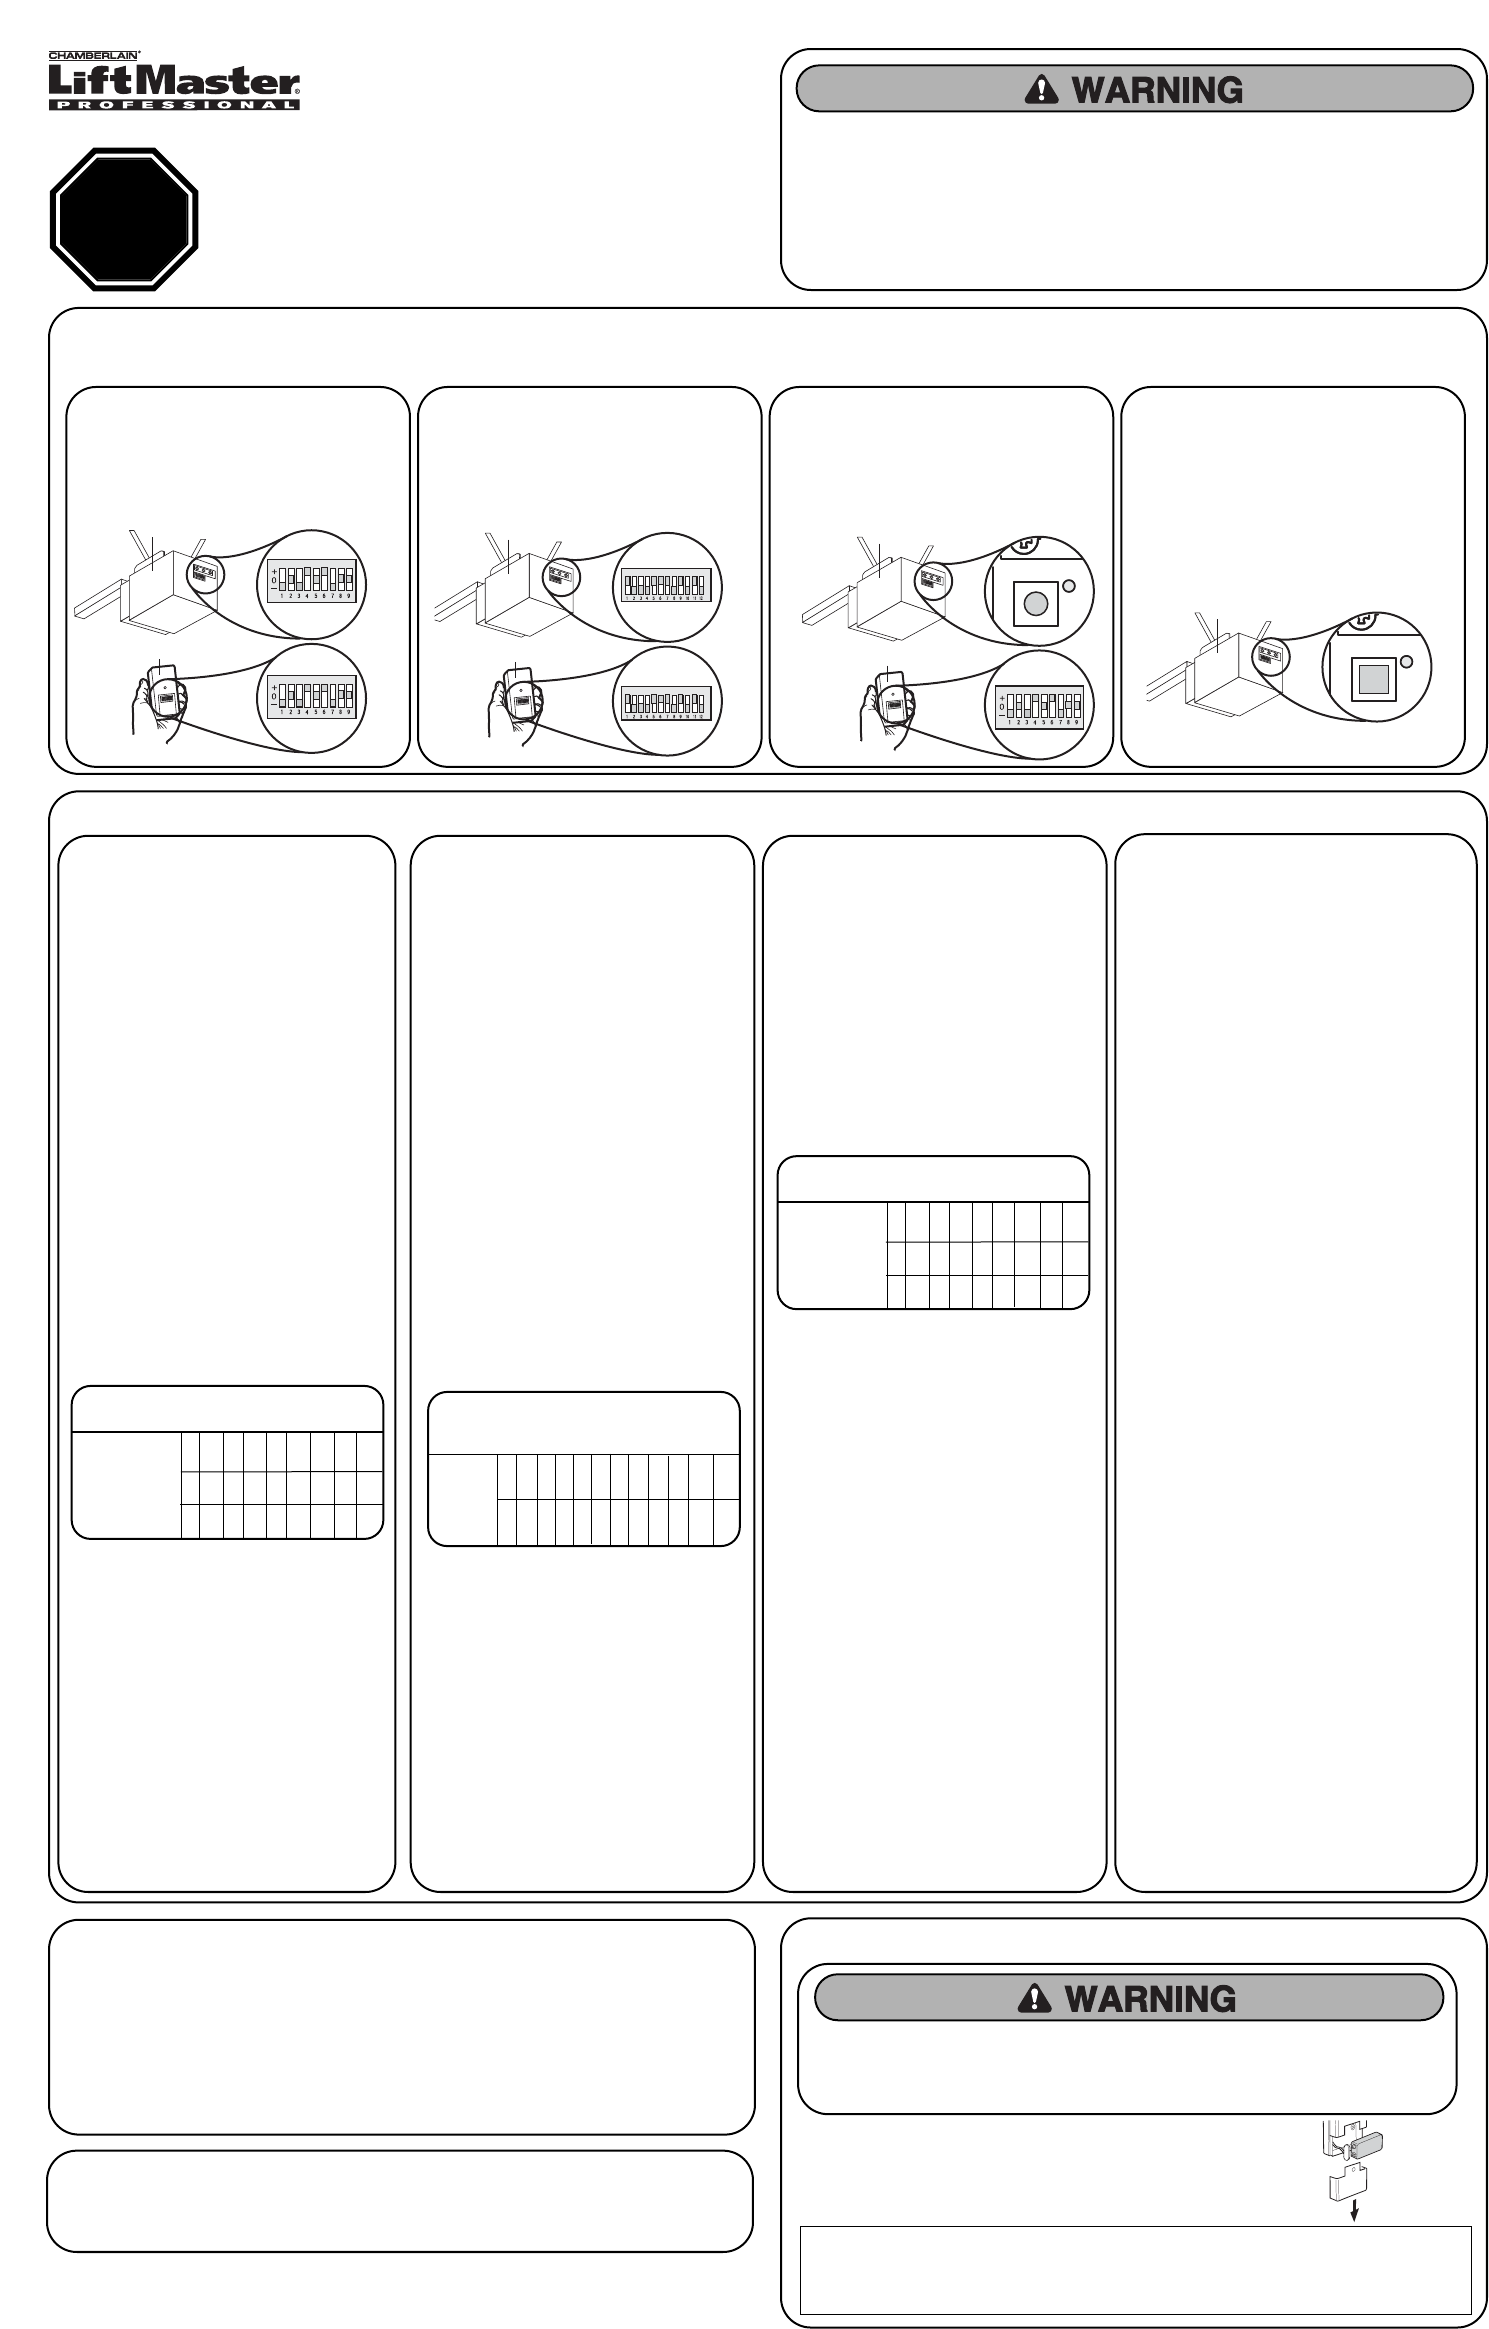
TYPE 3
1. Select and write a 4-digit PIN:
__ __ __ __
2. Your opener ID is 11.
3. Record your DIP switch sequence. Set
your first DIP switch to “-”, your first
DIP switch must be set to the “-”
position on your remote and opener. If
the DIP switch is in the “+” position
place a 1, “0” position place a 2, “-”
position place a 3 in the corresponding
box in the chart below: NOTE: Leave
any unused switch locations blank.
Write your DIP switch sequence below:
_________________________
4. Press * and # keys together until
keypad stops flashing.
5. Enter PIN from step 1, press #.
6. Enter 11, press #.
7. Enter DIP switch sequence from step 3,
press #.
8. Press and release the Smart/Learn
button on garage door opener.
9. Enter your 4 digit PIN and press the 0
key.
10. To test and use, wait until light turns off,
enter your PIN and press the 0 key.
If opener does not function, repeat
programming.
TYPE 4
1. Select and write a 4-digit PIN:
__ __ __ __
2. Determine your opener ID using the list
below.
ID Garage door opener brand and
manufacturing dates
• 1 = Linear garage door openers
manufactured from 1997 to present.
• 2 = Chamberlain, Sears Craftsman,
LiftMaster, Master Mechanic and
Do It garage door openers manufactured
from 1997 to 2004 [Orange Button].
• 3 = Chamberlain, Sears Craftsman,
LiftMaster, Master Mechanic and
Do It garage door openers manufactured
from 2005 to present [Purple Button].
• 4 = Chamberlain, Sears Craftsman,
LiftMaster, Master Mechanic and
Do It garage door openers manufactured
from 1993 to 1996 [Green Button].
• 5 = Genie Intellicode and Overhead Door
garage door openers manufactured from
2005 to present (315 MHz).
• 6 = Genie Intellicode and Overhead Door
garage door openers manufactured from
1995 to present (390 MHz).
• 7 = Stanley garage door openers
manufactured in 1998-present.
• 9 = Wayne Dalton garage door openers
manufactured in 1999-present.
(Write opener ID here: __)
3. Press * and # keys together until keypad
stops flashing.
4. Enter PIN from step 1, press #.
5. Enter ID from step 2, press #.
6. Press and release the Smart/Learn button on
garage door opener.
7. Enter your 4 digit PIN and press the 0 key.
NOTE: Genie and Overhead Door units, press
“0” twice.
8. To test and use, wait until light turns off, enter
your PIN and press the 0 key.
If opener does not function, repeat
programming.
123456789101112
DIP
Switch
Sequence
ON
OFF
Remote Control
Opener
Opener
Remote Control
ON
ON
Opener
Remote Control
Chamberlain, Sears Craftsman, LiftMaster,
Master Mechanic and Do It garage door
openers or receivers with:
Yellow, white or grey Smart/Learn
buttons.
+
0
-
123456 789
DIP Switch
Sequence
3