


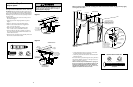
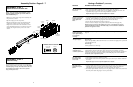
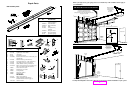

ASSEMBLY STEP 3
Attach the Rail Brackets
7
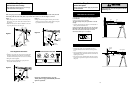
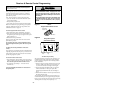
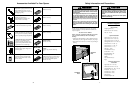
IMPORTANT INSTALLATION INSTRUCTIONS
To reduce the risk of severe injury or death to persons:
1. READ AND FOLLOW ALL INSTALLATION INSTRUCTIONS
2. Install only on a properly balanced and lubricated garage door. An improperly balanced door may not
reverse and could result in severe injury or death. Repairs to cables, spring assemblies and other
hardware must be made by a professional service person before installing opener.
3. Disable all locks and remove all ropes connected to the garage door before installing the opener. Ropes
connected to a garage door can cause entanglement and death.
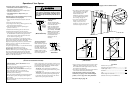
4. If possible, install door opener 7 feet or more above floor with the manual release handle mounted 6
feet above the floor.
5. Do not connect the opener to power source until instructed to do so.
6. Locate the Door Control within sight of the door at a minimum height of 5 feet where small children
cannot reach and away from all moving parts of the door.
7. Install the User Safety Instruction Label on the wall adjacent to the control button and the
Maintenance Instruction Label in a prominent location on the inside of the garage door.
8. Upon completion of the installation, the door must reverse when it comes in contact with a one-inch
high object or a 2x4 laid flat on the floor.
9. Do not wear watches, rings or loose clothing while installing or servicing an opener. Jewelry or loose
clothing can be caught in the mechanism of the garage door or the opener.
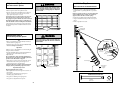
• Align rail brackets to end of rail assembly, as shown.
• Insert two 1/4"-20 x 5/8" hex screws and lock nuts.
Tighten securely with a 7/16" socket.
Rail
Brackets
Rail
1/4"-20
Lock Nuts
1/4"-20x5/8
Hex
Screws
WARNING
CAUTION
WARNING
WARNING
CAUTION
WARNING
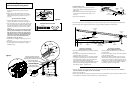
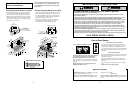
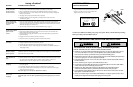
You have now finished assembling your garage door opener. Please read the following warnings
before proceeding to the installation section:
1/4" - 20
Lock Nut
1/4" - 20 x 5/8"
Hex Screw
Hardware Shown Actual Size
1. Does the opener have electric power? Plug a lamp into the outlet. If it doesn't light, check the
fuse box or the circuit breaker. (Some outlets are controlled by a wall switch.)
2. Have you disabled all door locks? Review installation instruction warnings on Page 7.
3. Is there a build-up of ice or snow under the door? The door may be frozen to the ground.
Remove any restriction.
4. The garage door spring may be broken. Have it replaced.
5. Repeated operation may have tripped the overload protector in the motor. Wait
15 minutes. Try again.
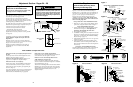
Having a Problem?
Situation Probable Cause & Solution
The opener doesn't
operate from either
the door control or
the remote control:
Opener operates from
the remote control, but
not from the door
control:
1. Is the door control push bar lit? If not, Remove the bell wire from the opener terminal
screws. Short the red and white terminals by touching both terminals at the same time with
a piece of wire. If the opener runs, check for a faulty wire connection at the door control, a
short under the staples, or a broken wire.
2. Are the wiring connections correct? Review Installation Step 7, page 17.
The door operates from
the door control, but not
from the remote
control:
1. If your model has the Lock feature, turn it off.
2. Is the wall push button flashing? Your opener needs to re-learn a remote control code.
Refer to instructions on the opener panel.
3. Does the battery test light glow when the remote control push button is pressed? If not,
replace the battery.
4. Program the receiver to match the remote control code.
5. Repeat the receiver programming procedure with all remote controls.
The remote control has
short range:
The garage door
opens and closes by
itself:
1. Be sure that all remote control push buttons and battery indicator lights are off.
2. Remove the bell wire from the door control terminals and operate from the remote control
only. If this solves the problem, the door control is faulty (replace), or there is an
intermittent short on the wire between the door control and the opener.
The door doesn't open
completely:
1. If the door has been working properly but now doesn't open all the way, increase the up
force. See page 25.
2. Is something obstructing the door? Remove the obstruction or repair the door.
3. If door opens at least 5 feet, the travel limits may need to be increased. One turn equals
2 inches of travel. See page 24.
Repeat the safety reverse test after the adjustment is complete.
The door stops but
doesn't close
completely:
Review the travel limits adjustment procedures on page 24.
Repeat the safety reverse test after any adjustment of door arm length, close force or down
limit.
30
1. Check the battery test light. If the light is dim, replace the battery.
2. Change the location of the remote control in your car.
3. Check to be sure the antenna on the right side panel of opener extends fully.
4. Some installations may have shorter range due to a metal door, foil backed insulation, or
metal garage siding.
Opener noise is
disturbing in living
quarters of home:
If operational noise is a problem because of proximity of the opener to the living quarters, the
Vibration Isolator Kit 41A3263 can be installed. This kit was designed to minimize vibration
to the house and is easy to install.