


Gasket Kit #4322
Installation Instructions
for use on the
Defiant Stove
Vermont Castings’ stoves use a rope-type gasket to
make a seal between some parts. With use, this gasket
can become compressed and begin to lose its effective-
ness. It should then be replaced.
This kit includes materials to re-gasket a Model #1910
or #1945 Defiant stove. This stove model has glass
panels in the front doors. This kit is not appropriate for
the 1975-1988 model Defiant stoves which do not have
glass panels in the front doors.
Contents
• 3.5’ of 5/16” Glass Fiber Gasket for the damper
• 7’ of 3/16” Glass Fiber Gasket (Glass)
• 4¹⁄₂’ of 5/16” Wire Reinforced Glass Fiber “Armaseal”
for the griddle
• 10.9’ of 3/8” Glass Fiber Gasket for the ash door and
main doors
• 3 oz. Tube of Gasket Cement
Tools Required
Phillips screwdriver
Utility knife or scissors
Wire brush
Small cold chisel
Rubber mallet, or hammer and wood block
Flashlight or droplight
Installation Precautions
Be sure the fire is out and the stove has cooled before
replacing the gasket, and be sure to follow the standard
safety procedure for working with dusty materials: Wear
safety goggles and a dust mask.
Regardless of its location, replacing a gasket involves
these steps:
1. Remove the existing gasket by scraping it out of its
channel with an old screwdriver.
2. Clean the gasketing channel with a wire brush. Be
careful with adjacent surfaces, especially if they are
enamelled. Remove any stubborn deposits with a
small cold chisel. Clean both mating surfaces thor-
oughly to bare metal.
3. Cut the appropriate size gasket to length, allowing
an extra inch.
4. Knead the tube of cement before opening, to mix the
contents thoroughly.
5. Place an unbroken 1/8” bead of gasket cement in
the channel. Do not use too much cement as it may
saturate the gasket; the gasket must remain soft
and resilient. One tube of cement will produce a 1/8”
bead sufficient for all the gasket in this kit.
6. Starting with one end, press the gasket into the
cemented channel. If the gasket goes around and
meets itself, ensure that you have a good joint be-
fore trimming the excess gasket. Do not overlap or
leave ragged edges.
7. Seat the gasket by placing it firmly against its normal
mating surface. A slip of waxed paper between the
gasket and its mating surface will help keep the ce-
ment from traveling through the gasket and sticking
to the mating surface. Clean away any excess ce-
ment.
8. With enamel stoves, be careful to keep cement off
the enamel finish. If cement does accidentally get on
the enamel, wash it off immediately with warm water.
9. Allow to dry. Be sure to remove the waxed paper!
10. If you have questions, refer to the Defiant Owner’s
Manual, or a Vermont Castings Dealer.
2003144 8/08 Rev. 6
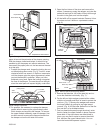
Griddle
Remove the griddle. Pull off the old gasket and clean
the channel with the wire brush. Set the steel reinforced
5/16” gasket in the griddle channel and mark the cor-
rect length. Place the gasket on a wood cutting surface
and trim with a utility knife or scissors. Twist the ends
slightly to prevent unraveling. Place a continuous 1/8”
bead of gasket cement in the channel and press the
gasket into place. Replace the griddle and compress
against the gasket by striking around the edges with
the rubber mallet or hammer and block of wood. Do not
strike the stove top.
Installation Instructions
Gaskets provide a tight seal between moving parts.
Eventually these gaskets will become compressed and
will no longer seal properly. Replacing the gaskets will
improve performance. For a guide to each gasketed
area, refer to the following sections and illustrations.