


In automatic changeover, the zoning system works on a first come
first serve basis. If 1 zone is calling for heating and the other for
cooling, the zone which sent its demand to the I/O center first will
operate the equipment in that mode until that zone is satisfied.
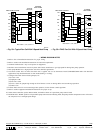
Step 5—Duct Temperature Optimizer (DTO)
For Monitoring Leaving Air Temperature
As the WeatherMaker Two-Zone System operates through a
heating or cooling cycle, the zone demands will change. This
changes actual load that is applied to the HVAC equipment. If the
zone airflow decreases, the cooling equipment will tend to lower
supply-air temperatures which could tend to exceed the LAT trip
limits. Conversely, the heating equipment will tend to raise the
supply-air temperatures which could exceed high trip limits. In
cooling, when the LAT reaches the non-adjustable low tempera-
ture trip limit (50°F) the LAT algorithm begins operating, closed
dampers are initially opened 3 positions, then 1 position every 20
sec there after until full open. WeatherMaker Two-Zone will not
shut down second-stage cooling (if used); however, if temperature
continues to drop to 45°F, the zoning system will turn off both
stages of cooling. If the temperature improves, the system will stay
in the duct temperature optimizer mode until the LAT reaches
55°F or higher. At 55°F the LAT algorithm will reset and return
dampers to their original position. In the heating mode, Weather-
Maker Two-Zone will perform the same duct temperature optimi-
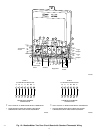
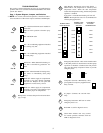
zation. The trip limits will be determined by the jumper setting.
(See Fig. 12.) This will continue until the LAT problem is
corrected.
This control helps WeatherMaker Two-Zone System cope with
installations where the air conditioning system may suffer from
poor ductwork, improperly sized heating or cooling equipment,
and/or improper settings of the barometric bypass damper. This
control is especially useful in retrofit applications where the size
and routing of the ductwork may not be entirely known or
satisfactory.
The duct temperature optimizer works by controlling how cold or
hot the air inside the supply-air duct gets by monitoring the
temperature of the air inside the supply-air system.
Whenever WeatherMaker Two-Zone is providing heating or cool-
ing, the zone within the home that is asking for conditioned air will
always have its damper fully open. The other zone in the system
may or may not have an open damper depending upon its
particular needs. If the ductwork is too small (or the air
conditioner/heater is too large), then the zone requiring condi-
tioned air may not be able to take enough air to allow your
equipment to operate properly. WeatherMaker Two-Zone will
detect this, and open up the closed damper allowing the equipment
to continue to operate.
The duct temperature optimizer may be disabled on the
control center. A 10k resistor can be installed in place of the
duct sensor at the terminal block. By disabling the duct
temperature optimizer, the LAT safety algorithm is removed
from the system.
It is highly recommended that you use this control option. The
heating LAT is adjustable for the duct sensor. In this Installation
Instruction, you will find the section showing an adjustment for the
heating LAT. (See Fig. 12.) It is very important that this tempera-
ture is properly set. For gas or oil furnaces, the temperature limit
will be in the higher temperature range. For heat pumps the
temperature setting should always be in the lower temperature
range.
If you encounter a situation where 1 zone seems to have poor
ductwork, then the WeatherMaker Two-Zone system is capable of
reverting back to a fully open, constant-volume system. If this
condition persists, it should always be looked upon as an indication
of a HVAC problem, not a WeatherMaker Two-Zone problem.
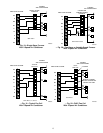
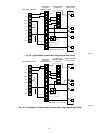
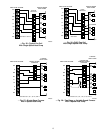
Step 6—Electronic Thermostat Connection with
WeatherMaker Two-Zone Control
Carrier electronic non-programmable and programmable thermo-
stats can be connected to the WeatherMaker Two-Zone. See
pre-sale literature for thermostat part numbers.
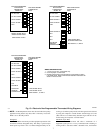
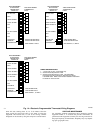
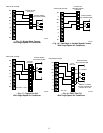
NOTE: The zone control board is only capable of 2-stage heat
and 2-stage cool operation. Fig. 13 and 14 will reflect these
applications only. Review and understand the following items
before installing.
THERMOSTAT SETUP
1. Thermostat will not operate unless both R and C are connected
to zone module input.
2. If selected thermostat is a heat pump (HP) or 2-speed (2S)
model, convert thermostat to air conditioning operation. This
will assure that Y signals are generated for cooling, and W
signals are generated for heating from thermostat to zone
module input. The thermostat O/W2 output will now be the
second-stage heat call. If installation is a heat pump system,
the zone control board will provide proper output signal to
heat pump.
3. Select "Zoning" option on thermostat. This will disable the
Timeguard and 4-cycle per hr (cph) protection built into
thermostat. Let zone control board perform the Timeguard and
cycle protection. Refer to thermostat Installation Instruction
under Zoning for more detail.
4. The zone 1 thermostat is the only thermostat that can control
continuous fan operation with zoning. Connect G between
zone 1 thermostat and zone 1 input on zone control module.
5. Follow all safety and installation considerations outlined in the
thermostat Installation Instructions.
ZONE CONTROL BOARD SETUP
1. Configure zone control board jumper for Tstat (thermostat)
Fnc option only. Do not use Tstat HP option. When Tstat Fnc
is selected this will setup control inputs to recognize Y1 and
Y2 for first- and second-stage cooling, W1 and W2 for first-
and second-stage heating.
2. Configure zone control board for either Equipmt (equipment),
HP or Fnc. When a heat pump system is used, Equipmt HP
mode should be selected. The zone control board will provide
the proper output signal to the heat pump. When a gas/electric
furnace is used, Equipmt Fnc mode should be selected for
proper output signal.
3. Configure zone control board for either Fnc Ht, w/f (with fan),
or w/of (without fan). With Fan mode should be selected when
a heat pump is installed and fan is needed to come on
immediately with demand. Without Fan mode should be
selected when fan is controlled by gas/electric furnace.
4. Configure zone control board for either DTO On or Off. When
DTO On is selected (Factory default) and if a LAT trip occurs,
closed dampers will begin opening to try and keep equipment
running by maintaining proper air temperatures. However, if
LAT temperatures exceed their limits, equipment will start
staging down. When DTO Off is selected, equipment will
stage down. Closed dampers will not open on inial trip,
however if LAT temperatures exceed their limits, control will
lockout and damper will open.
5
→