


20
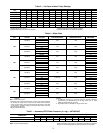
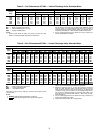
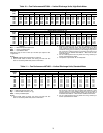
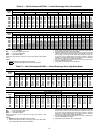
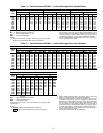
Step 9 — Adjust Evaporator-Fan Speed —
Ad-
just evaporator-fan rpm to meet jobsite conditions. Table 5
shows fan rpm at motor pulley settings. Table 6 shows motor
performance. See Table 7 for Accessory/FIOP Static Pressure.
Refer to Tables 8-29 to determine fan speed settings.
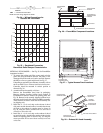
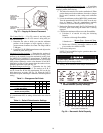
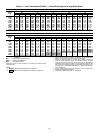
DIRECT-DRIVE MOTORS — The evaporator-fan motor
factory speed setting is shown on label diagram affixed to base
unit. If other than factory setting is desired, refer to label dia-
gram for motor reconnection. See Fig. 40 for direct drive motor
location.
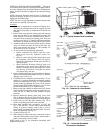
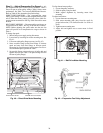
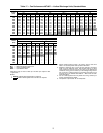
BELT-DRIVE MOTORS — Fan motor pulleys are factory set
for speed shown in Table 1. See Fig. 41 for belt drive location.
NOTE: Before adjusting fan speed, make sure the new fan
speed will provide an air temperature rise range as shown in
Table 1.
To change fan speed:
1. Shut off unit power supply and tag disconnect.
2. Loosen belt by loosening fan motor mounting nuts. See
Fig. 41.
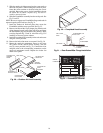
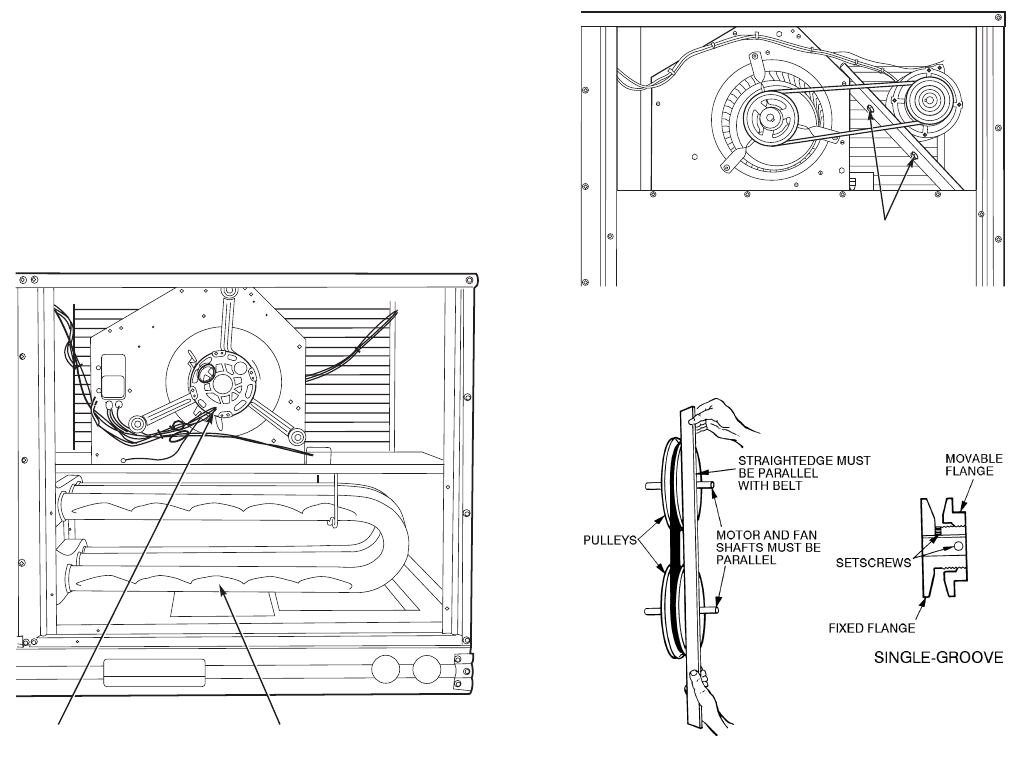
3. Loosen movable pulley flange setscrew (see Fig. 42).
4. Screw movable flange toward fixed flange to increase
speed and away from fixed flange to decrease speed.
Increasing fan speed increases load on motor. Do not ex-
ceed maximum speed specified in Table 1.
5. Set movable flange at nearest keyway of pulley hub and
tighten setscrew. (See Table 1 for speed change for each
full turn of pulley flange.)
To align fan and motor pulleys:
1. Loosen fan pulley setscrews.
2. Slide fan pulley along fan shaft.
3. Make angular alignment by loosening motor from
mounting.
To adjust belt tension:
1. Loosen fan motor mounting nuts.
2. Slide motor mounting plate away from fan scroll for
proper belt tension (
1
/
2
-in. deflection with 8 to 10 lbs of
force).
3. Tighten motor mounting nuts.
4. Adjust bolt and tighten nut to secure motor in fixed
position.
MOTOR MOUNTING
PLATE NUTS
Fig. 41 — Belt Drive Motor Mounting
Fig. 42 — Evaporator-Fan Pulley Adjustment
DIRECT DRIVE MOTOR
DIMPLED HEAT EXCHANGER
Fig. 40 — Direct-Drive Motor Mounting