


PRE-START-UP
Evacuate and Dehydrate
the entire refrigerant sys-
tem by either of the methods described in Carrier Standard
Service Techniques Manual, Chapter 1.
Leak Test the entire refrigerant system by the pres-
sure method described in Carrier Standard Service Tech-
niques Manual, Chapter 1. Use R-22 at approximately
25 psig (172.4 kPa) backed up with an inert gas to a total
pressure not to exceed 245 psig (1689 kPa).
Turn on Crankcase Heaters for 24 hours before start-
ing the unit to be sure all the refrigerant is out of the oil. To
energize the crankcase heaters, proceed as follows.
1. Set the space thermostat set point above the space tem-
perature so there is no demand for cooling.
2. Close the field disconnect.
3. Turn the fan circuit breaker on. Leave the compressor cir-
cuit breakers off. The crankcase heaters are now
energized.
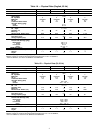
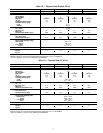
Add Preliminary Charge to the refrigerant system ac-
cordingly to Carrier Standard Service Techniques Manual,
Chapter 1. By the liquid charging method and charging by
weight procedure, charge the units with approximately the
amounts of R-22 refrigerant shown in Table 6.
Table 6 — Charging Data (R-22)
UNIT
REFRIGERANT CHARGE - lb (kg)
CONDENSING
TEMP
DURING
CHARGING-F(C)
Required Charge
Above Clear
Sight Glass
Outdoor Unit
Total Charge
(Approx)
38AE012 3.0 (1.4) 22 (10) 125 (51.7)
38AE014 4.8 (2.2) 23 (10.5) 123 (50.6)
38AE016 3.4 (1.5) 23 (10.5) 130 (54.4)
38AKS024 3.4 (1.5) 28 (12.7) 131 (54.8)
Before Starting Unit ensure the following:
1. Compressor oil level must be at least within sight in
the compressor sight glass. Add oil if necessary (see
Tables 1A-1D and Oil Charge section).
2. Compressor holddown bolts must be snug, but not tight.
Refer to Compressor Mounting section and tag on com-
pressor foot.
3. All internal wiring connections must be tight; all barriers
and covers must be in place.
4. Electrical power source must agree with unit nameplate
rating.
5. All service valves must be open.
6. Crankcase heater must be firmly locked into the com-
pressor crankcase.
START-UP
To Start Unit —
Set thermostat set point below the space
temperature. After starting unit, there is a delay of at least 3
seconds before compressor starts.
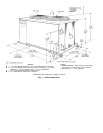
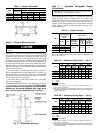
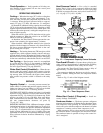
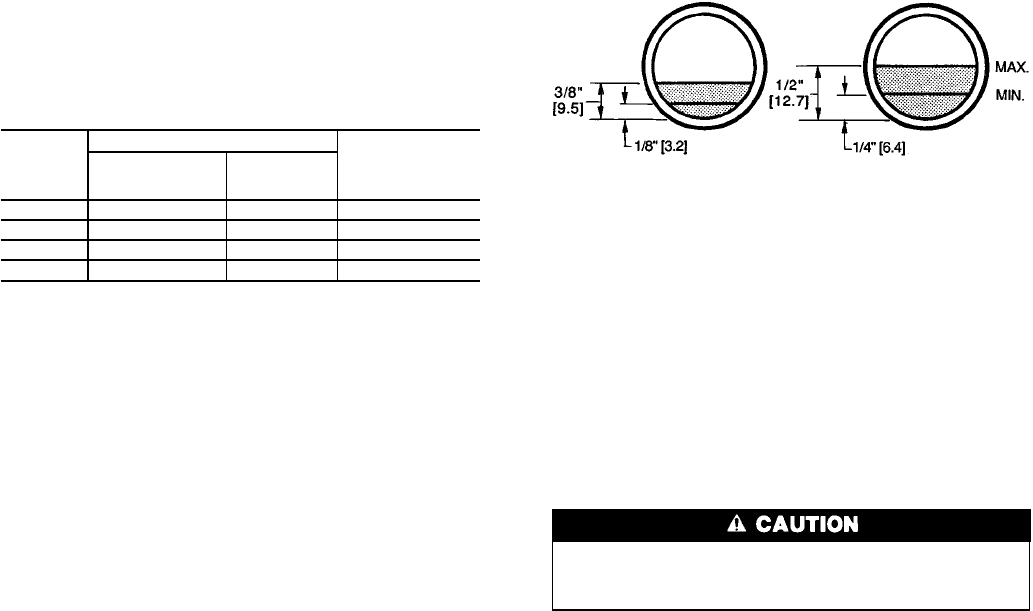
Oil Charge (see Tables 1A-1D) —Allow unit to run for
about 20 minutes. Stop unit and check compressor oil level
at sight glass. Add oil if necessary to bring oil to the correct
level shown in Fig. 8. Use only Carrier-approved compres-
sor oil. Approved oils are:
Witco Chemical Corp. ................Suniso 3GS
Texaco, Inc. ...........................WF32
Petroleum Specialties Co. ...............Cryol 150
Do not reuse drained oil or use any oil that has been ex-
posed to atmosphere. Procedures for adding or removing oil
are given in Carrier Standard Service Techniques Manual,
Chapter 1, Refrigerants.
If oil is added, run unit for additional 10 minutes. Stop
unit and check oil level. If level is still low, add oil only after
determining that piping system is designed for proper oil re-
turn and that the system is not leaking oil.
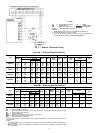
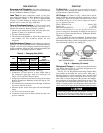
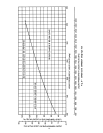
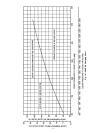
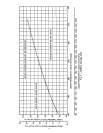
Refrigerant Charge — Actual start-up should be done
only under supervision of a qualified refrigeration me-
chanic. Refer to charging charts.
See Fig. 9-11 for the particular unit being charged. Mea-
sure pressure at the liquid line service valve, being sure a
Schrader depressor is used if required. Also, measure liquid
line temperature as close to the liquid service valve as pos-
sible. Add or reduce charge until the pressure and tempera-
ture conditions of the charging charge curve are met. If liq-
uid pressure and temperature point falls above curve, add
charge. If liquid pressure and temperature point falls below
curve, reduce the charge until the conditions match the curve.
Never charge liquid into the low-pressure side of sys-
tem. Do not overcharge. During charging or removal of
refrigerant, be sure indoor fan system is operating.
38AKS024
(06E COMPRESSOR)
38AE012,014,016
(06D COMPRESSOR)
Fig. 8 — Operating Oil Levels
9