2
Carrier’s diagnostic standard tier display tools such as
Navigator or Scrolling Marquee can be used with the Premier-
Link controller. Access is available via an RJ-11 connection or
a 3-wire connection to the communication bus. User interfaces
available for use with the CCN system are PC’s equipped with
Carrier user interface software such as Service Tool, Comfort-
VIEW™, or ComfortWORKS® software. When used as part
of the CCN, other devices such as the CCN data transfer,
Linkage Thermostat, or Comfort Controller can read data from
or write data to the PremierLink retrofit controller.
INSTALLATION
Inspection —
Inspect package contents for visual defects
that may have occurred during shipping. If there is any dam-
age, contact your local representative before proceeding.
PremierLink Controller Hardware —
The Premier-
Link package consists of the following hardware:
• control module (with plastic cover and label)
• 7 wire harnesses
• 10 spade connectors
• wire nuts
• 4 no. 6x1-in. self-drilling Phillips pan head mounting screws
Field-Supplied Hardware —
PremierLink controller is
configurable with the following field-supplied sensors:
• space temperature sensor (33ZCT55SPT, 33ZCT56SPT, or
33ZCT58SPT) in sensor mode or thermostat mode for
economizer control
• supply air temperature sensor (33ZCSENSAT) required for
all applications
• indoor air quality sensor (33ZCSENCO2, 33ZCT55CO2,
33ZCT56CO2) required only for demand control ventilation
• outdoor air quality sensor (33ZCTSENCO2) required only
for demand control ventilation
• outdoor air temperature sensor (HH79NZ017)
• outdoor air enthalpy switch (33CSENTHSW)
• return air enthalpy sensor (33CSENTSEN)
For specific details about sensors, refer to the literature
supplied with the sensor.
SPACE TEMPERATURE (SPT) SENSOR — A field-supplied
Carrier space temperature sensor is required to maintain space
temperature in sensor mode. There are three sensors available for
this application:
• 33ZCT55SPT, Space Temperature Sensor with Override
Button
• 33ZCT56SPT, Space Temperature Sensor with Override
Button and Set Point Adjustment
• 33ZCT58SPT, T58 Communicating Room Sensor with
Override Button, Set Point Adjustment, and Manual Fan
control
If controlling an economizer in the thermostat mode, a duct
sensor must be mounted in the return air duct and wired to SPT
input.
SUPPLY AIR TEMPERATURE (SAT) SENSOR — The
PremierLink controller must be connected to a field-supplied
supply air temperature (SAT) sensor (part number
33ZCSENSAT) to monitor the temperature of the air delivered.
The SAT consists of a thermistor encased within a stainless
steel probe. The probe is 6 in. nominal length. The SAT sensor
has 114 in. of unshielded, plenum-rated cable (2 conductors,
22 AWG [American Wire Gage]). The sensor range is –40 to
185 F with a nominal resistance of 10,000 ohms at 77 F. The
sensor measures temperature with an accuracy of ±0.36 F.
Ideally, the SAT sensor should be located in the supply air
duct downstream from unit heat source to control.
INDOOR AIR QUALITY CO
2
SENSOR — An indoor air
quality sensor is required for CO
2
level monitoring. Three
different CO
2
sensors are available for this application:
• 33ZCSENCO2 sensor is an indoor, wall-mounted sensor
with an LED (light-emitting diode) display
• 33ZCT55CO2 sensor is an indoor, wall-mounted sensor
without display. The CO
2
sensor also includes a space tem-
perature sensor with override button
• 33ZCT56CO2 sensor is an indoor, wall-mounted sensor
without display. The CO
2
sensor also includes a space tem-
perature sensor with override button and temperature offset
OUTDOOR AIR QUALITY CO
2
SENSOR — The outdoor
air CO
2
sensor (33ZCTSENCO2) is designed to monitor car-
bon dioxide (CO
2
) levels found in diesel exhaust and control
ventilation systems. It comes with an outdoor enclosure. This
sensor provides an outdoor baseline for differential DCV (De-
mand Control Ventilation) control.
OUTDOOR AIR TEMPERATURE SENSOR — The outdoor
air temperature sensor (HH79NZ017) monitors the tempera-
ture outside of the outside air entering the equipment.
OUTDOOR AIR ENTHALPY SWITCH — The outdoor air
enthalpy switch (33CSENTHSW) monitors outdoor air
enthalpy and dry bulb temperature to determine when free
cooling can be used.
RETURN AIR ENTHLAPY SENSOR — The return air en-
thalpy sensor (33CSENTSEN), when used in conjunction with
the outdoor air enthalpy switch, compares the outdoor air and
return air to determine when free cooling can be used.
Mount PremierLink Control
LOCATION — The PremierLink controller should be
located inside one of the available service access panels of the
indoor unit. Be sure the location selected prevents moisture
and rain from coming into contact with the circuit board.
Select a location which will be safe from water damage and
allow sufficient access for service and wiring. For service
access, there should be at least 6 in. of clearance between the
front of the PremierLink controller and adjacent surfaces. Be
sure to leave
1
/
2
-in. clearance in front of RJ-14 connector
for attaching RJ-14 cable from CCN or Navigator™ display
module. A field-supplied right angle 6-pin RJ-14 connector can
be attached if necessary.
NOTE: If the PremierLink controller must be installed in a
location where there is not easy access to CCN connectors,
a remote connection kit (part number 33CSREMCCN) can
be ordered.
MOUNTING — Refer to Mounting Sheet included with
controller for additional detailed mounting instructions.
1. Ensure all power to unit is removed.
2. Locate a space in the unit control panel or a space inside
the equipment that is free from dirt and dust.
3. Remove plastic cover by gently squeezing the middle of
longer sides of the cover and pull away from the board.
This will release the locking tabs inside.
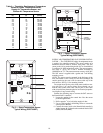
4. Mount the PremierLink controller to the desired location
by holding the controller firmly in place. Be sure all
standoffs are in contact with mounting surface and board
DOES NOT flex! Attach controller to unit using 4 screws
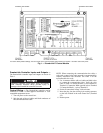
provided ensuring a secure grip to unit surface. See Fig. 1.
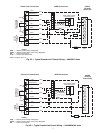
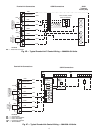
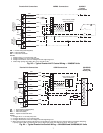
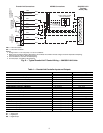
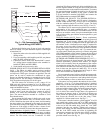
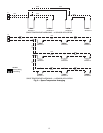
5. Provide 24 v power to the circuit board from the unit
transformer or an isolated power transformer. Use the
appropriate conductors for voltage per base unit name-
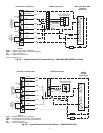
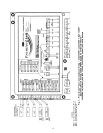
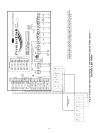
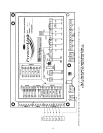
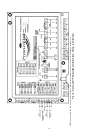
plate. See Fig. 2A-2I. Board will require 10 va at 24 vac.
6. Replace plastic cover to protect circuit board.
7. Restore power to unit.
IMPORTANT: PremierLink™ part number
33CSPREMLK should only be used in applications
where the integrity of the Underwriters Laboratories rat-
ing will be maintained.


