


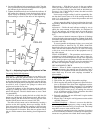


7. When removing the labyrinth seals, note the position of
the anti-rotation button located on the inside of the top
half of the seal. Pull up the garter spring surrounding
the floating labyrinth seal and carefully slip out the top
half. Rotate the garter spring until the lock is visible.
Twist counterclockwise to disengage the lock, remove
the garter spring, then rotate the lower half of the seal
out of the groove in the bearing housing while noting
the orientation of the oil drain holes. Note the condition
of these floating labyrinth seals. If they are cracked or
chipped, they must be replaced. Do not attempt to reuse
a damaged seal.
8. To remove the bottom bearing half, the shaft must be
raised a slight amount to relieve pressure on the bear-
ing. On the rear end, this can be done by jacking or lift-
ing on the shaft extension. (Care must be taken to pro-
tect the shaft from damage.) On the front end, jacking
or lifting can be done using bolts threaded into the tapped
holes provided in the shaft end.
NOTE: Lift only enough to free the bearing; over-
lifting the shaft can cause difficulty in removing the
bearing.
9. Roll the bottom bearing half to the top of the shaft jour-
nal and then lift it using suitable eyebolts threaded into
the holes provided. Again, avoid any contact with the
shaft shoulders that could damage the bearing thrust faces.
Place the lower bearing half on a clean, dry surface to
protect the parting surfaces.
Use extreme care when rolling out the lower bear-
ing half. Keep the hands and fingers well clear of
any position where they might be caught by the bear-
ing half if it were accidentally released and rotated
back to its bottom position. Serious personal injury
could result.
10. Protect the shaft journal by wrapping it with clean, heavy
paper or cardboard.
Reassembly — Bearing reassembly is basically a reversal of
the disassembly procedures outlined above, with the follow-
ing additional steps.
Curil-T is the only approved compound for use in the
assembly of the bearings on this motor. Other products
may harden and impede the operation.
During the reassembly of the bearing parts, a thin layer
of Curil-T should be applied to all gasketed and ma-
chined interface surfaces. This suggestion does not ap-
ply to the machined surfaces of the bearing liner halves.
When seating the bearing shell, apply a thin layer of
lubricating oil at the spherical surface of the liner. Slowly
roll the lower bearing liner into the bearing housing mak-
ing sure that the split surfaces of the liner and the hous-
ing are flush. Gradually lower the shaft onto the bear-
ing. The weight of the shaft will help rotate the bearing
liner so that the babbitt surface of the liner will match
the slope of the journal. Sometimes it is necessary to
use a rubber mallet to tap lightly on the bearing housing
while slowly rolling the shaft to help this seating
operation.
1. The interior of the bearing housing should be cleaned
and then flushed with clean oil or kerosene.
2. The bearing halves and the shaft journal should be wiped
clean using lint-free cloth soaked with clean oil.
3. All parts should be carefully inspected for nicks, scratches,
etc., in any contact surfaces. Such imperfections should
be removed by an appropriate method such as stoning,
scraping, filing, etc., followed by thorough cleaning.
4. Apply a few drops of oil to the journal and bearing saddles.
5. Roll the bottom half of the bearing into place and lower
the shaft.
6. Before installing the floating labyrinth seal halves, ob-
serve their condition. Do not attempt to use a cracked or
chipped seal. The bottom half seal has a set of drilled
holes in its side face. These must be placed at the bot-
tom toward the inside of the bearing so that accumu-
lating oil may drain back into the housing.
7. Put a small bead of Curil-T around the bottom seal half
outside diameters on both sides adjacent to the garter
spring groove. This prevents oil from bypassing the seal
around its outside.
8. Place the bottom seal half on top of the shaft (ensuring
that the proper orientation of the drain holes is pro-
vided) and roll it into position. Install the top half of the
seal making sure that the anti-rotation button is located
in the proper position on the inboard side of the bearing.
Insert the garter spring pulling up on both ends to per-
mit engaging the lock. Run a small bead of Curil-T around
the outside diameters on both sides adjacent to the gar-
ter spring groove on this half also.
9. Carefully reassemble the two oil ring halves. Inspect the
dowel pins for burrs and straightness and make any cor-
rections required. Do not force the ring halves together.
Excessive force may alter the roundness or flatness of
the ring which can change its oil delivery performance.
Apply locking compound to the oil ring screws prior to
reassembly.
10. Assemble the top half of the bearing liner making sure
that the match marks on the liner halves align with one
another. Failure to ensure alignment of match marks can
cause misalignment and possible damage to bearings and
journal surfaces. Reinstall any split bolts, if supplied,
between the bearing halves.
11. Some of the pipe plugs in the housing are metric thread
type and have a copper, lead, or similar material washer.
If these plugs are removed, be careful not to lose the
washers. Before reassembly, inspect the washers and re-
place them if required.
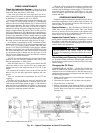
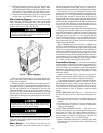
12. Before installing the bearing cap, observe the position
of the floating labyrinth seal. The ‘‘tab’’ must be on top
to engage the pocket. Failure to position the seal prop-
erly will result in damage when the cap is assembled.
13. Carefully lower the bearing housing cap over the float-
ing seals. Keep the bearing cap level to avoid binding
and possibly damaging the seals. The bearing cap should
seat evenly on the bearing housing base.
Do not force the bearing cap down. Damage could
occur to the labyrinth seals.
If the bearing cap does not seat completely, remove and
reset the floating labyrinth seal position. When install-
ing upper bearing cap, the floating labyrinth seals some-
times rotate and the anti-rotation ‘‘tab’’ does not seat in
its holder, thus preventing the bearing housing from seat-
ing properly. This procedure should be repeated until
the bearing cap seats properly.
80