


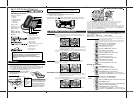

Spirit 410 Corded Telephone
Unpacking your
phone
Important note---back up batteries
The Spirit 410 requires 2 x 1.5V AAA size Alkaline batteries
installed
into the battery compartment before use.
Warning: The caller display will not work without batteries
installed.
In the box you will find:
• Base Unit
• Handset
• Coiled Handset cord
• Telephone line cord
for Base unit
• User manual
Keep the packing
materials in a safe
place in case you later
need to transport
Keep your sales (till)
receipt, which is your
guarantee.
the unit
1. LCD Screen
3. M1,M2,M3 Memory buttons
4. Scroll Up & Down buttons
5. Delete button
6. Set/Store button
7. Memory button
8. LNR(Last Number Redial) button
9. Speakerphone button
10. Mute button
11.R(Recall) button
12.Pause button
2. Ringer light indication
1
2
3
4
5
6
7
8
9
10
11
12
2. Installation
1. Locating the Base unit
The Base unit should be placed on a level surface, in a position where:
the telephone line cable will reach your telephone line socket or
extension socket.
it is not close to a sink, bath or shower, or anywhere else where it
might get wet.
it is not close to other electrical equipment - fridges, washing
machines,
2. Plug the coiled handset
cord into the Handset.
Plug the other end into
the jack on the left
side of the Base unit.
3. Place the Handset in
the Base unit.
Make sure the plugs
click into place.
4. Plug the telephone line cord
free end into
a modular wall jack.
Press the cable into the groove so
5. Lift the Handset and check
for Dial tone
in the earpiece.
Always use the
telephone line
cord supplied
with your
Spirit 410 phone.
Other telephone
line cords may
not work.
to Modular
Wall jack
microwave ovens, TVs, fluorescent lights, etc.
that the Base unit stands level.
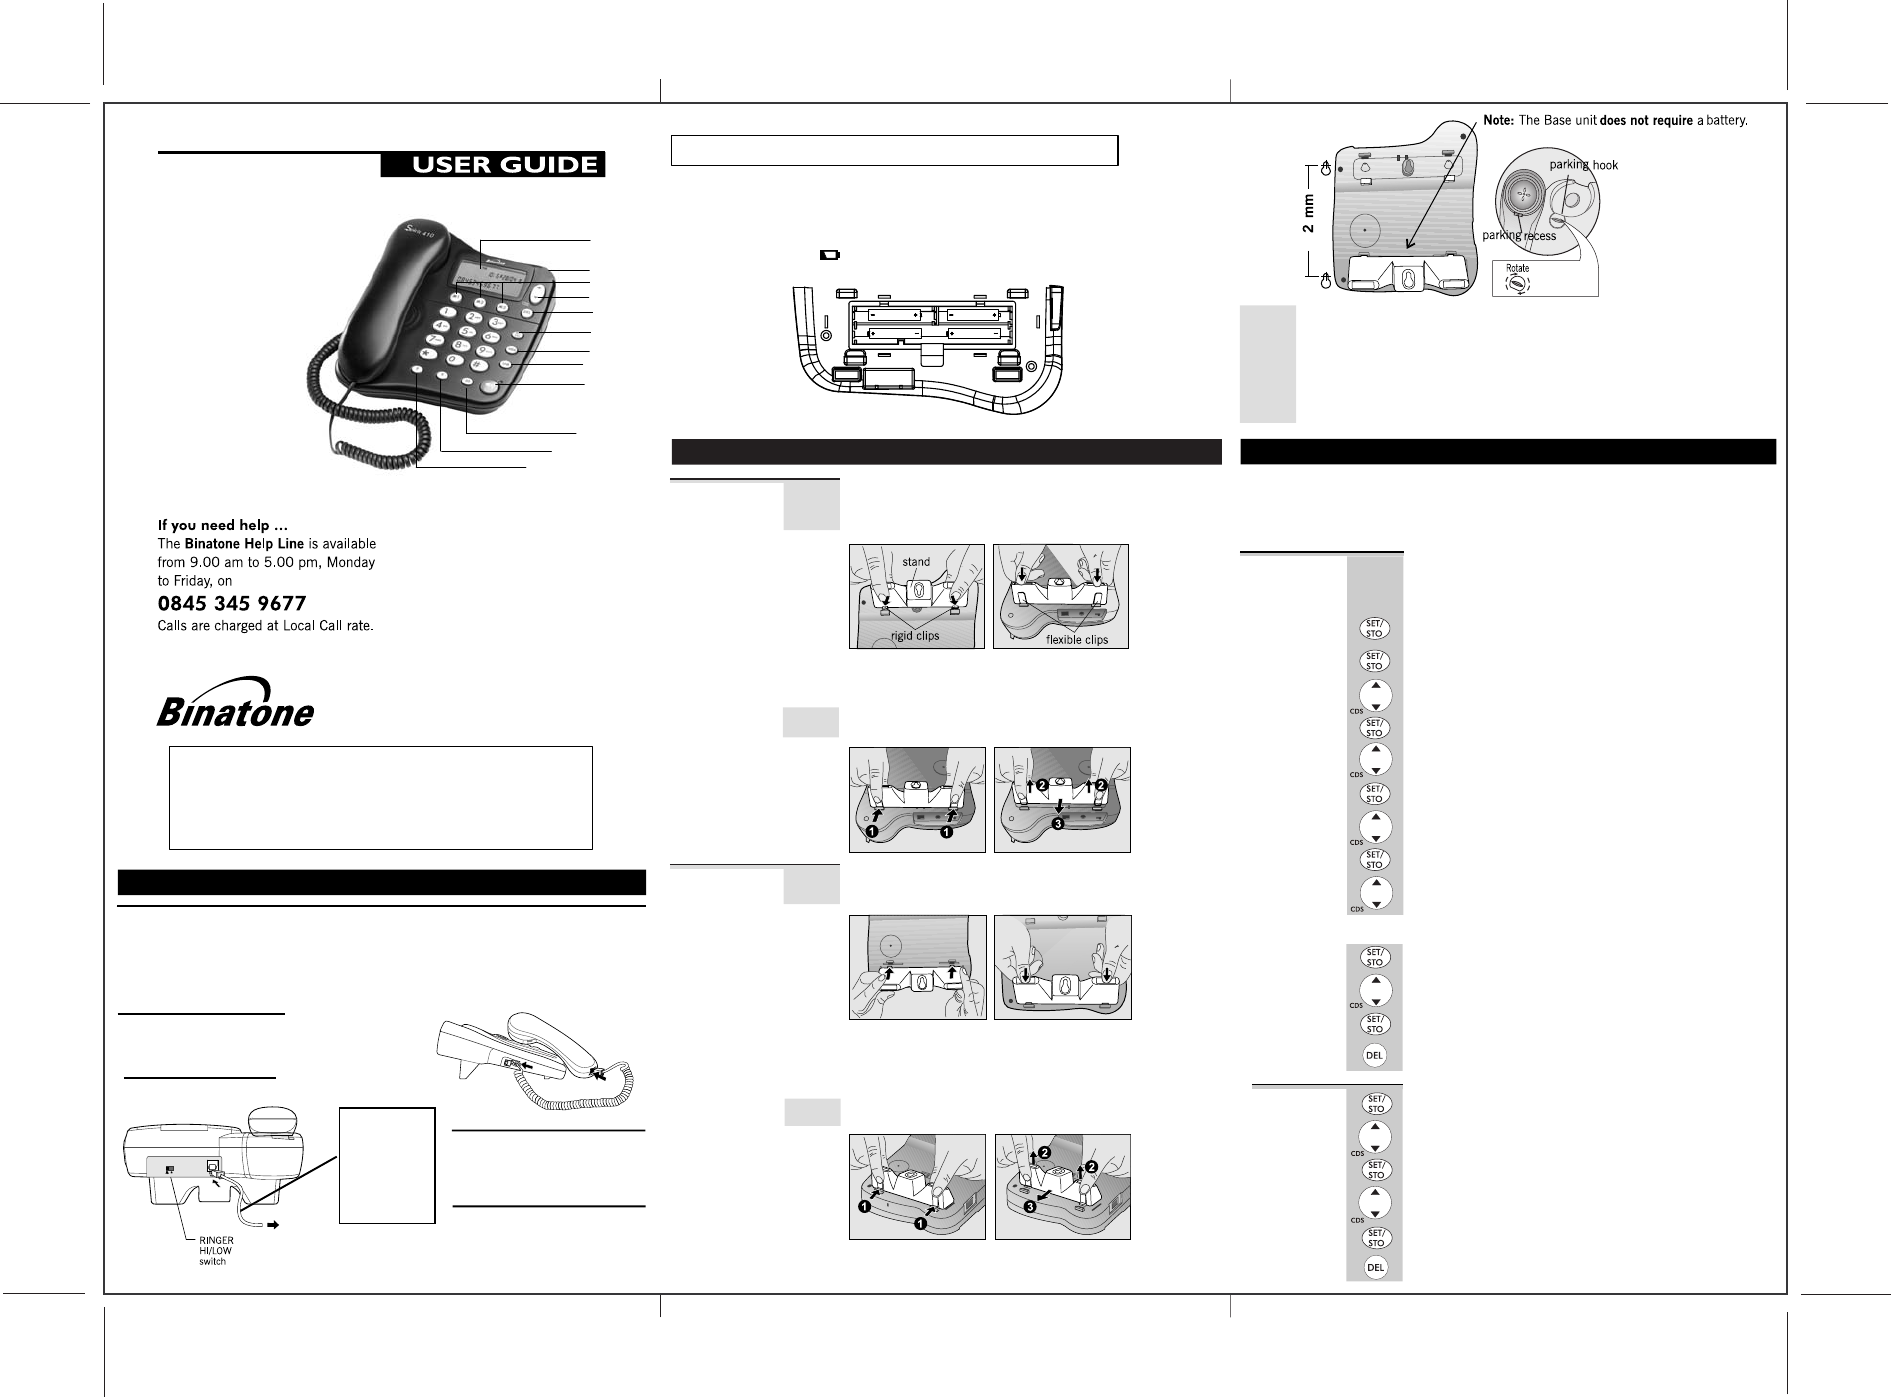
Installing (or Replacing) the Battery
IMPORTANT
- Before removing the battery compartment cover,always
make sure the base unit is disconnected from the telephone line.
Install 2 pcs of Alkaline AAA batteries into the battery compartment and
place back the cover before use.
Note: 1) Please do NOT use Rechargeable batteries in this phone.
,-8806: 27 458 24.39/0/ 810 9428
2)
?GDL QGD A@QQDOT HP JMS<
CHPNJ@T
QGD A@QQDOHDP< QGDT SHJJ ADBMKD
QMQ@JJT CHPBG@OFDC @LC TMRO CHPNJ@T PBODDL SHJJ LMQ SMOI=
will show up of the
SIZE AAA
SIZE AAA
SIZE AAASIZE AAA
PBODDL= >E TMR CM LMQODNJ@BD
3. Desk/Wall mount installation
To place the Spirit 410 on a desk, connect
the bottom of the phone in the
slots near the rear of the base
as shown below .
Desk Mount
Insert the rigid clips of the stand into the slots
the phone (near the rear of
the flexible
clips clicks into place.
To remove the stand, (1) pinch the flexible
clips, (
the stand, and then (3)
slide up and forward (3) as shown below.
To place the Spirit 410 on a wall, connect
bottom of the phone in the
cover as shown
W
all Mount
below.
the stand to
on the bottom of
the base). Press down firmly until
2) pull back
the stand to the
slots near the front of the base
0
and
inatone .com/
08453459677
0818762092
3
online
Desk/Wall mounting continue...
Insert the rigid clips of the stand into the slots
on the bottom of
near the front of
the flexible
clips clicks into place.
To remove the stand, (1) pinch the flexible
the stand, and then (3)
slide up and forward as shown below.
Mark two points on the wall that are 92mm apart to lay the
fixing centers as shown below.
the phone (
the base). Press down firmly until
clips, (
2
) pull back
BE CAREFUL to check that there are no
in the wall.
Fix two screws (supplied with the unit) at the
approximately 7mm
Hang the cradle unit on the screws using the
wall mount slots.
You may need to remove the
tighten the
does not wobble
cradle with the
parking hook on the cradle
arranged to fit in the
parking recess
under the
earpiece on the Handset.
9
electrical wires hidden
marked locations,
between the wall and the the
screw head.
telephone from the wall and
that the cradle is securely fixed and
leaving
screws so
. Place the Handset on the
Set Time/Date
1 In standby mode, press SET/STO button.
Ö
The display shows ' SET 1 DATE '.
2 Press SET/STO button to confirm.
Ö
The 'year' icon will be blinking.
3 Press UP or DOWN button to set the year.
4. Setting up your phone
Press the SET/STO button to enter the menu
UP DOWN
SET 1 DATE SET 2 LCD
SET 3 FLASH
Note: The system will time out if you leave
You will need to set the correct time and date
displayed correctly on the display.
If you subscribe to a Caller Display service, the
will be set automatically on
4 Press SET/STO button to confirm.
Ö
The 'month' icon will be blinking.
5
Press UP or DOWN button to set the month.
6 Press SET/STO button to confirm.
Ö The 'date' icon will be blinking.
7 Press UP or DOWN button to set the date.
8 Press SET/STO button to confirm.
ÖThe 'hour' icon will be blinking.
and then use or buttons to cycle
through the following options:
more than 8 seconds between key presses.
receipt of your first incoming call.
9 Press UP or DOWN button to set the hour.
so they can be
time and date
10 Press SET/STO button to confirm.
Ö The 'minute' icon will be blinking.
Press SET/STO button to confirm the setting.
Ö The display shows ' SET 2 LCD ' , you can
11
12
or press DELETE
button to return to standby mode.
Press UP or DOWN button to set the minute.
Setting up continue...
continue with
programming,
Set LCD
1
In standby mode, press SET/STO button.
Ö The display shows ' SET 1 DATE '.
2 Press UP or DOWN button until the display
3 Press SET/STO to confirm.
4 Press UP or DOWN button to select your
5
Press SET/STO button to confirm the setting.
Ö The display shows ' SET 2 LCD ' , you can
programming, or press DELETE button to return to standby mode.
Contrast
shows 'SET 2 LCD'.
viewing level (1~8).
The default setting is 3.
comfortable display
continue with