


DIGITAL REVERB/DELAY DR400
Thank you for showing your confidence in us by purchasing the BEHRINGER DIGITAL
REVERB/DELAY DR400. This Reverb/Delay effects pedal delivers 24-bit high-resolution
stereo reverb and delay effects. Experience state-of-the-art sounds comparable to
studio processors in one compact pedal.
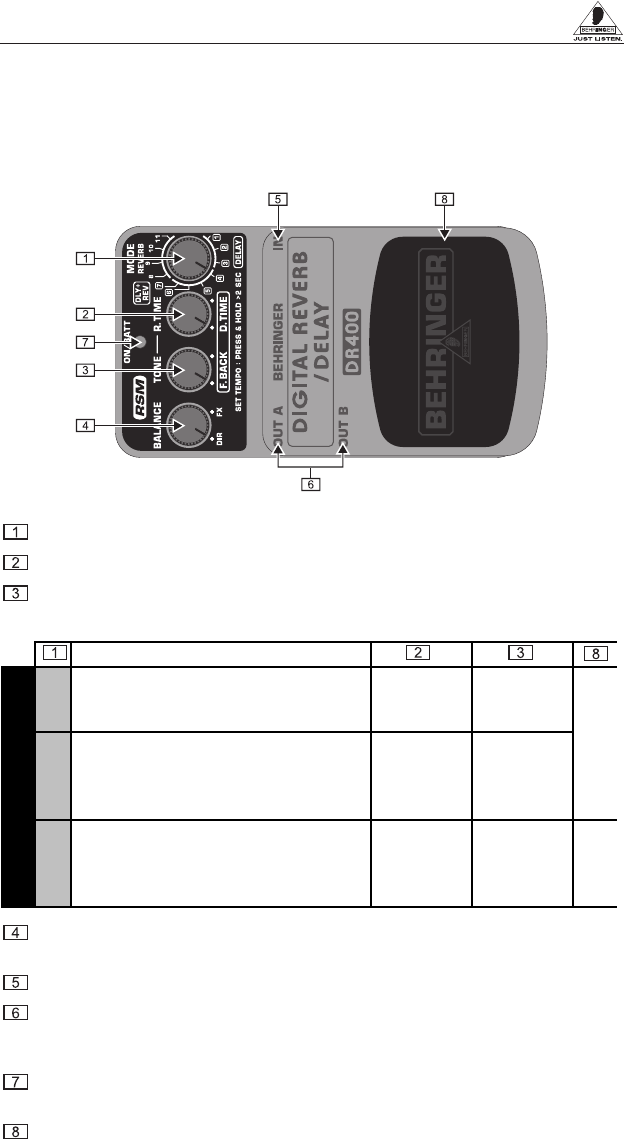
1. CONTROLS
Top view
Select the effect mode via the MODE switch (see table below).
Depending on the selected mode, this knob adjusts the reverb time or the delay time.
In REVERB mode, this knob adjusts the reverbs’ tonal character. In DELAY and
DLY+REV mode, this knob adjusts the amount of feedback (number of repetitions).
Effect description
1
Short delay (32 - 128 ms) Delay time Feedback
2
Medium delay (128 - 500 ms) Delay time Feedback
3
Long delay (500 - 2000 ms) Delay time Feedback
4
Delay+small room (32 - 2000 ms) Delay time Feedback
5
Delay+big room (32 - 2000 ms) Delay time Feedback
6
Delay+concert hall (32 - 2000 ms) Delay time Feedback
7
Delay+reverb plate (32 - 2000 ms) Delay time Feedback
8
Simulates the reverb of a small room Reverb time Tone
9
Simulates the reverb of a big room Reverb time Tone
10
Simulates the reverb of a concert hall Reverb time Tone
11
Simulates the sound of a reverb plate Reverb time Tone
DELAYDLY+REVREVERB
Tap delay time
-
The BALANCE control determines the balance between the direct (dry instrument)
signal and the effect sound.
Use the ¼" TS IN connector to plug in the instrument cable.
The two ¼" TS connectors OUT A and OUT B send the signal to your amp or other
effects devices. Use both connectors if you want to achieve a full stereo effect.
For mono use, just plug in OUT A.
The ON/BATT LED illuminates when the effect is activated. It also serves as a
battery level indicator.
Use the foot switch to activate/deactivate the effect. When pressing the foot
switch 2 seconds or longer, you can tap in the delay time (ON/BATT LED flashes).
Use the DC IN connection at the front of the unit to plug in a 9 V power supply (not included).
The BATTERY COMPARTMENT is located underneath the pedal cover. To install or
replace the 9 V battery (not included), press the hinges with a ballpoint pen and remove
the pedal cover. Be careful not to scratch the unit.