TH115 A/F/AF 400-115-003-B 27/2/07 1/2
Aube’s TH115 programmable thermostats have three temperature
control modes:
1
Place the switch in Standby to cut power to the heater when not in use (e.g., in the sum-
mer). This will not affect the time and temperature settings.
2
If your thermostat is installed on a power base equipped with a ground fault protection,
to reset the ground fault protection, switch the thermostat to Standby and back to On.
3
The thermostat displays the percentage of heating time required to maintain the desired
temperature. For example, is displayed when heating is activated 40 percent of the
time.
4
GFI appears when the ground fault protection has tripped.
Some thermostat configurations can be modified via
switches on the back of the faceplate (control module).
Default (factory) settings are inside the gray cells.
n Refer to the installation
instructions of the power
base.
o Insert the tabs at the top of
the control module in the slots
at the top of the power base.
p Secure the control module
using the captive screw
underneath the base.
NOTE
: Keep the thermostat's air vents clean and unobstructed at all times.
n Press the Hour button to set the hour.
o Set the Min button to set the minutes.
p Set the Day button to set the day.
q Press Mode/Ret to exit.
Daylight Savings Time
The thermostat can automatically re-adjust its clock at Daylight Sav-
ings Time changeover. When this function is enabled (On), the ther-
mostat switches to Daylight Savings Time on the second Sunday of
March and to normal time on the first Sunday of November.
NOTE: The function is disabled (default setting) when the clock loses
its setting.
n Press the Day button (3 seconds) until DLS appears
on the screen.
o Press the to toggle between On (enabled) and Off
(disabled).
p Press the Day button briefly. The year setting is dis-
played.
q Press the to set the current year.
r Press the Day button briefly. The month setting is dis-
played.
s Press the to set the current month.
t Press the Day button briefly. The date setting is dis-
played.
u Press the to set the current date.
v Press Mode/Ret to exit.
The display illuminates for 12 seconds when the backlight button is
pressed.
When either of the buttons is pressed, the display also illuminates
for 12 seconds. The setpoint temperature appears for 5 seconds,
then the actual (measured) temperature is displayed.
6.1 Setpoint Temperature
The thermostat normally displays the actual (measured) temperature.
To view the setpoint, press one of the buttons once. The setpoint
will appear for the next 5 seconds.
To change the setpoint, press one of the buttons until the desired
temperature is displayed. To scroll faster, press and hold the button.
6.2 Preset Temperatures
The thermostat has 3 preset temperatures:
Comfort temperature
Economy temperature
Vacation temperature
To use a preset temperature, press the corresponding button. The
corresponding icon , or will be displayed.
The following table shows the intended use and the default setting of
each of the preset temperatures.
To store a preset temperature:
n Set the desired temperature using the buttons.
o Press and hold the corresponding button until the corresponding
icon is displayed.
n
Description
1.
A mode: controls the ambient air temperature
F mode: controls the floor temperature using an
external temperature sensor
AF mode: controls the ambient air temperature
maintains the floor temperature within desired
limits using an external temperature sensor
Display
% of heating time 1 to 24% 25 to 49% 50 to 74% 75 to 99% 100%
o
Configuration
2.
# Configurations UP DN
1 Display format °F / 12 h
°C / 24 h
2
Early Start
a
a. Early Start can be used in Automatic mode only. When this function is enabled, the
thermostat calculates the optimal time to start heating in order to obtain the desired
temperature by the set time. The thermostat re-assesses the start time daily based
on the previous day’s results.
Enable
Disable
3
Temperature control mode
b
b. To select the F mode, place the switch in the F position. To select the AF mode,
place the switch in the AF position and ensure that the remote temperature sensor
is connected to the thermostat. To select the A mode, place the switch in the AF
position and ensure that the remote temperature sensor is NOT connected to the
thermostat.
F
AF
p
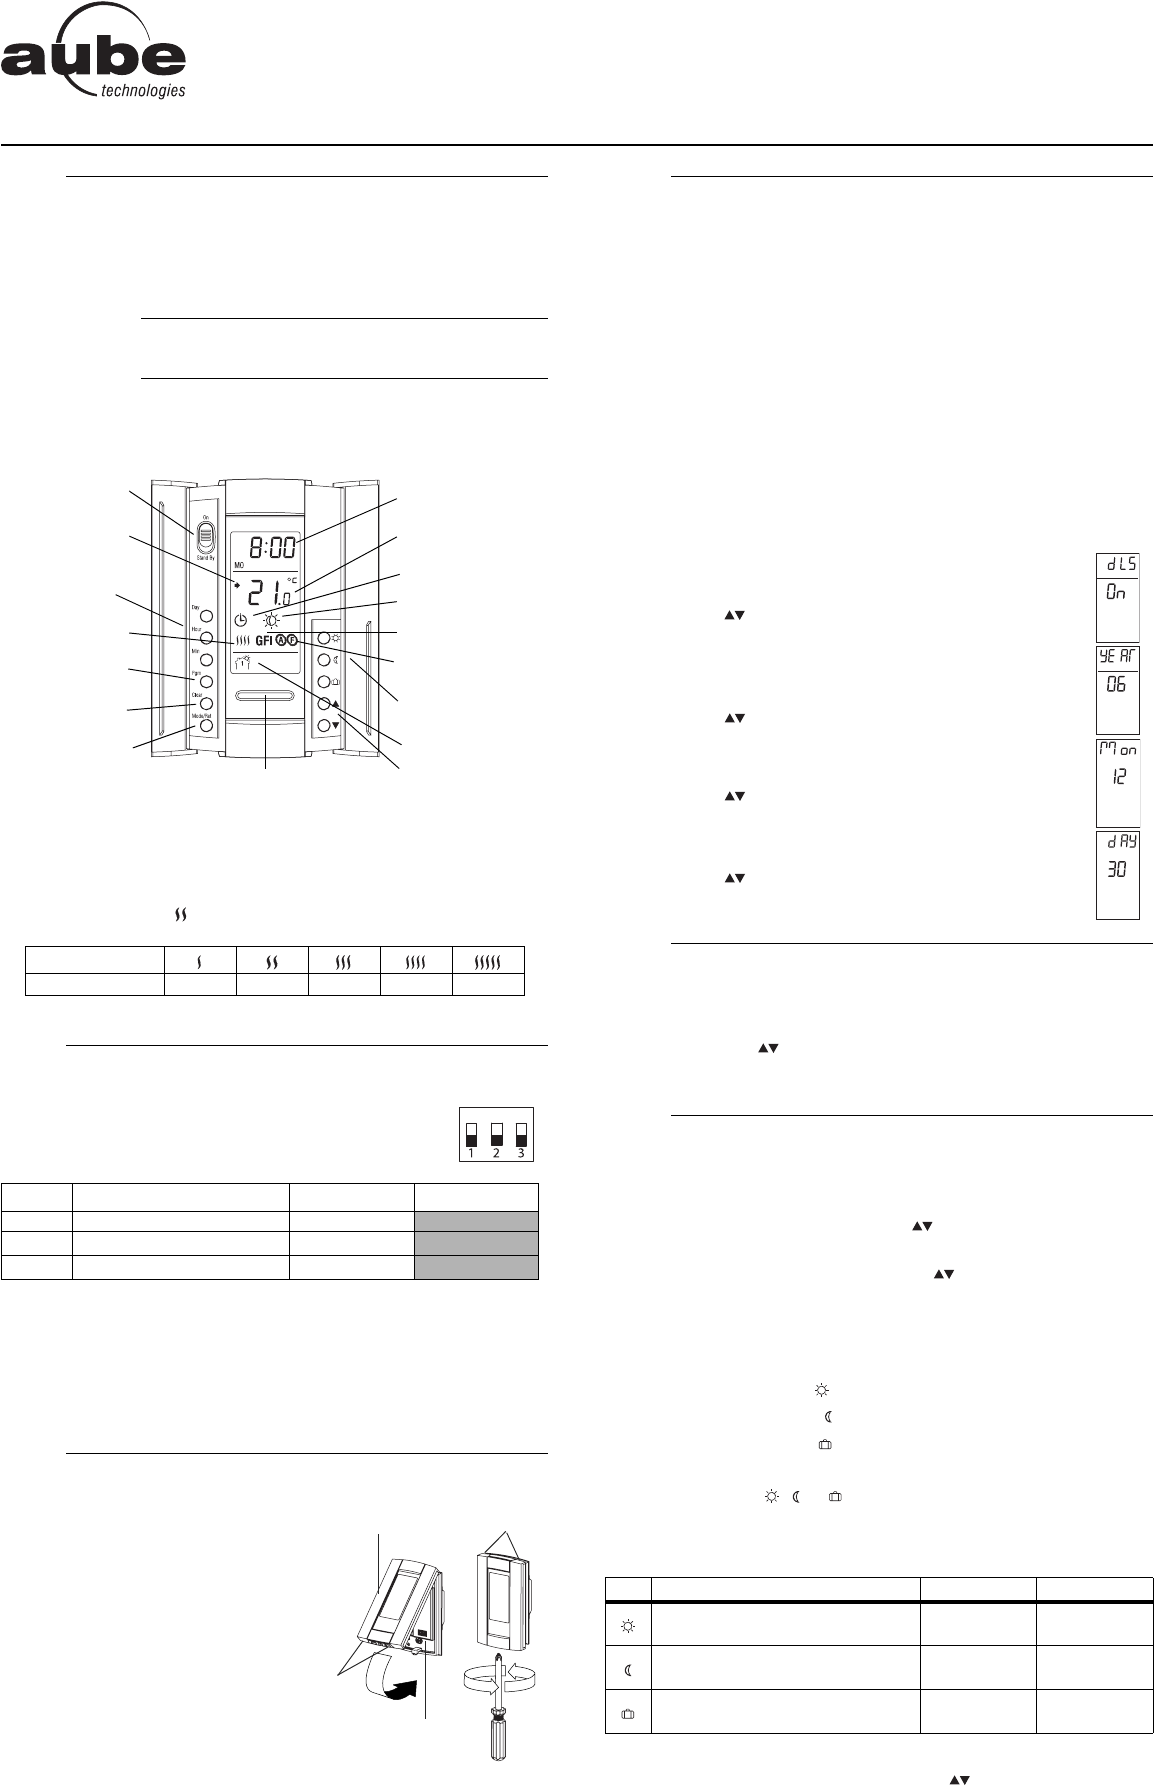
Installation
3.
On/Standby switch
1
and GFCI reset
2
Day and time
settings
Temperature
adjustment buttons
Program button
Mode selection /
program exit
Temperature display
Mode display
Period display
Temperature
preset buttons
Time and day display
Percentage of
heating time
3
Backlight button
Program
clear button
Preset temperature
indicator
Appears when the
setpoint is displayed
Temperature control
mode indicator
Ground fault indicator
4
Power base
Control module
Air vents
Air vents
q
Clock and Day Setting
4.
r
Backlight
5.
s
Temperature Adjustment
6.
Icon Intended use A/AF modes F mode
Comfort
(when at home)
21 °C (70 °F) 28 °C (82 °F)
Economy
(when asleep or away from home)
17 °C (63 °F) 20 °C (68 °F)
Vacation
(during prolonged absence)
10 °C (50 °F) 10 °C (50 °F)
TH115 A/F/AF
User Guide
Programmable Thermostat
400-115-003-B (TH115B_AF) ENG.fm Page 1 Tuesday, February 27, 2007 2:55 PM


