


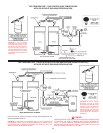

26
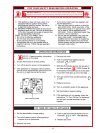
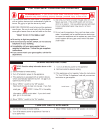
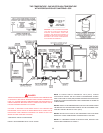
FIGURE 16.
To dissolve and remove the more stubborn mineral deposits, manufacturer's
UN•LIME® Professional Delimer should be used.
The manufacturer's UN•LIME® Professional Delimer is an easy to handle
patented food grade acid formulated specically for lime scale removal
from all types of water using equipment. Available in 1 gallon (3.8L)
(part no. 4763) and 5 gallon (19L) (part no. 4813) sizes. Hydrochloric base
acids are not recommended for use on glass-lined tanks.
Form No. 4800, entitled “Why, When and How”, describes tank cleaning
methods and materials. UN•LIME and the booklet may be obtained through
your company's dealer or distributor.
The cleanout opening is shown in Figure 16. To clean heater through cleanout
opening, proceed as follow:
1. Turn off water inlet valve, the heater electrical disconnect switch and open
drain valve.
2. Remove outer cover plate from lower side of heater jacket.
3. Remove cover from cleanout opening.
4. Remove lime, scale or sediment using care not to damage the
glass-lining.
5. Inspect cleanout plate gasket: If new gasket is required, call toll-free
number on jacket for replacement number.
6. Install cleanout plate. Be sure to draw plate up tight by tightening screws
securely.
7. Close drain valve, open water inlet line and turn on the power burner
electrical disconnect switch.
8. Check for water leakage.
9. Replace outer jacket cover plate.
POWERED ANODE SYSTEM
The AHCG3/HCG360T120 thru AHCG3/HCG3100T250 heaters are factory
equipped with a powered anode system. The anodes are of a permanent
design and do not need replacing unless damaged.
FLUSHING
1. Turn off the heater electrical disconnect switch.
2. Open the drain valve and allow water to ow until it runs clean.
3. Close the drain valve when nished ushing.
4. Turn on the heater electrical disconnect switch.
DRAINING
The heater must be drained if it is to be shut down and exposed to freezing
temperatures. Maintenance and service procedures may also require draining
the heater.
1. Turn off the heater electrical disconnect switch.
2. Close the cold water inlet valve to heater.
3. Open a nearby hot water faucet to vent the system.
4. Open the heater drain valve.
5. If the heater is being drained for an extended shutdown, it is suggested
the drain valve be left open during this period.
• Follow FILLING instructions when restoring hot water service.
SEDIMENT REMOVAL
Waterborne impurities consist of the particles of soil and sand which settle
out and form a layer of sediment on the bottom of the tank.
For convenience, sediment removal and lime scale removal should be
performed at the same time.
LIME SCALE REMOVAL
The amount of calcium carbonate (lime) released from water is in
direct proportion to water temperature and usage. The higher the water
temperature or water usage, the more lime deposits are dropped out of
the water. This is the lime scale which forms in pipes, heaters and on
cooking utensils.
Lime accumulation not only reduces the life of the equipment but also reduces
efciency of the heater and increases fuel consumption.
The usage of water softening equipment greatly reduces the hardness of the
water. However, this equipment does not always remove all of the hardness
(lime). For this reason it is recommended that a regular schedule for deliming
be maintained.
The depth of lime buildup should be measured periodically. Heaters will
have about 3" (7.6cm) of lime buildup when the level of lime has reached
the bottom of the cleanout opening or about 1" (2.5cm) of lime buildup if
it has reached the drain valve opening. A schedule for deliming should be
set up, based on the amount of time it would take for a 1" (2.5cm) buildup
of lime.
Example 1:
Initial inspection shows 1/2" (1.3cm) of lime accumulation. Therefore, the
heater can be delimed once a year.
Example 2 :
Initial inspection shows 2" (5cm) of lime accumulation. Therefore, the
heater should be delimed every 3 months.
Sediment and lime scale removal may be accomplished through the cleanout
opening furnished on the heater, see Figure 25. The heater must be drained,
see DRAINING, before removing cleanout cover on tank.